# DICloak
[**DICloak**](https://dicloak.com/) is an antidetect browser designed to mask digital fingerprints and simulate authentic browsing environments.
Follow the instructions below to integrate Oxylabs [**ISP Proxies**](https://oxylabs.io/products/isp-proxies)**:**
{% hint style="warning" %}
Please note that some screenshots provided in this guide depict the setup process using Residential Proxies for illustrative purposes, refer to the specific guidelines for ISP Proxies provided in the text.
{% endhint %}
{% stepper %}
{% step %}
### Set up DICloak
Download DICloak from the [**official website**](https://dicloak.com/download), launch the app, and log in.
{% endstep %}
{% step %}
### Add a new proxy
Select the **Proxies** tab and click **Create Proxy**.
{% endstep %}
{% step %}
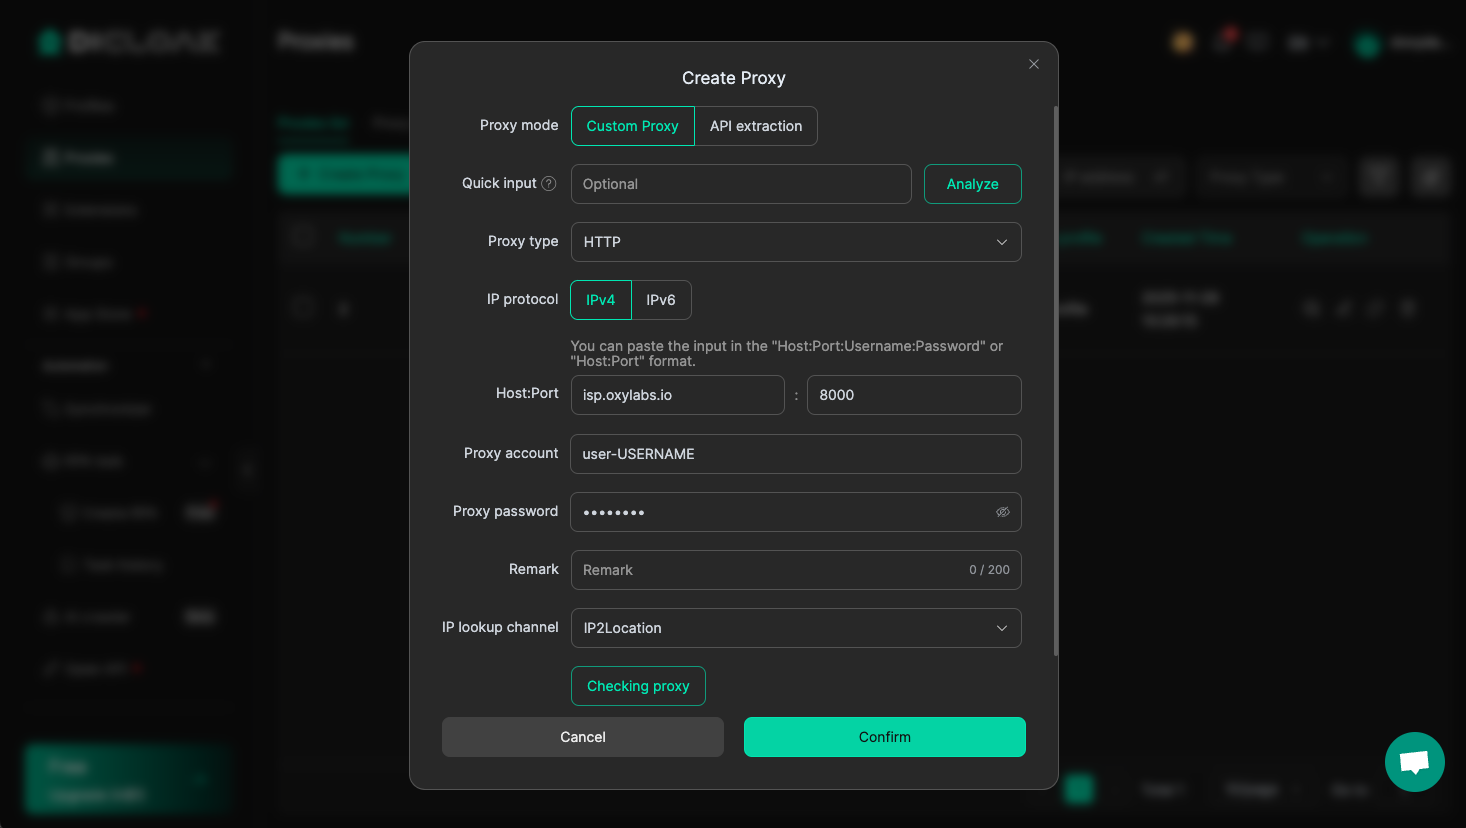
### Enter proxy details
Choose a proxy type (HTTP, HTTPS, or [SOCKS5](https://oxylabs.io/products/socks5-proxies) protocols), then enter your proxy details and Oxylabs proxy user’s credentials. Use the same username and password you entered to create a new proxy user in the [Oxylabs dashboard](https://dashboard.oxylabs.io/en/):
**Proxy type:** `HTTP`, `HTTPS`, or `SOCKS5`
**Host:** `isp.oxylabs.io`
**Port:** `8001`
**Proxy account:** `user-USERNAME`
**Proxy password:** `PASSWORD`
{% hint style="warning" %}
**Note:** Don't forget to add `user-` prefix to your username.
{% endhint %}
With ISP Proxies, the port is assigned to a specific IP address and its location. Hence, port `8001` will always pick the first IP from your [proxy list](https://developers.oxylabs.io/proxies/isp-proxies/proxy-list).
If you want to get a different IP with each request, change the Port to `8000` to enable [proxy rotation](https://developers.oxylabs.io/proxies/isp-proxies/proxy-rotation).
{% endstep %}
{% step %}
### Testing
To check proxy functionality, select your IP lookup channel (IP-API or IP2Location), then click **Checking proxy**.
If the test is successful, you’ll see an active proxy IP address.
Finally, **Confirm** your new proxy. You can add as many proxies as you like and pair or unpair them with different profiles.
{% endstep %}
{% step %}
### Create a browser profile
Go to the **Profiles** tab and select **Create profile**.
There, enter your **Profile name**, and **select the proxy you just added** from **Saved Proxies**.
If required, adjust your profile with a custom browser fingerprint, including user agents, cookies, and hardware or software parameters.
To finish the profile, click **Confirm** at the bottom of the screen.
{% endstep %}
{% step %}
### Run new profile
Press **Open** in the Operation column of the profile to launch a private browser and carry on with your tasks.
{% endstep %}
{% endstepper %}
And that’s it. You’ve successfully integrated your Oxylabs ISP proxies with DICloak antidetect browser. You can find the original DICloak integration blog post [**here**](https://oxylabs.io/resources/integrations/dicloak).
If you have any questions or concerns regarding our solutions or the process above, please contact us via the live chat on our [homepage](https://oxylabs.io/) or email us at .