> For the complete documentation index, see [llms.txt](https://developers.oxylabs.io/llms.txt). Markdown versions of documentation pages are available by appending `.md` to page URLs; this page is available as [Markdown](https://developers.oxylabs.io/products/pt-br/web-scraper-api/features/js-rendering-and-browser-control.md).

# Renderização de JS e Controle do Navegador

## Renderização de JavaScript

Se a página que você deseja coletar exigir JavaScript para carregar dinamicamente todos os dados necessários no DOM, você pode incluir um `render` parâmetro nas suas requisições em vez de configurar e usar manualmente instruções personalizadas do navegador. As requisições com esse parâmetro serão totalmente renderizadas, e os dados serão armazenados em um arquivo HTML ou em uma captura de tela PNG, dependendo do parâmetro especificado.

### HTML

Defina o `render` parâmetro como `html` para obter a saída bruta da página renderizada.

### PNG (captura de tela)

Defina o `render` parâmetro como `png` para obter uma captura de tela codificada em Base64 da página renderizada.

{% hint style="info" %}
Se você quiser coletar uma imagem e baixá-la, consulte [**esta seção**](/products/pt-br/web-scraper-api/features/result-processing-and-storage/output-types/download-images.md)**.**
{% endhint %}

### Exemplo de requisição

{% tabs %}
{% tab title="cURL" %}

```shell
curl --user "user:pass" \\
'https://realtime.oxylabs.io/v1/queries' \\
-H "Content-Type: application/json" \\
-d '{"source": "universal", "url": "https://www.example.com", "render": "html"}'
```

{% endtab %}

{% tab title="Python" %}

```python
import requests
from pprint import pprint

# Structure payload.
payload = {
    'source': 'universal',
    'url': 'https://www.example.com',
    'render': 'html',
}

# Get response.
response = requests.request(
    'POST',
    'https://realtime.oxylabs.io/v1/queries',
    auth=('user', 'pass1'),
    json=payload,
)

# Instead of response with job status and results url, this will return the
# JSON response with the result.
pprint(response.json())
```

{% endtab %}

{% tab title="PHP" %}

```php
<?php

$params = [
    'source' => 'universal',
    'url' => 'https://www.example.com',
    'render' => 'html',
];

$ch = curl_init();

curl_setopt($ch, CURLOPT_URL, "https://realtime.oxylabs.io/v1/queries");
curl_setopt($ch, CURLOPT_RETURNTRANSFER, 1);
curl_setopt($ch, CURLOPT_POSTFIELDS, json_encode($params));
curl_setopt($ch, CURLOPT_POST, 1);
curl_setopt($ch, CURLOPT_USERPWD, "user" . ":" . "pass1");

$headers = array();
$headers[] = "Content-Type: application/json";
curl_setopt($ch, CURLOPT_HTTPHEADER, $headers);

$result = curl_exec($ch);
echo $result;

if (curl_errno($ch)) {
    echo 'Error:' . curl_error($ch);
}
curl_close($ch);
```

{% endtab %}

{% tab title="C#" %}

```csharp
using System;
using System.Collections.Generic;
using System.Net.Http;
using System.Net.Http.Json;
using System.Threading.Tasks;

namespace OxyApi
{
    class Program
    {
        static async Task Main()
        {
            const string Username = "YOUR_USERNAME";
            const string Password = "YOUR_PASSWORD";

            var parameters = new Dictionary<string, string>()
            {
                { "source", "universal" },
                { "url", "https://www.example.com" },
                { "render" : "html" },
            };


            var client = new HttpClient();

            Uri baseUri = new Uri("https://realtime.oxylabs.io");
            client.BaseAddress = baseUri;

            var requestMessage = new HttpRequestMessage(HttpMethod.Post, "/v1/queries");
            requestMessage.Content = JsonContent.Create(parameters);

            var authenticationString = $"{Username}:{Password}";
            var base64EncodedAuthenticationString = Convert.ToBase64String(System.Text.ASCIIEncoding.UTF8.GetBytes(authenticationString));
            requestMessage.Headers.Add("Authorization", "Basic " + base64EncodedAuthenticationString);

            var response = await client.SendAsync(requestMessage);
            var contents = await response.Content.ReadAsStringAsync();

            Console.WriteLine(contents);
        }
    }
}
```

{% endtab %}

{% tab title="Golang" %}

```go
package main

import (
	"bytes"
	"encoding/json"
	"fmt"
	"io/ioutil"
	"net/http"
)

func main() {
	const Username = "YOUR_USERNAME"
	const Password = "YOUR_PASSWORD"

	payload := map[string]string{
		"source": "universal",
		"url": "https://www.example.com",
        	"render": "html",
	}

	jsonValue, _ := json.Marshal(payload)

	client := &http.Client{}
	request, _ := http.NewRequest("POST",
		"https://realtime.oxylabs.io/v1/queries",
		bytes.NewBuffer(jsonValue),
	)

	request.SetBasicAuth(Username, Password)
	response, _ := client.Do(request)

	responseText, _ := ioutil.ReadAll(response.Body)
	fmt.Println(string(responseText))
}
```

{% endtab %}

{% tab title="Java" %}

```java
package org.example;

import okhttp3.*;
import org.json.JSONObject;

public class Main implements Runnable {
    private static final String AUTHORIZATION_HEADER = "Authorization";
    public static final String USERNAME = "YOUR_USERNAME";
    public static final String PASSWORD = "YOUR_PASSWORD";

    public void run() {
        JSONObject jsonObject = new JSONObject();
        jsonObject.put("source", "universal");
        jsonObject.put("url", "https://www.example.com");
        jsonObject.put("render": "html");

        Authenticator authenticator = (route, response) -> {
            String credential = Credentials.basic(USERNAME, PASSWORD);

            return response
                    .request()
                    .newBuilder()
                    .header(AUTHORIZATION_HEADER, credential)
                    .build();
        };

        var client = new OkHttpClient.Builder()
                .authenticator(authenticator)
                .build();

        var mediaType = MediaType.parse("application/json; charset=utf-8");
        var body = RequestBody.create(jsonObject.toString(), mediaType);
        var request = new Request.Builder()
                .url("https://realtime.oxylabs.io/v1/queries")
                .post(body)
                .build();

        try (var response = client.newCall(request).execute()) {
            assert response.body() != null;
            System.out.println(response.body().string());
        } catch (Exception exception) {
            System.out.println("Error: " + exception.getMessage());
        }

        System.exit(0);
    }

    public static void main(String[] args) {
        new Thread(new Main()).start();
    }
}
```

{% endtab %}

{% tab title="Node.js" %}

```javascript
import fetch from 'node-fetch';

const username = 'YOUR_USERNAME';
const password = 'YOUR_PASSWORD';
const body = {
  'source': 'universal',
  'url': 'https://www.example.com',
  'render': 'html'
};
const response = await fetch('https://realtime.oxylabs.io/v1/queries', {
  method: 'post',
  body: JSON.stringify(body),
  headers: {
    'Content-Type': 'application/json',
    'Authorization': 'Basic ' + Buffer.from(`${username}:${password}`).toString('base64'),
  }
});

console.log(await response.json());
```

{% endtab %}

{% tab title="HTTP" %}

```http
A string inteira que você enviar precisa estar codificada em URL.

https://realtime.oxylabs.io/v1/queries?source=universal&url=https%3A%2F%2Fwww.example.com%2F&render=html&access_token=12345abcde
```

{% endtab %}

{% tab title="JSON" %}

```json
{
    "source": "universal", 
    "url": "https://www.example.com", 
    "render": "html"
}
```

{% endtab %}
{% endtabs %}

{% hint style="warning" %}
A renderização de JavaScript leva mais tempo para coletar a página. Defina o timeout no lado do cliente para 180 segundos se estiver usando os métodos de integração Realtime ou Proxy Endpoint.
{% endhint %}

{% hint style="warning" %}
Para garantir o menor consumo de tráfego possível, nosso sistema não carrega ativos desnecessários durante a renderização da página.
{% endhint %}

## Forçando a renderização em páginas específicas

Para uma coleta bem-sucedida, alguns tipos de página de domínios específicos exigem renderização devido ao conteúdo dinâmico. Nosso sistema aplica automaticamente a renderização para essas páginas, mesmo que não seja definida explicitamente pelo usuário.

{% hint style="warning" %}
Observe que jobs renderizados consomem mais tráfego do que jobs não renderizados.
{% endhint %}

Queremos que nossos usuários estejam totalmente cientes disso ao coletar as seguintes páginas:

{% file src="/files/ba9e7982f85c1e1e301ad0f85908bb5ab516aefb" %}

Essa abordagem oferece a melhor experiência de coleta possível, garantindo precisão e confiabilidade dos dados nessas páginas desafiadoras.&#x20;

Se você quiser desativar a renderização, pode fazer isso adicionando o seguinte parâmetro às suas requisições:

```
"render": ""
```

## Instruções do navegador

Você pode definir suas próprias instruções do navegador que são executadas ao renderizar JavaScript.

{% hint style="success" %}
A maneira mais fácil de configurar instruções do navegador é usando o construtor visual de instruções do navegador com IA no [Web Scraper API Playground](https://dashboard.oxylabs.io/?route=/api-playground). Leia sobre isso [aqui](/products/pt-br/web-scraper-api/web-scraper-api-playground/oxycopilot.md#browser-instruction-builder).
{% endhint %}

### Uso

Para usar instruções do navegador, forneça um conjunto de `browser_instructions` ao criar um job.

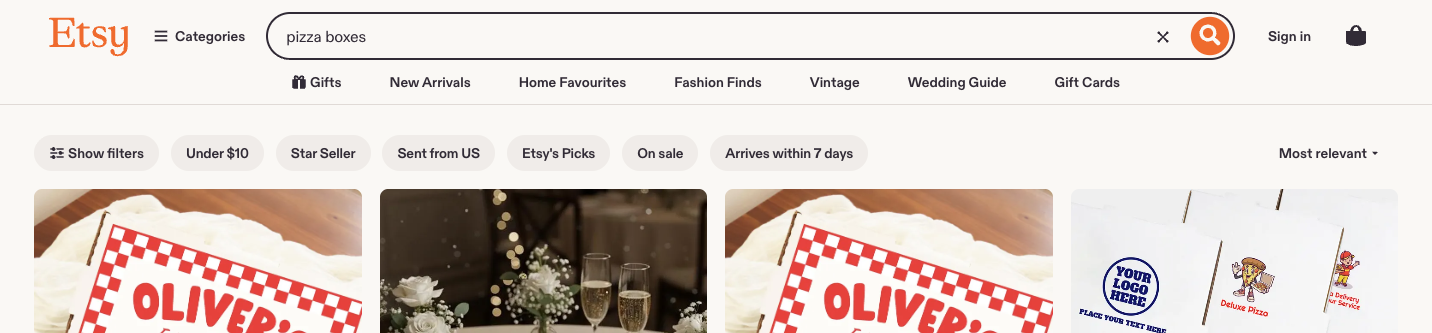
Digamos que você queira pesquisar o termo `caixas de pizza` em um site.

<figure><img src="/files/80c1fd5a9c03dba369512e1cbb1edd069bd64d48" alt=""><figcaption></figcaption></figure>

Um exemplo de parâmetros de job seria o seguinte:

```json
{
    "source": "universal",
    "url": "https://www.ebay.com/",
    "render": "html",
    "browser_instructions": [
        {
            "type": "input",
            "value": "pizza boxes",
            "selector": {
                "type": "xpath",
                "value": "//input[@class='gh-tb ui-autocomplete-input']"
            }
        },
        {
            "type": "click",
            "selector": {
                "type": "xpath",
                "value": "//input[@type='submit']"
            }
        },
        {
            "type": "wait",
            "wait_time_s": 5
        }
    ]
}
```

**Step 1.** Você deve fornecer o `"render": "html"` parâmetro.

**Step 2.** As instruções do navegador devem ser descritas no campo `"browser_instructions"` .

As instruções de navegador de exemplo acima especificam que o objetivo é inserir um termo de busca em um campo de pesquisa, clicar no `caixas de pizza` botão `de busca` e aguardar 5 segundos para o conteúdo carregar.

O resultado coletado deve ficar assim:

```json
{
  "results": [
    {
      "content": "<!doctype html><html>
        Conteúdo após executar as instruções      
      </html>",
      "created_at": "2023-10-11 11:35:23",
      "updated_at": "2023-10-11 11:36:08",
      "page": 1,
      "url": "https://www.ebay.com/",
      "job_id": "7117835067442906113",
      "status_code": 200
    }
  ]
}
```

O HTML coletado deve ficar assim:

<figure><img src="/files/f79c6a098d7bc794c7bf8b71bc9baa9281fd36c3" alt=""><figcaption></figcaption></figure>

#### Obtendo recursos do navegador <a href="#fetching-browser-resources" id="fetching-browser-resources"></a>

Fornecemos uma instrução de navegador independente para obter recursos do navegador.

A função está definida aqui:

Usando `fetch_resource` fará com que o job retorne a primeira ocorrência de um recurso Fetch/XHR que corresponda ao formato fornecido, em vez do HTML que está sendo alvo.

Digamos que queiramos direcionar um recurso GraphQL que é obtido ao visitar organicamente uma página de produto no navegador. Forneceremos as informações do job assim:

```json
{
    "source": "universal",
    "url": "https://www.example.com/product-page/123",
    "render": "html",
    "browser_instructions": [
        {
            "type": "fetch_resource",
            "filter": "/graphql/product-info/123"
        }
    ]
}
```

Essas instruções resultarão em um resultado assim:

```json
{
  "results": [
    {
      "content": "{'product_id': 123, 'description': '', 'price': 123}",
      "created_at": "2023-10-11 11:35:23",
      "updated_at": "2023-10-11 11:36:08",
      "page": 1,
      "url": "https://example.com/v1/graphql/product-info/123/",
      "job_id": "7117835067442906114",
      "status_code": 200
    }
  ]
}
```

## Lista de instruções de navegador suportadas <a href="#list-of-supported-browser-instructions" id="list-of-supported-browser-instructions"></a>

### Argumentos gerais

Todas as instruções definidas abaixo têm um conjunto consistente de argumentos. Os argumentos são os seguintes.

#### `tipo` <a href="#type" id="type"></a>

* **Tipo**: `Enum["click", "input", "scroll", "scroll_to_bottom", "wait", "wait_for_element", "fetch_resource"]`
* **Descrição:** Tipo de instrução do navegador.

#### `timeout_s` <a href="#timeout_s" id="timeout_s"></a>

* **Tipo**: `inteiro`
* **Descrição:** Quanto tempo até a ação ser ignorada se não for concluída a tempo.
* **Restrições**: 0 < `timeout_s` <= 60
* **Valor padrão**: 5

#### `wait_time_s` <a href="#wait_time_s" id="wait_time_s"></a>

* **Tipo**: `inteiro`
* **Descrição:** Quanto tempo esperar antes de executar a próxima ação.
* **Restrições**: 0 < `wait_time_s` <= 60
* **Valor padrão**: 0

#### `on_error` <a href="#on_error" id="on_error"></a>

* **Tipo**: `Enum["error", "skip"]`
* **Descrição:** Indica o que fazer com as instruções caso esta instrução falhe:
  * `"error"`Interrompe a execução das instruções do navegador.
  * `"skip"`Continua com a próxima instrução.
* **Valor padrão**: `"error"`

#### Exemplo com argumentos gerais

```json
{
    "type": "wait_for_element",
    "selector": {
        "type": "text",
        "value": "Load More Items"
    },
    "timeout_s": 5,
    "wait_time_s": 2,
    "on_error": "skip"

}
```

### Instruções <a href="#click" id="click"></a>

#### `click` <a href="#click" id="click"></a>

* **Descrição**: Clica em um elemento e espera uma quantidade definida de segundos.
* **Argumentos:**
  * `type: str = "click"`
  * `selector: dict`
    * `type: Enum["xpath", "css", "text"]`
    * `value: str`

**Exemplo**:

```json
{
    "type": "click",
    "selector": {
        "type": "xpath",
        "value": "//button"
    }
}
```

#### `input` <a href="#input" id="input"></a>

* **Descrição**: Insere um texto em um elemento selecionado.
* **Argumentos:**
  * `type: str = "input"`
  * `selector: dict`
    * `type: Enum["xpath", "css", "text"]`
    * `value: str`
  * `value: str`&#x20;

**Exemplo:**

```json
{
    "type": "input",
    "selector": {
        "type": "xpath",
        "value": "//input"
    },
    "value": "pizza boxes"
}
```

#### `scroll` <a href="#scroll" id="scroll"></a>

* **Descrição**: Rola uma quantidade definida de pixels.
* **Argumentos:**
  * `type: str = "scroll"`
  * `x: int`
  * `y: int`

**Exemplo:**

```json
{
    "type": "scroll",
    "x": 0,
    "y": 100
}
```

#### `scroll_to_bottom` <a href="#scroll_to_bottom" id="scroll_to_bottom"></a>

* **Descrição**: Rola até o final por uma quantidade definida de segundos.
* **Argumentos:**
  * `type: str = "scroll_to_bottom"`

**Exemplo**:

```json
{
    "type": "scroll_to_bottom",
    "timeout_s": 10
}
```

#### `wait` <a href="#wait" id="wait"></a>

* **Descrição**: Aguarda uma quantidade definida de segundos.
* **Argumentos:**
  * `type: str = "wait"`

**Exemplo**:

```json
{
    "type": "wait",
    "wait_time_s": 2
}
```

#### `wait_for_element` <a href="#wait_for_element" id="wait_for_element"></a>

* **Descrição**: Aguarda o elemento carregar por uma quantidade definida de segundos.
* **Argumentos:**
  * `type: str = "wait_for_element"`
  * `selector: dict`
    * `type: Enum["xpath", "css", "text"]`
    * `value: str`

**Exemplo:**

```json
{
    "type": "wait_for_element",
    "selector": {
        "type": "text",
        "value": "Load More Items"
    },
    "timeout_s": 5
}
```

#### `fetch_resource` <a href="#fetch_resource" id="fetch_resource"></a>

{% hint style="warning" %}
A `fetch_resource` instrução deve ser a última na lista de instruções do navegador; quaisquer instruções subsequentes não serão executadas.
{% endhint %}

* **Descrição**: Obtém a primeira ocorrência de um recurso Fetch/XHR correspondente ao padrão definido.
* **Argumentos:**
  * `type: str = "fetch_resource"`
  * `filter: str(RegEx expression)`
  * `on_error: Enum["error", "skip"]`

**Exemplo:**

```json
{
    "type": "fetch_resource",
    "filter": "/graphql/item/"
}
```

### Validação de instruções

Qualquer inconsistência em relação ao formato da instrução resultará em um `400` código de status e uma mensagem de erro correspondente.

Por exemplo, um payload assim:

```json
{
    "source": "universal",
    "url": "https://www.example.com/",
    "render": "html",
    "browser_instructions": [
        {
            "type": "unsupported-wait",
            "wait_time_s": 5
        }
    ]
}
```

Resultará em:

```json
{    
    "errors": {
        "message": "Tipo de ação `unsupported-wait` não suportado, escolha entre 'click,fetch_resource,input,scroll,scroll_to_bottom,wait,wait_for_element'"
    }
}
```

## Solução de problemas <a href="#status-codes" id="status-codes"></a>

### Códigos de status <a href="#status-codes" id="status-codes"></a>

Consulte nossos códigos de resposta listados [**aqui**](/products/pt-br/web-scraper-api/response-codes.md). Os códigos de status em relação à validação de instruções estão documentados [**aqui**](/products/pt-br/web-scraper-api/features/js-rendering-and-browser-control.md#instruction-validation).

### Erros e avisos

Se houver um erro ou aviso resultante de suas ações de navegação, você o encontrará no resultado sob as chaves `browser_instructions_error` ou `browser_instructions_warnings`. Por exemplo, se você enviou as seguintes instruções do navegador e o esperado `xpath` não for localizado na página, o resultado incluirá um aviso.

`browser_instructions`:

```json
[
    {
        "type": "input", 
        "selector": {
            "type": "xpath",
            "value": "//input[@type='search']"
        },
        "value": "oxylabs"
    }
]
```

Resultados:

```json
{
  "results": [
    {
      "content": "<!doctype html><html>
        Conteúdo após executar as instruções      
      </html>",
      "created_at": "2023-10-11 11:35:23",
      "updated_at": "2023-10-11 11:36:08",
      "browser_instructions_warnings": [
        {
          "action_type": "click",
          "msg": "Não foi possível encontrar o tipo de seletor `xpath` com o valor `//input[@type=search]` na página."
        },
      ],
      "page": 1,
      "url": "https://example.com",
      "job_id": "7117835067442906113",
      "status_code": 200
    }
  ]
}

```

| Possíveis erros e avisos                                                                                 |
| -------------------------------------------------------------------------------------------------------- |
| Ocorreu um erro inesperado ao converter instruções do navegador em ações.                                |
| Ocorreu um erro inesperado ao executar `{action.type}` instruções do navegador.                          |
| Ação `{action.type}` esgotou o tempo limite.                                                             |
| Não foi possível encontrar o tipo de seletor `{selector.type}` com o valor `{selector.value}` na página. |


---

# Agent Instructions
This documentation is published with GitBook. GitBook is the documentation platform designed so that both humans and AI agents can read, navigate, and reason over technical content effectively. Learn more at gitbook.com.

## Querying This Documentation
If you need additional information that is not directly available in this page, you can query the documentation dynamically by asking a question.

Perform an HTTP GET request on the current page URL with the `ask` query parameter, and the optional `goal` query parameter:

```
GET https://developers.oxylabs.io/products/pt-br/web-scraper-api/features/js-rendering-and-browser-control.md?ask=<question>&goal=<endgoal>
```

`ask` is the immediate question: it should be specific, self-contained, and written in natural language.
`goal` is optional and describes the broader end goal you are ultimately trying to accomplish on behalf of the user. GitBook uses it to tailor the answer towards what is most useful for that goal.

The response will contain a direct answer to the question and relevant excerpts and sources from the documentation.

Use this mechanism when the answer is not explicitly present in the current page, you need clarification or additional context, or you want to retrieve related documentation sections.