> For the complete documentation index, see [llms.txt](https://developers.oxylabs.io/llms.txt). Markdown versions of documentation pages are available by appending `.md` to page URLs; this page is available as [Markdown](https://developers.oxylabs.io/products/es/web-scraper-api/features/js-rendering-and-browser-control.md).

# Renderizado de JS y control del navegador

## Renderizado de JavaScript

Si la página que quieres scrapear usa JavaScript para cargar sus datos en el DOM, añade el `render` parámetro a tu solicitud. Luego la página se renderiza por completo antes de devolver el resultado, en uno de dos formatos:

<table><thead><tr><th width="162.625">valor de render</th><th>Obtienes</th></tr></thead><tbody><tr><td><code>html</code></td><td>El HTML sin procesar de la página completamente renderizada</td></tr><tr><td><code>png</code></td><td>Una captura de pantalla (PNG) codificada en Base64 de la página renderizada</td></tr></tbody></table>

{% hint style="info" %}
Si quieres scrapear una imagen y descargarla, consulta [**esta sección**](/products/es/web-scraper-api/features/result-processing-and-storage/output-types/download-images.md)**.**
{% endhint %}

### Ejemplo de solicitud

{% tabs %}
{% tab title="cURL" %}

```shell
curl --user "USERNAME:PASSWORD" \
'https://realtime.oxylabs.io/v1/queries' \
-H "Content-Type: application/json" \
-d '{"source": "universal", "url": "https://www.example.com", "render": "html"}'
```

{% endtab %}

{% tab title="Python" %}

```python
import requests
from pprint import pprint

# Structure payload.
payload = {
    'source': 'universal',
    'url': 'https://www.example.com',
    'render': 'html',
}

# Get response.
response = requests.request(
    'POST',
    'https://realtime.oxylabs.io/v1/queries',
    auth=('USERNAME', 'PASSWORD'),
    json=payload,
)

# Instead of response with job status and results url, this will return the
# JSON response with the result.
pprint(response.json())
```

{% endtab %}

{% tab title="PHP" %}

```php
<?php

$params = [
    'source' => 'universal',
    'url' => 'https://www.example.com',
    'render' => 'html',
];

$ch = curl_init();

curl_setopt($ch, CURLOPT_URL, "https://realtime.oxylabs.io/v1/queries");
curl_setopt($ch, CURLOPT_RETURNTRANSFER, 1);
curl_setopt($ch, CURLOPT_POSTFIELDS, json_encode($params));
curl_setopt($ch, CURLOPT_POST, 1);
curl_setopt($ch, CURLOPT_USERPWD, "USERNAME" . ":" . "PASSWORD");

$headers = array();
$headers[] = "Content-Type: application/json";
curl_setopt($ch, CURLOPT_HTTPHEADER, $headers);

$result = curl_exec($ch);
echo $result;

if (curl_errno($ch)) {
    echo 'Error:' . curl_error($ch);
}
curl_close($ch);
```

{% endtab %}

{% tab title="C#" %}

```csharp
using System;
using System.Collections.Generic;
using System.Net.Http;
using System.Net.Http.Json;
using System.Threading.Tasks;

namespace OxyApi
{
    class Program
    {
        static async Task Main()
        {
            const string Username = "YOUR_USERNAME";
            const string Password = "YOUR_PASSWORD";

            var parameters = new Dictionary<string, string>()
            {
                { "source", "universal" },
                { "url", "https://www.example.com" },
                { "render" : "html" },
            };


            var client = new HttpClient();

            Uri baseUri = new Uri("https://realtime.oxylabs.io");
            client.BaseAddress = baseUri;

            var requestMessage = new HttpRequestMessage(HttpMethod.Post, "/v1/queries");
            requestMessage.Content = JsonContent.Create(parameters);

            var authenticationString = $"{Username}:{Password}";
            var base64EncodedAuthenticationString = Convert.ToBase64String(System.Text.ASCIIEncoding.UTF8.GetBytes(authenticationString));
            requestMessage.Headers.Add("Authorization", "Basic " + base64EncodedAuthenticationString);

            var response = await client.SendAsync(requestMessage);
            var contents = await response.Content.ReadAsStringAsync();

            Console.WriteLine(contents);
        }
    }
}
```

{% endtab %}

{% tab title="Golang" %}

```go
package main

import (
	"bytes"
	"encoding/json"
	"fmt"
	"io/ioutil"
	"net/http"
)

func main() {
	const Username = "YOUR_USERNAME"
	const Password = "YOUR_PASSWORD"

	payload := map[string]string{
		"source": "universal",
		"url": "https://www.example.com",
        	"render": "html",
	}

	jsonValue, _ := json.Marshal(payload)

	client := &http.Client{}
	request, _ := http.NewRequest("POST",
		"https://realtime.oxylabs.io/v1/queries",
		bytes.NewBuffer(jsonValue),
	)

	request.SetBasicAuth(Username, Password)
	response, _ := client.Do(request)

	responseText, _ := ioutil.ReadAll(response.Body)
	fmt.Println(string(responseText))
}
```

{% endtab %}

{% tab title="Java" %}

```java
package org.example;

import okhttp3.*;
import org.json.JSONObject;

public class Main implements Runnable {
    private static final String AUTHORIZATION_HEADER = "Authorization";
    public static final String USERNAME = "YOUR_USERNAME";
    public static final String PASSWORD = "YOUR_PASSWORD";

    public void run() {
        JSONObject jsonObject = new JSONObject();
        jsonObject.put("source", "universal");
        jsonObject.put("url", "https://www.example.com");
        jsonObject.put("render": "html");

        Authenticator authenticator = (route, response) -> {
            String credential = Credentials.basic(USERNAME, PASSWORD);

            return response
                    .request()
                    .newBuilder()
                    .header(AUTHORIZATION_HEADER, credential)
                    .build();
        };

        var client = new OkHttpClient.Builder()
                .authenticator(authenticator)
                .build();

        var mediaType = MediaType.parse("application/json; charset=utf-8");
        var body = RequestBody.create(jsonObject.toString(), mediaType);
        var request = new Request.Builder()
                .url("https://realtime.oxylabs.io/v1/queries")
                .post(body)
                .build();

        try (var response = client.newCall(request).execute()) {
            assert response.body() != null;
            System.out.println(response.body().string());
        } catch (Exception exception) {
            System.out.println("Error: " + exception.getMessage());
        }

        System.exit(0);
    }

    public static void main(String[] args) {
        new Thread(new Main()).start();
    }
}
```

{% endtab %}

{% tab title="Node.js" %}

```javascript
import fetch from 'node-fetch';

const username = 'YOUR_USERNAME';
const password = 'YOUR_PASSWORD';
const body = {
  'source': 'universal',
  'url': 'https://www.example.com',
  'render': 'html'
};
const response = await fetch('https://realtime.oxylabs.io/v1/queries', {
  method: 'post',
  body: JSON.stringify(body),
  headers: {
    'Content-Type': 'application/json',
    'Authorization': 'Basic ' + Buffer.from(`${username}:${password}`).toString('base64'),
  }
});

console.log(await response.json());
```

{% endtab %}

{% tab title="JSON" %}

```json
{
    "source": "universal", 
    "url": "https://www.example.com", 
    "render": "html"
}
```

{% endtab %}
{% endtabs %}

{% hint style="warning" %}
El renderizado de JavaScript tarda más en scrapear la página. Configura el tiempo de espera en el lado del cliente a 180 segundos si usas los métodos de integración Realtime o Proxy Endpoint.
{% endhint %}

{% hint style="warning" %}
Para garantizar el menor consumo de tráfico, nuestro sistema no carga recursos innecesarios durante el renderizado de la página.
{% endhint %}

## Forzar el renderizado en páginas específicas

Para un scraping exitoso, algunos tipos de páginas de dominios específicos requieren renderizado debido a su contenido dinámico. Para estas, nuestro sistema **aplica el renderizado automáticamente** incluso si no estableces el `render` parámetro, para que siempre obtengas datos precisos y fiables de estas páginas, que de otro modo serían difíciles.

{% hint style="warning" %}
Ten en cuenta que los trabajos renderizados consumen más tráfico que los no renderizados.
{% endhint %}

La lista completa de objetivos afectados se mantiene en el archivo de abajo. Queremos que nuestros usuarios sean plenamente conscientes de esto al scrapear las siguientes páginas:

{% file src="/files/674ee44a666a72cc3853ac716b832b1848a0ca40" %}

Si deseas desactivar el renderizado, puedes hacerlo añadiendo el siguiente parámetro a tus solicitudes:

```
"render": ""
```

## Instrucciones del navegador

Cuando una página necesita interacción, como hacer clic en un botón, introducir un término de búsqueda o desplazarte para cargar más elementos, puedes definir tus propias `browser_instructions` que se ejecutan mientras se renderiza la página.

{% hint style="success" %}
La forma más sencilla de crear instrucciones del navegador es el generador visual impulsado por IA en el [Web Scraper API Playground](https://dashboard.oxylabs.io/?route=/api-playground). Lee sobre ello [aquí](/products/es/web-scraper-api/web-scraper-api-playground/oxycopilot.md#browser-instruction-builder).
{% endhint %}

### Inicio rápido

Ante todo, las instrucciones del navegador requieren el `render` parámetro, ya sea `html` o `png`, y se proporcionan como una lista en el `browser_instructions` campo. Cada elemento de la lista se ejecuta en orden.

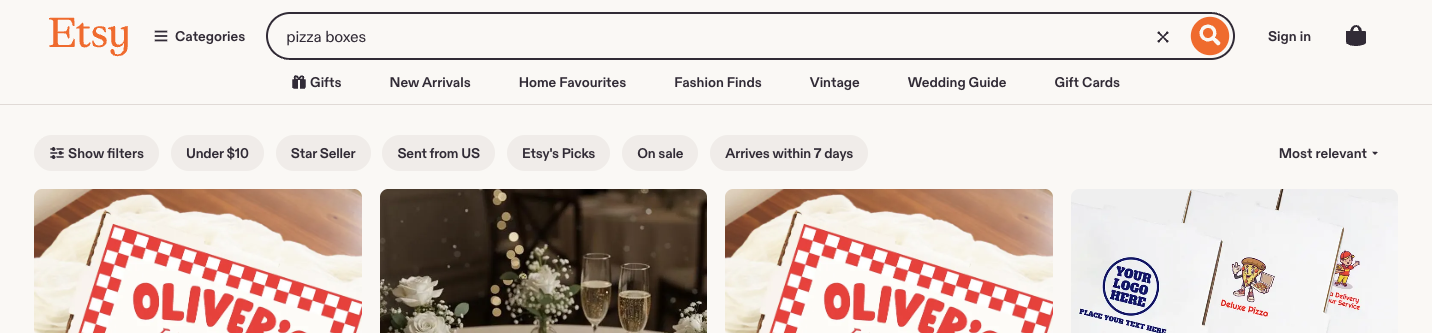
Supongamos que quieres buscar `cajas de pizza` en un sitio web — escribe el término en el campo de búsqueda, haz clic en el botón de búsqueda y espera 5 segundos a que se carguen los resultados:

```json
{
    "source": "universal",
    "url": "https://www.etsy.com/",
    "render": "html",
    "browser_instructions": [
        {
            "type": "input",
            "value": "pizza boxes",
            "selector": {
                "type": "css",
                "value": "#global-enhancements-search-query"
            }
        },
        {
            "type": "click",
            "selector": {
                "type": "css",
                "value": "button[data-id='gnav-search-submit-button']"
            }
        },
        {
            "type": "wait",
            "wait_time_s": 5
        }
    ]
}
```

El resultado contiene el HTML después de que las instrucciones se hayan ejecutado:

```json
{
  "results": [
    {
      "content": "<!DOCTYPE html><html lang=\"en-US\">  Search results for \"pizza boxes\"  </html>",
      "created_at": "2026-08-19 12:23:06",
      "updated_at": "2026-08-19 12:23:24",
      "page": 1,
      "url": "https://www.etsy.com/search?q=pizza+boxes&ref=search_bar&instant_download=false",
      "job_id": "7495817623108602881",
      "is_render_forced": false,
      "type": "raw",
      "status_code": 200
    }
  ]
}
```

El HTML extraído debería verse así:

<figure><img src="/files/191d56a09aa06afbf2126b52bd70de6297455485" alt=""><figcaption></figcaption></figure>

#### Obtención de recursos del navegador <a href="#fetching-browser-resources" id="fetching-browser-resources"></a>

Ofrecemos una instrucción de navegador independiente para obtener recursos del navegador.

La función se define aquí:

Usar `fetch_resource` hará que el trabajo devuelva la primera ocurrencia de un recurso Fetch/XHR que coincida con el formato proporcionado, en lugar del HTML objetivo.

Supongamos que queremos apuntar a un recurso GraphQL que se obtiene al visitar de forma orgánica una página de producto en el navegador. Proporcionaremos la información del trabajo así:

```json
{
    "source": "universal",
    "url": "https://www.example.com/product-page/123",
    "render": "html",
    "browser_instructions": [
        {
            "type": "fetch_resource",
            "filter": "/graphql/product-info/123"
        }
    ]
}
```

Estas instrucciones darán como resultado algo así:

```json
{
  "results": [
    {
      "content": "{'product_id': 123, 'description': '', 'price': 123}",
      "created_at": "2023-10-11 11:35:23",
      "updated_at": "2023-10-11 11:36:08",
      "page": 1,
      "url": "https://example.com/v1/graphql/product-info/123/",
      "job_id": "7117835067442906114",
      "status_code": 200
    }
  ]
}
```

## Lista de instrucciones de navegador admitidas <a href="#list-of-supported-browser-instructions" id="list-of-supported-browser-instructions"></a>

### Argumentos generales

Todas las instrucciones definidas a continuación tienen un conjunto coherente de argumentos. Los argumentos son los siguientes.

#### `type` <a href="#type" id="type"></a>

* **Tipo**: `Enumeración["click", "input", "scroll", "scroll_to_bottom", "wait", "wait_for_element", "fetch_resource"]`
* **Descripción:** Tipo de instrucción del navegador.
* **Requerido**: `true`

#### `timeout_s` <a href="#timeout_s" id="timeout_s"></a>

* **Tipo**: `entero`
* **Descripción:** Cuánto tiempo transcurre hasta que la acción se omite si no se completa a tiempo.
* **Restricciones**: 0 < `timeout_s` <= 60
* **Valor predeterminado**: 5

#### `wait_time_s` <a href="#wait_time_s" id="wait_time_s"></a>

* **Tipo**: `entero`
* **Descripción:** Cuánto esperar antes de ejecutar la siguiente acción.
* **Restricciones**: 0 < `wait_time_s` <= 60
* **Valor predeterminado**: 0

#### `on_error` <a href="#on_error" id="on_error"></a>

* **Tipo**: `Enumeración["error", "skip"]`
* **Descripción:** Indica qué hacer con las instrucciones si esta instrucción falla:
  * `"error"`: Detiene la ejecución de las instrucciones del navegador.
  * `"skip"`: Continúa con la siguiente instrucción.
* **Valor predeterminado**: `"error"`

#### Ejemplo con argumentos generales

```json
{
    "type": "wait_for_element",
    "selector": {
        "type": "text",
        "value": "Load More Items"
    },
    "timeout_s": 5,
    "wait_time_s": 2,
    "on_error": "skip"

}
```

### Instrucciones <a href="#click" id="click"></a>

#### `click` <a href="#click" id="click"></a>

* **Descripción**: Hace clic en un elemento y espera una cantidad fija de segundos.
* **Args:**
  * `type: str = "click"`
  * `selector: dict`
    * `type: Enum["xpath", "css", "text"]`
    * `value: str`

**Ejemplo**:

```json
{
    "type": "click",
    "selector": {
        "type": "xpath",
        "value": "//button"
    }
}
```

#### `input` <a href="#input" id="input"></a>

* **Descripción**: Introduce texto en un elemento seleccionado.
* **Args:**
  * `type: str = "input"`
  * `selector: dict`
    * `type: Enum["xpath", "css", "text"]`
    * `value: str`
  * `value: str`&#x20;

**Ejemplo:**

```json
{
    "type": "input",
    "selector": {
        "type": "xpath",
        "value": "//input"
    },
    "value": "pizza boxes"
}
```

#### `scroll` <a href="#scroll" id="scroll"></a>

* **Descripción**: Se desplaza una cantidad fija de píxeles.
* **Args:**
  * `type: str = "scroll"`
  * `x: int`
  * `y: int`

**Ejemplo:**

```json
{
    "type": "scroll",
    "x": 0,
    "y": 100
}
```

#### `scroll_to_bottom` <a href="#scroll_to_bottom" id="scroll_to_bottom"></a>

* **Descripción**: Se desplaza hasta abajo durante una cantidad fija de segundos.
* **Args:**
  * `type: str = "scroll_to_bottom"`

**Ejemplo**:

```json
{
    "type": "scroll_to_bottom",
    "timeout_s": 10
}
```

#### `wait` <a href="#wait" id="wait"></a>

* **Descripción**: Espera una cantidad fija de segundos.
* **Args:**
  * `type: str = "wait"`

**Ejemplo**:

```json
{
    "type": "wait",
    "wait_time_s": 2
}
```

#### `wait_for_element` <a href="#wait_for_element" id="wait_for_element"></a>

* **Descripción**: Espera a que el elemento cargue durante una cantidad fija de segundos.
* **Args:**
  * `type: str = "wait_for_element"`
  * `selector: dict`
    * `type: Enum["xpath", "css", "text"]`
    * `value: str`

**Ejemplo:**

```json
{
    "type": "wait_for_element",
    "selector": {
        "type": "text",
        "value": "Load More Items"
    },
    "timeout_s": 5
}
```

#### `fetch_resource` <a href="#fetch_resource" id="fetch_resource"></a>

{% hint style="warning" %}
La `fetch_resource` instrucción debe ser la última instrucción en la lista de instrucciones del navegador; cualquier instrucción posterior no se ejecutará.
{% endhint %}

* **Descripción**: Obtiene la primera ocurrencia de un recurso Fetch/XHR que coincida con el patrón establecido.
* **Args:**
  * `type: str = "fetch_resource"`
  * `filter: str(RegEx expression)`
  * `on_error: Enum["error", "skip"]`

**Ejemplo:**

```json
{
    "type": "fetch_resource",
    "filter": "/graphql/item/"
}
```

### Validación de instrucciones

Cualquier inconsistencia con respecto al formato de la instrucción dará como resultado un `400` código de estado y un mensaje de error correspondiente.

Por ejemplo, una carga útil como esta:

```json
{
    "source": "universal",
    "url": "https://www.example.com/",
    "render": "html",
    "browser_instructions": [
        {
            "type": "unsupported-wait",
            "wait_time_s": 5
        }
    ]
}
```

Dará como resultado:

```json
{    
    "errors": {
        "message": "Tipo de acción no compatible `unsupported-wait`, elige entre 'click,fetch_resource,input,scroll,scroll_to_bottom,wait,wait_for_element'"
    }
}
```

## Solución de problemas <a href="#status-codes" id="status-codes"></a>

### Códigos de estado <a href="#status-codes" id="status-codes"></a>

Consulta nuestros códigos de respuesta descritos [**aquí**](/products/es/web-scraper-api/response-codes.md). Los códigos de estado con respecto a la validación de instrucciones están documentados [**aquí**](/products/es/web-scraper-api/features/js-rendering-and-browser-control.md#instruction-validation).

### Errores y advertencias

Si hay un error o una advertencia que resulte de tus acciones de navegación, lo encontrarás en el resultado bajo las claves `browser_instructions_error` o `browser_instructions_warnings`. Por ejemplo, si has enviado las siguientes instrucciones del navegador y el `xpath` no se encuentra en la página, el resultado incluirá una advertencia.

`browser_instructions`:

```json
[
    {
        "type": "input", 
        "selector": {
            "type": "xpath",
            "value": "//input[@type='search']"
        },
        "value": "oxylabs"
    }
]
```

Resultados:

```json
{
  "results": [
    {
      "content": "<!doctype html><html>
        Contenido después de ejecutar las instrucciones      
      </html>",
      "created_at": "2023-10-11 11:35:23",
      "updated_at": "2023-10-11 11:36:08",
      "browser_instructions_warnings": [
        {
          "action_type": "click",
          "msg": "No se pudo encontrar el tipo de selector `xpath` con el valor `//input[@type=search]` en la página."
        },
      ],
      "page": 1,
      "url": "https://example.com",
      "job_id": "7117835067442906113",
      "status_code": 200
    }
  ]
}

```

| Posibles errores y advertencias                                                                          |
| -------------------------------------------------------------------------------------------------------- |
| Se produjo un error inesperado al convertir las instrucciones del navegador en acciones.                 |
| Se produjo un error inesperado al ejecutar `{action.type}` las instrucciones del navegador.              |
| La acción `{action.type}` agotó el tiempo de espera.                                                     |
| No se pudo encontrar el tipo de selector `{selector.type}` con el valor `{selector.value}` en la página. |


---

# Agent Instructions
This documentation is published with GitBook. GitBook is the documentation platform designed so that both humans and AI agents can read, navigate, and reason over technical content effectively. Learn more at gitbook.com.

## Querying This Documentation
If you need additional information that is not directly available in this page, you can query the documentation dynamically by asking a question.

Perform an HTTP GET request on the current page URL with the `ask` query parameter, and the optional `goal` query parameter:

```
GET https://developers.oxylabs.io/products/es/web-scraper-api/features/js-rendering-and-browser-control.md?ask=<question>&goal=<endgoal>
```

`ask` is the immediate question: it should be specific, self-contained, and written in natural language.
`goal` is optional and describes the broader end goal you are ultimately trying to accomplish on behalf of the user. GitBook uses it to tailor the answer towards what is most useful for that goal.

The response will contain a direct answer to the question and relevant excerpts and sources from the documentation.

Use this mechanism when the answer is not explicitly present in the current page, you need clarification or additional context, or you want to retrieve related documentation sections.