> For the complete documentation index, see [llms.txt](https://developers.oxylabs.io/llms.txt). Markdown versions of documentation pages are available by appending `.md` to page URLs; this page is available as [Markdown](https://developers.oxylabs.io/products/cn/proxies/mobile-proxies/public-api.md).

# Public API

通过 Public API 以编程方式管理移动代理子用户、设置流量限制并跟踪使用统计。

该 [**Public API**](https://residential-api.oxylabs.io/v2/docs) 使你能够 **以编程方式管理代理用户** 无需使用仪表板。您可以创建、删除和修改代理子用户，设置流量使用限制，并查看移动代理当前和历史流量使用情况。

### 可用路径

**基础端点：** `https://residential-api.oxylabs.io/v2`

将基础端点与路径结合以执行特定操作：

<table data-full-width="false"><thead><tr><th width="99.15625">方法</th><th width="449.92578125">路径</th><th>描述</th></tr></thead><tbody><tr><td><mark style="color:$success;">POST</mark></td><td><code>/login</code></td><td>进行身份验证以获取访问令牌（JWT）。</td></tr><tr><td><mark style="color:蓝色;">GET</mark></td><td><code>/users/{userId}/sub-users</code></td><td>获取所有活跃子用户</td></tr><tr><td><mark style="color:$success;">POST</mark></td><td><code>/users/{userId}/sub-users</code></td><td>创建一个新的子用户。</td></tr><tr><td><mark style="color:蓝色;">GET</mark></td><td><code>/users/{userId}/sub-users/{subUserId}</code></td><td>获取特定子用户的流量使用统计信息。</td></tr><tr><td><mark style="color:$primary;">PATCH</mark></td><td><code>/users/{userId}/sub-users/{subUserId}</code></td><td>修改一个子用户。</td></tr><tr><td><mark style="color:红色;">DELETE</mark></td><td><code>/users/{userId}/sub-users/{subUserId}</code></td><td>删除一个子用户。</td></tr><tr><td><mark style="color:蓝色;">GET</mark></td><td><code>/users/{userId}/sub-users/{subUserId}/target-stats</code></td><td>获取某个子用户按目标划分的流量使用统计信息。需要指定日期（可查看最近 30 天）。</td></tr><tr><td><mark style="color:蓝色;">GET</mark></td><td><code>/users/{userId}/client-stats</code></td><td>获取当月总流量使用情况。</td></tr></tbody></table>

### 如何使用 Public API

<details>

<summary><strong>通过网页界面进行测试</strong></summary>

#### 1. 授权你的主用户

***

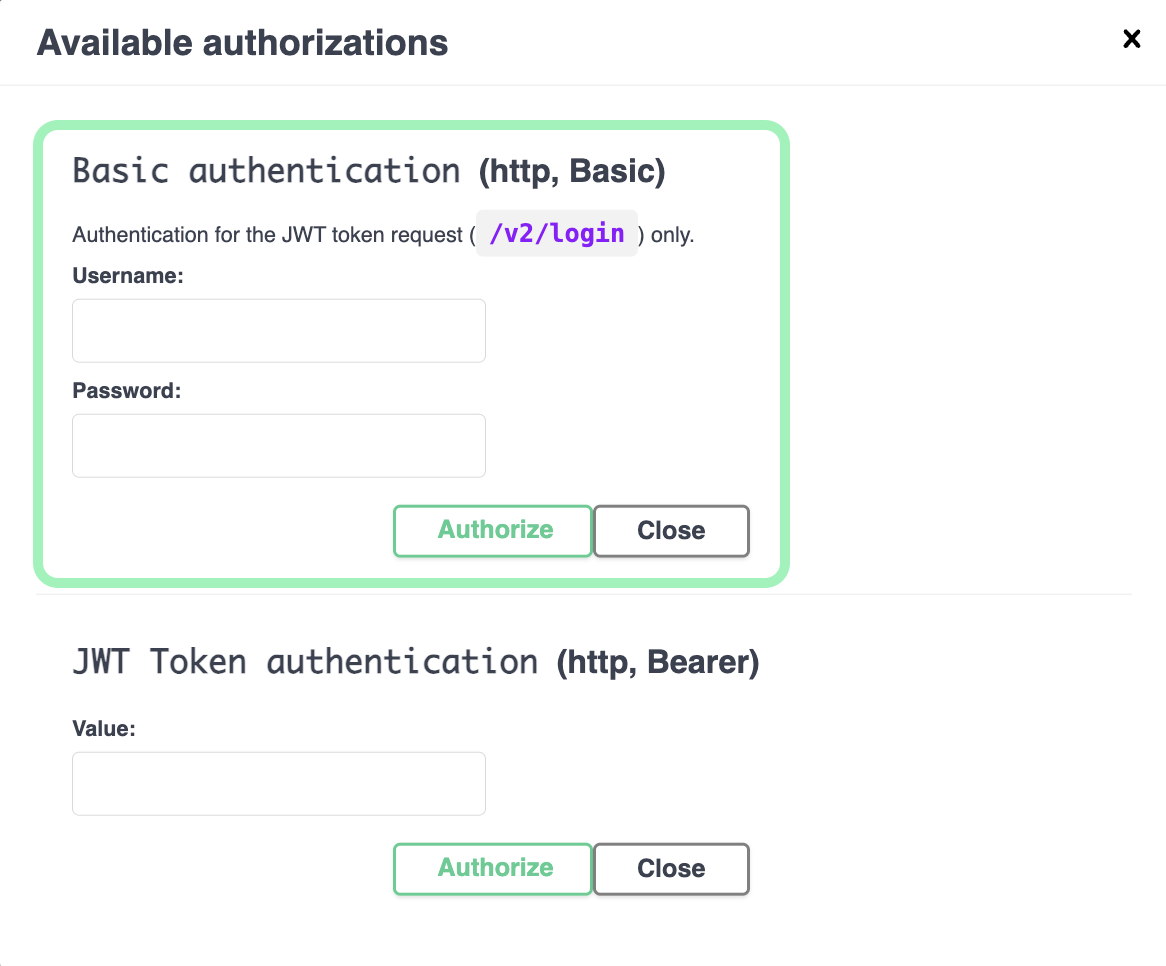
如果你正在通过 [Public API](https://residential-api.oxylabs.io/v2/docs) 界面进行测试，请点击 **授权** 按钮。

<figure><img src="https://3714446197-files.gitbook.io/~/files/v0/b/gitbook-x-prod.appspot.com/o/spaces%2FBQ7Zf9paoN3FTeGcyfY1%2Fuploads%2Fgit-blob-22e213b85d803819672eefc9b304c22d4320f603%2Fauthorize-1.png?alt=media" alt=""><figcaption></figcaption></figure>

接下来，在新打开的窗口中输入你的主代理用户凭据并 **授权** 再次选择。

{% hint style="info" %}
主用户是 **第一个子用户** 在你的 [**用户列表中**](https://dashboard.oxylabs.io/?route=/overview/MP/users).
{% endhint %}

<figure><img src="https://3714446197-files.gitbook.io/~/files/v0/b/gitbook-x-prod.appspot.com/o/spaces%2FBQ7Zf9paoN3FTeGcyfY1%2Fuploads%2Fgit-blob-433b36c6ead11efb109315877279802db64aa636%2Fauthorize-2.png?alt=media" alt="" width="375"><figcaption></figcaption></figure>

#### 2. 登录以生成 JWT

***

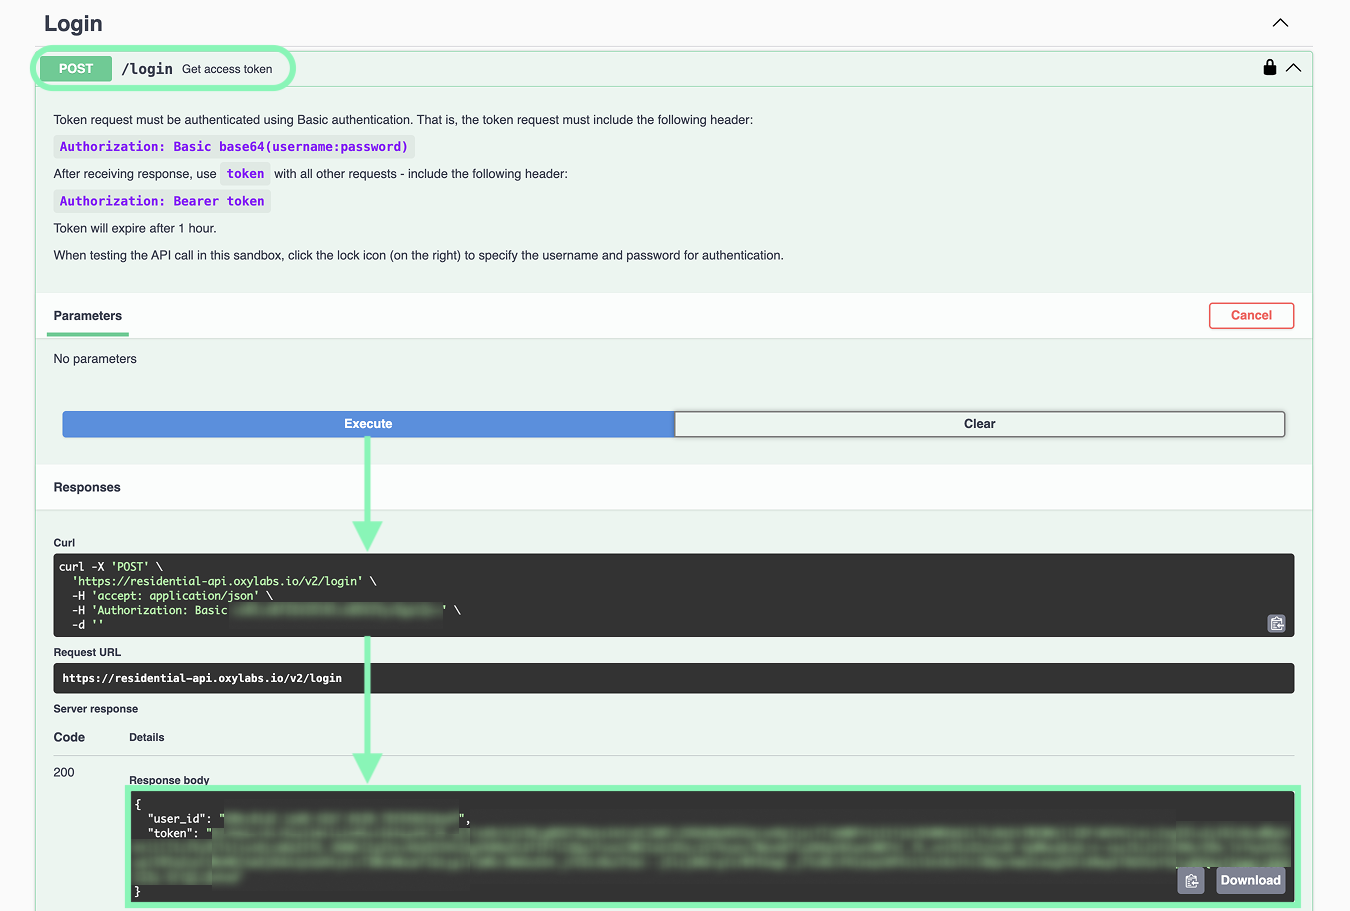
授权后，前往 **POST** `/login` 选项卡以生成完成授权所需的 JSON Web Token (JWT)。

<figure><img src="https://3714446197-files.gitbook.io/~/files/v0/b/gitbook-x-prod.appspot.com/o/spaces%2FBQ7Zf9paoN3FTeGcyfY1%2Fuploads%2Fgit-blob-35156ad8c2232a46b7850229ed203bb5af77e4b4%2FJWT-1.png?alt=media" alt=""><figcaption></figcaption></figure>

然后，选择 **试用** **→** **执行**. 保存 `user_id` 和 `token` 值以供后续使用。

{% hint style="warning" %}
**JWT 在 1 小时后过期**. 之后，你需要重新生成一个。
{% endhint %}

{% hint style="warning" %}
如果你最近更改了主用户的密码，你会收到错误。要处理此问题，你必须 **使用原始密码** 还是 **联系我们的 7x24 支持团队** 通过 [在线聊天 ](https://oxylabs.drift.click/oxybot)还是 [电子邮件](mailto:support@oxylabs.io).
{% endhint %}

<figure><img src="https://3714446197-files.gitbook.io/~/files/v0/b/gitbook-x-prod.appspot.com/o/spaces%2FBQ7Zf9paoN3FTeGcyfY1%2Fuploads%2Fgit-blob-78bf728799910d6d33c6fbccaa6253bf4e92c31c%2FJWT-2.png?alt=media" alt=""><figcaption></figcaption></figure>

#### 3. 使用 JWT 完成授权

***

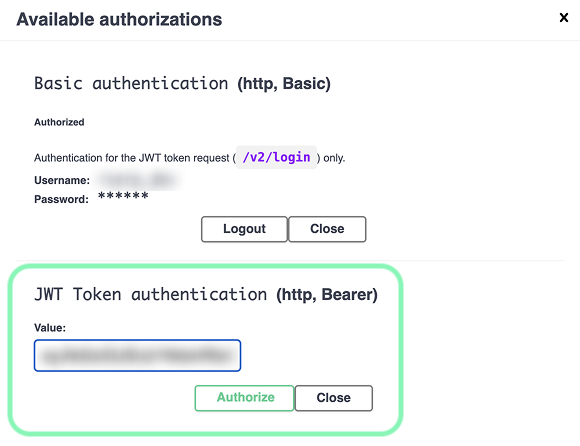
再次打开 **授权** 窗口并 **粘贴令牌** 到 JWT Token 认证字段中。然后，点击 **授权** 按钮保存。

<figure><img src="https://3714446197-files.gitbook.io/~/files/v0/b/gitbook-x-prod.appspot.com/o/spaces%2FBQ7Zf9paoN3FTeGcyfY1%2Fuploads%2Fgit-blob-9d3696e13a42aae79ece4d54b8346040682b936c%2FJWT-3.png?alt=media" alt="" width="435"><figcaption></figcaption></figure>

#### 4. 测试 Public API

现在你可以在浏览器中测试 Public API 端点。对于每个端点，你都需要输入 `user_id`，即在第 2 步中获取的内容。

</details>

{% stepper %}
{% step %}

#### 登录并生成 JWT

使用 Basic Authentication，用你的主用户凭据（以 base64 编码）登录以获取 JWT 令牌。

{% hint style="info" %}
主用户是 **第一个子用户** 在你的 [**用户列表中**](https://dashboard.oxylabs.io/?route=/overview/MP/users)**.**
{% endhint %}

**端点：** `https://residential-api.oxylabs.io/v2/login`

**标头：** `Authorization: Basic base64(username:password)`

<pre class="language-bash"><code class="lang-bash">curl -X "POST" \
  "https://residential-api.oxylabs.io/v2/login" \
  -H "accept: application/json" \
  -u "<a data-footnote-ref href="#user-content-fn-1">USERNAME:PASSWORD</a>"
</code></pre>

{% hint style="warning" %}
如果你最近更改了主用户的密码，你会收到错误。要处理此问题，你必须 **使用原始密码** 还是 **联系我们的 7x24 支持团队** 通过 [在线聊天 ](https://oxylabs.drift.click/oxybot)还是 [电子邮件](mailto:support@oxylabs.io).
{% endhint %}

执行后，服务器将返回 **两个重要值** 供后续步骤使用：

* `user_id` 是 API 请求所需的唯一用户标识符。
* `token` 是进一步授权所需的 JSON Web Token (JWT)。

{% code title="输出示例：" %}

```json
{
  "user_id": "00000000-0000-0000-0000-000000000000",
  "token": "example token"
}
```

{% endcode %}

{% hint style="warning" %}
**JWT 在 1 小时后过期**. 之后，你需要重新生成一个。
{% endhint %}
{% endstep %}

{% step %}

#### 使用 `token` 和 `user_id` 在请求中

你现在可以查询 API 来管理用户并检查统计信息。后续所有请求都需要 JWT `token` 以及你的 `user_id`.

**标头：** `Authorization: Bearer {token}`

例如，让我们检查当月总流量使用情况。

<pre class="language-bash" data-full-width="false"><code class="lang-bash">curl -X "GET" \
  "https://residential-api.oxylabs.io/v2/users/<a data-footnote-ref href="#user-content-fn-2">{userId}</a>/client-stats" \
  -H "accept: application/json" \
  -H "Authorization: Bearer <a data-footnote-ref href="#user-content-fn-3">{token}</a>"
</code></pre>

<details>

<summary><strong>输出示例</strong></summary>

```json
{
  "traffic": 1.2354839,
  "date_from": "2026-01-01",
  "date_to": "2026-01-15"
}
```

</details>
{% endstep %}
{% endstepper %}

### Backconnect 入口 IP

如果你想使用自己的 backconnect 入口节点 DNS 名称，可以将你的子域名/域名指向我们的入口节点。为此，你需要添加一条 DNS `CNAME` 记录，并将 `pr.oxylabs.io` 作为目标。这是在 Cloudflare DNS 管理器中针对 `入口` 子域名：

![Backconnect](https://3714446197-files.gitbook.io/~/files/v0/b/gitbook-x-prod.appspot.com/o/spaces%2FBQ7Zf9paoN3FTeGcyfY1%2Fuploads%2Fgit-blob-9d15ff608e52a76e6d288eb45c3bd648ddf970ef%2Fcname.jpg?alt=media)

如需更多信息，请联系 [**support@oxylabs.io**](mailto:support@oxylabs.io) 或你的客户经理。

[^1]: 替换为你的 **主用户凭据**. cURL 会自动编码为 base64 并使用 Basic Authentication 方法。

[^2]: 替换为你的 `user_id`

[^3]: 替换为你的 JWT `token`


---

# Agent Instructions
This documentation is published with GitBook. GitBook is the documentation platform designed so that both humans and AI agents can read, navigate, and reason over technical content effectively. Learn more at gitbook.com.

## Querying This Documentation
If you need additional information that is not directly available in this page, you can query the documentation dynamically by asking a question.

Perform an HTTP GET request on the current page URL with the `ask` query parameter, and the optional `goal` query parameter:

```
GET https://developers.oxylabs.io/products/cn/proxies/mobile-proxies/public-api.md?ask=<question>&goal=<endgoal>
```

`ask` is the immediate question: it should be specific, self-contained, and written in natural language.
`goal` is optional and describes the broader end goal you are ultimately trying to accomplish on behalf of the user. GitBook uses it to tailor the answer towards what is most useful for that goal.

The response will contain a direct answer to the question and relevant excerpts and sources from the documentation.

Use this mechanism when the answer is not explicitly present in the current page, you need clarification or additional context, or you want to retrieve related documentation sections.