> For the complete documentation index, see [llms.txt](https://developers.oxylabs.io/llms.txt). Markdown versions of documentation pages are available by appending `.md` to page URLs; this page is available as [Markdown](https://developers.oxylabs.io/integrations/pt-br/proxy-integrations/datacenter-proxies-guides/switchyomega.md).
# SwitchyOmega
O SwitchyOmega é um gerenciador de proxy poderoso e confiável que funciona com muitos navegadores populares.
{% hint style="warning" %}
**Aviso:** O Switchy Omega não é mais compatível com o Google Chrome e navegadores baseados em Chromium desde o lançamento do Manifest V3. O guia a seguir cobre apenas a extensão de navegador disponível para Mozilla Firefox.
{% endhint %}
Siga estas etapas para integrar Oxylabs [**Datacenter Proxies**](https://oxylabs.io/products/datacenter-proxies):
**Etapa 1.** Obtenha o plugin e instale-o. Para o complemento do Firefox, clique [**aqui**](https://addons.mozilla.org/en-US/firefox/addon/switchyomega/).
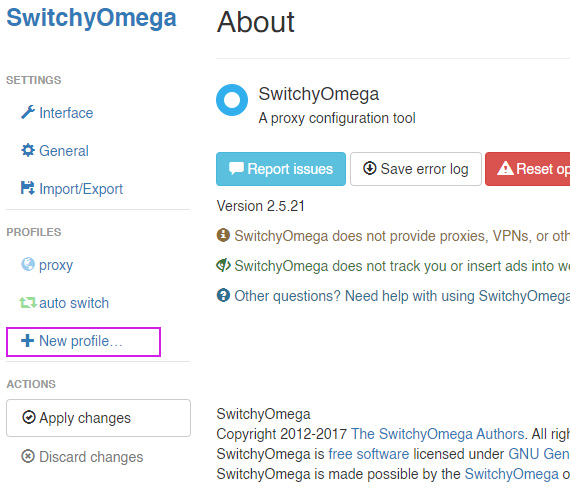
**Etapa 2.** Abra o SwitchyOmega **Opções**.
**Etapa 3.** Clique em **+Novo perfil.**
**Etapa 4.** Dê um nome a este novo perfil, escolha **Perfil de Proxy** tipo, e clique em **Criar**.
**Etapa 5.** Preencha os detalhes:
**Tipo de conexão:** `HTTP`, `HTTPS`, ou `SOCKS5`
**Servidor:** `dc.oxylabs.io`
**Porta:** `8001`
{% hint style="warning" %}
Na assinatura **Pay-per-IP** a porta é o número sequencial atribuído a um endereço IP da lista fornecida. Assim, a porta `8001` usa o primeiro endereço IP da sua lista.
Na assinatura **Pay-per-traffic** assinatura, porta `8001` seleciona um endereço IP aleatório, mas permanece consistente durante uma sessão.
{% endhint %}
{% hint style="info" %}
Você também pode especificar a geolocalização, por exemplo, os EUA, dentro da string de autenticação do usuário: `user-USERNAME-country-US:PASSWORD`. Confira nosso [documentação](https://developers.oxylabs.io/proxies/datacenter-proxies/select-country) para mais detalhes.
{% endhint %}
**Etapa 6.** Clique no **ícone de** à direita. Preencha os detalhes para **Autenticação de Proxy**:
**usuário do proxy** **nome de usuário:** `user-username`
**senha do usuário do proxy:** `senha`
{% hint style="info" %}
Certifique-se de ter adicionado a `user-` parte antes do seu nome de usuário.
{% endhint %}
Clique em **Salve as alterações.**
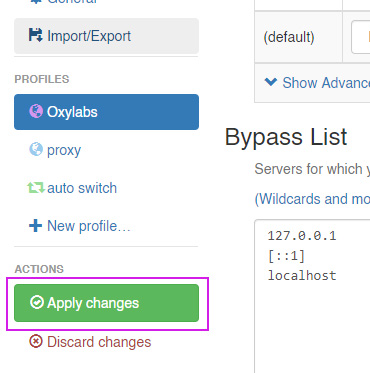
**Etapa 7.** Clique em **Aplique as alterações.**
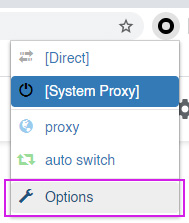
**Etapa 8**. Clique no ícone do SwitchyOmega e escolha o proxy que você acabou de configurar.
É isso! Agora você está pronto para usar o SwitchyOmega com Datacenter Proxies.
Encontre a publicação original do blog sobre a integração com o SwitchyOmega [aqui](https://oxylabs.io/resources/integrations/proxy-switchyomega).
---
# Agent Instructions
This documentation is published with GitBook. GitBook is the documentation platform designed so that both humans and AI agents can read, navigate, and reason over technical content effectively. Learn more at gitbook.com.
## Querying This Documentation
If you need additional information that is not directly available in this page, you can query the documentation dynamically by asking a question.
Perform an HTTP GET request on the current page URL with the `ask` query parameter:
```
GET https://developers.oxylabs.io/integrations/pt-br/proxy-integrations/datacenter-proxies-guides/switchyomega.md?ask=
```
The question should be specific, self-contained, and written in natural language.
The response will contain a direct answer to the question and relevant excerpts and sources from the documentation.
Use this mechanism when the answer is not explicitly present in the current page, you need clarification or additional context, or you want to retrieve related documentation sections.