> For the complete documentation index, see [llms.txt](https://developers.oxylabs.io/llms.txt). Markdown versions of documentation pages are available by appending `.md` to page URLs; this page is available as [Markdown](https://developers.oxylabs.io/integrations/proxy-integrations/webharvy.md).
# WebHarvy
Integrate WebHarvy web scraper with Oxylabs Proxies. Step-by-step setup guide for proxy configuration and authentication.
[**WebHarvy**](https://www.webharvy.com/index.html) is a web scraping tool that extracts text, HTML, and images from web pages. The tool handles logins, form submissions, navigation, pagination, scheduled scraping and supports proxies.
Follow the steps below to integrate the following Oxylabs proxies with WebHarvy:
* [**Residential & Mobile Proxies**](#residential-and-mobile-proxies)
* [**Datacenter Proxies**](#datacenter-proxies)
* [**Dedicated Datacenter Proxies (Enterprise)**](#dedicated-datacenter-proxies-enterprise)
* [**Dedicated Datacenter Proxies (Self-service)**](#dedicated-datacenter-proxies-self-service)
* [**ISP Proxies**](#isp-proxies)
* [**Dedicated ISP Proxies**](#dedicated-isp-proxies)
### **Step 1**
[**Download**](https://www.webharvy.com/index.html) and install the WebHarvy app.
### **Step 2**
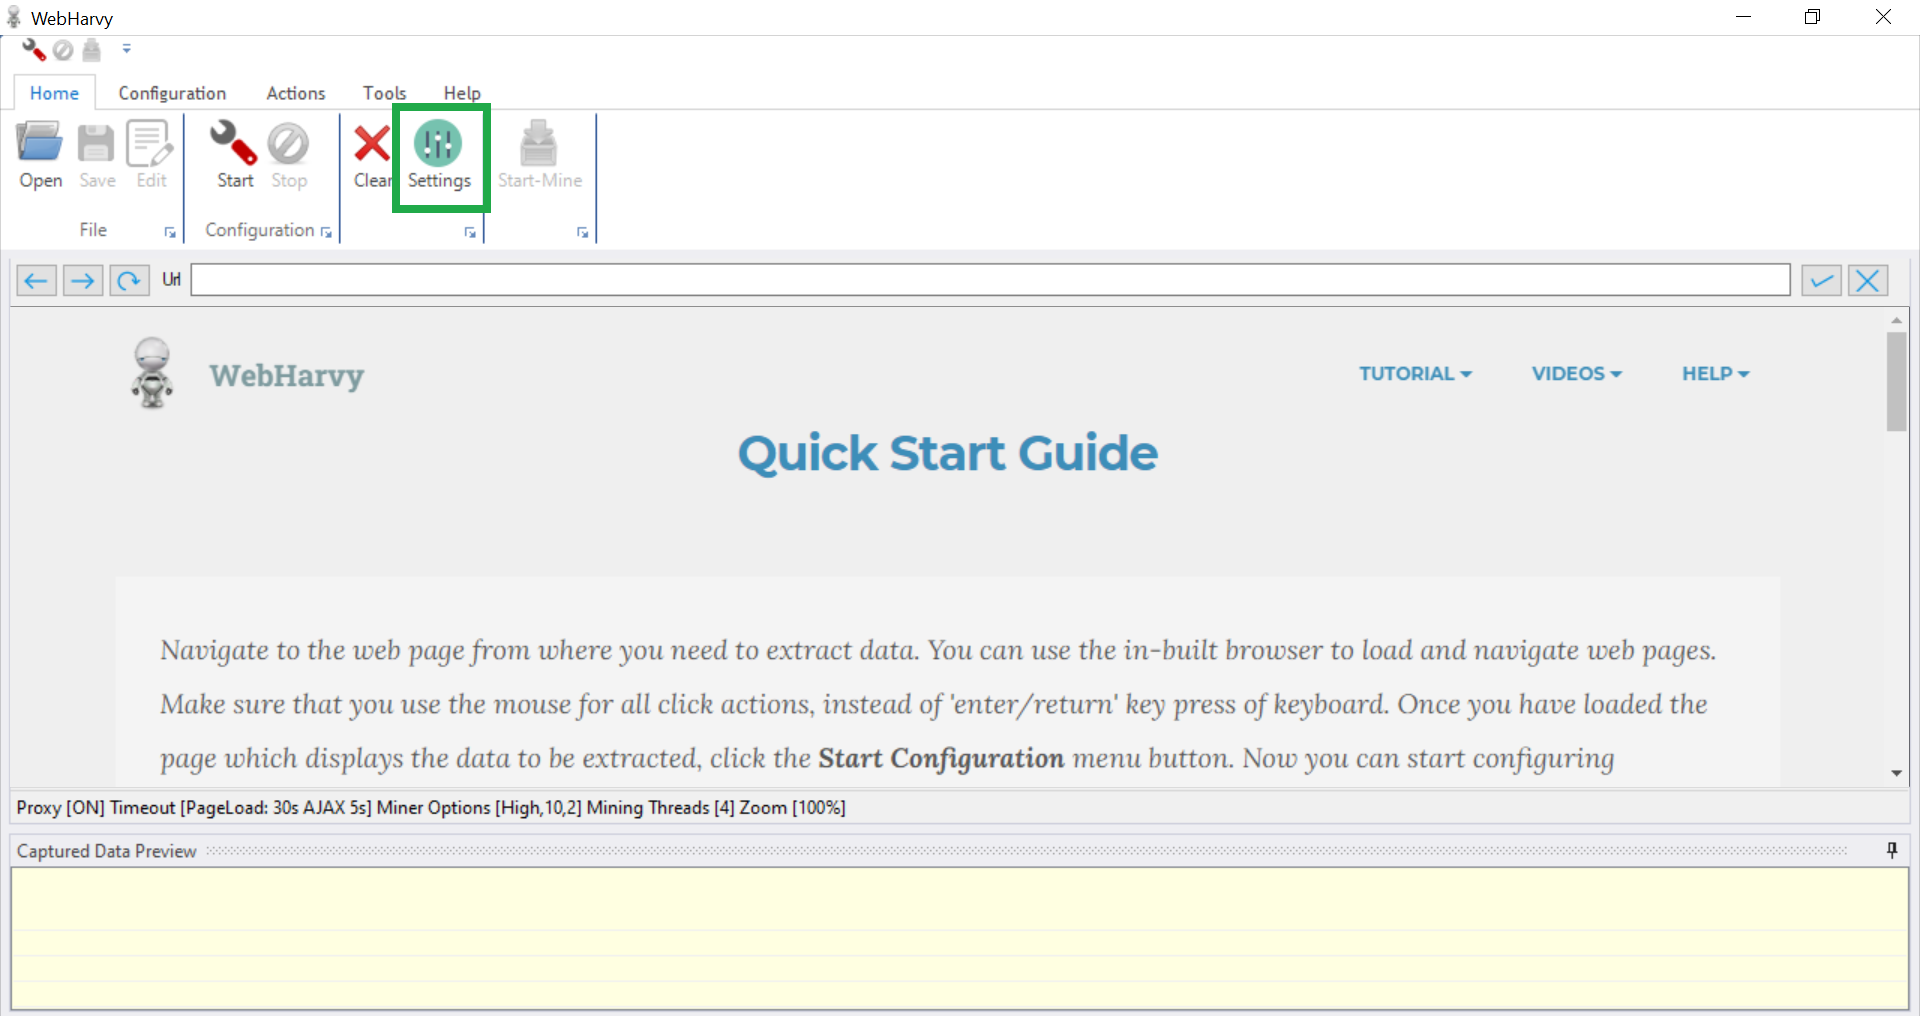
Once set up, navigate to **Settings.**
### **Step 3**
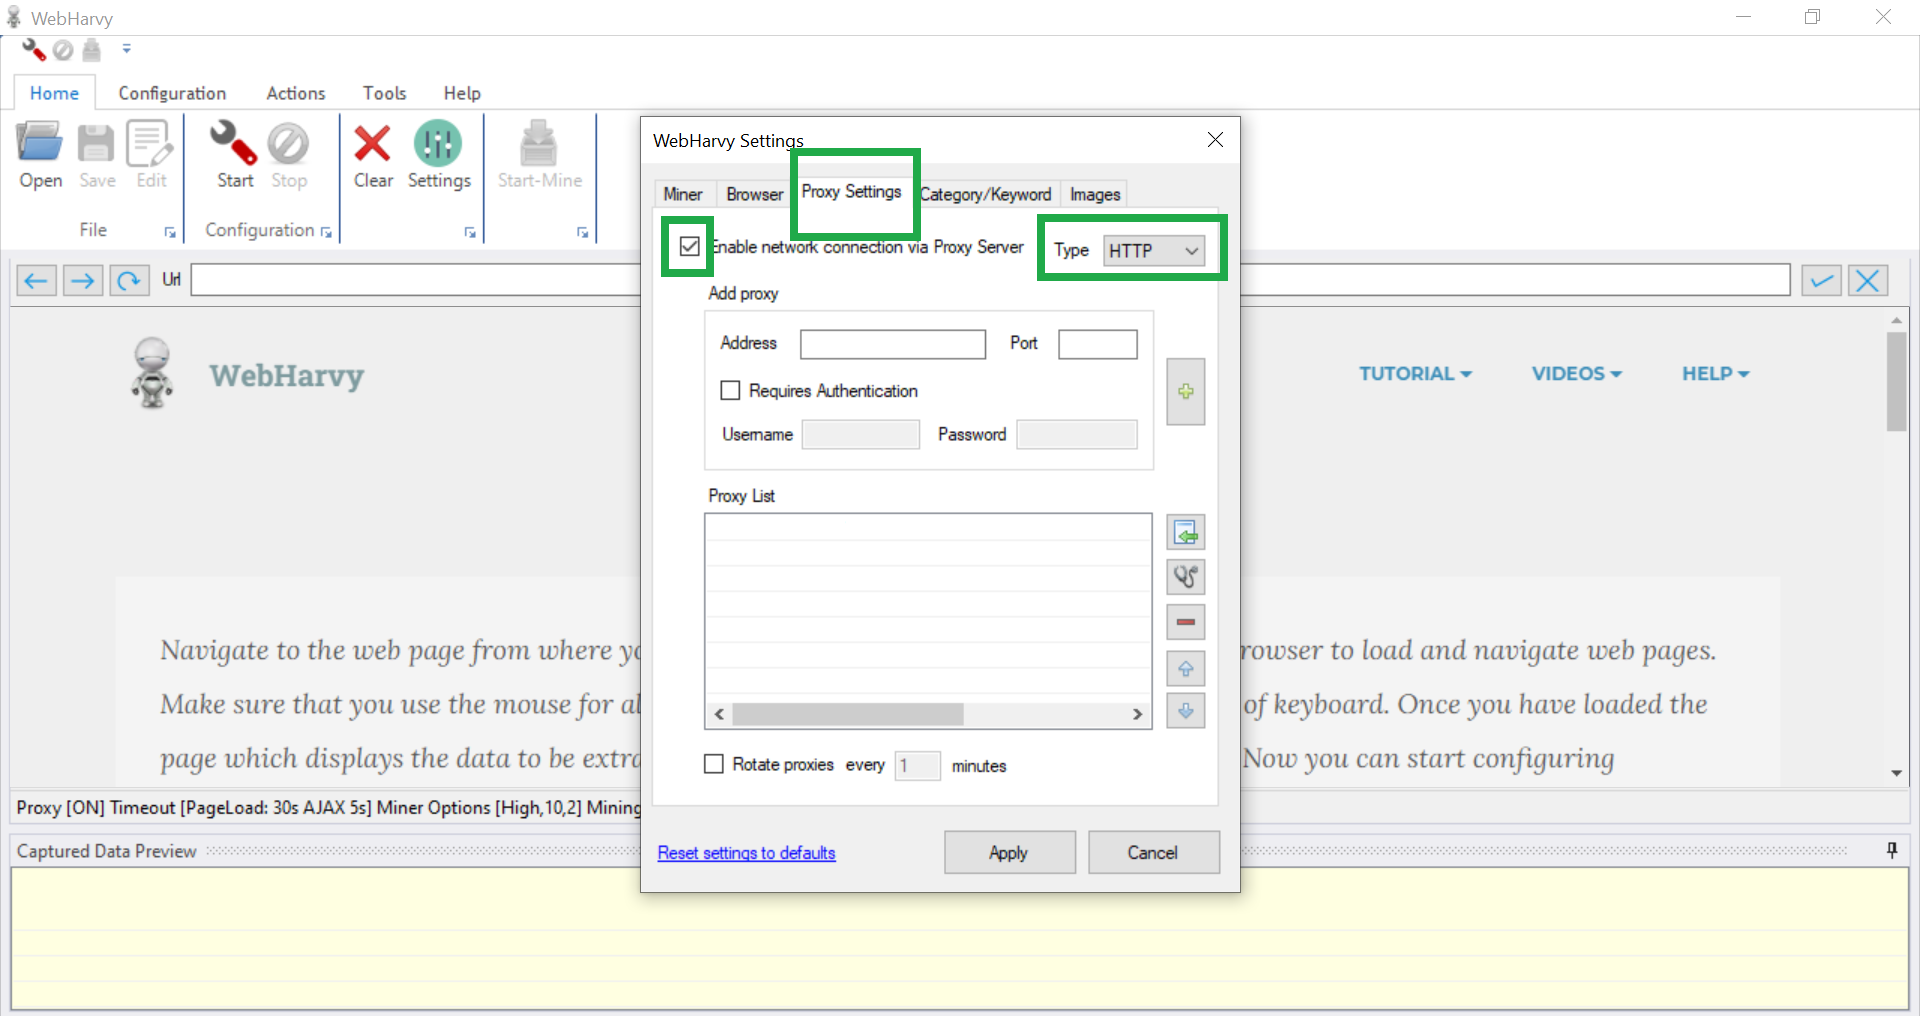
Click on **Proxy Settings***.* Select to mark **Enable network connection via Proxy Server** and choose `HTTP`, `HTTPS`, or `SOCKS5` as your proxy protocol **Type**.
### **Step 4**
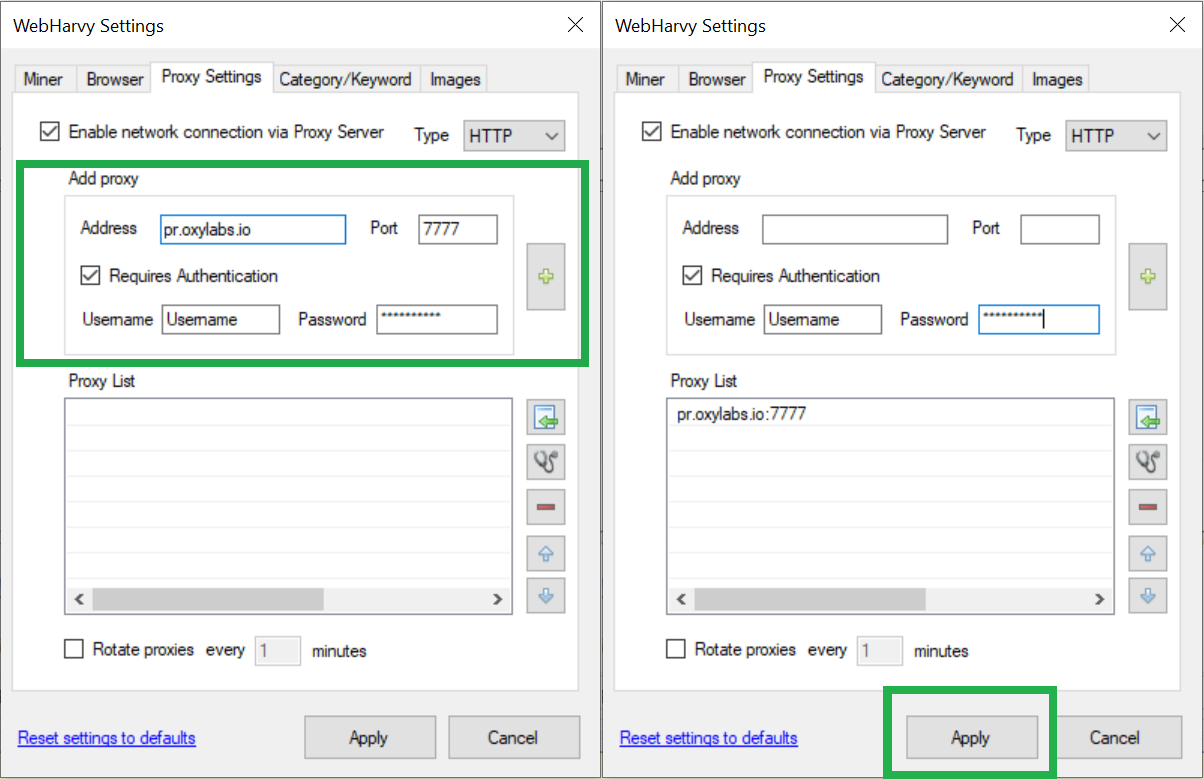
Fill in the connection details for your chosen proxy type:
* [Residential & Mobile Proxies](#residential-and-mobile-proxies)
* [Datacenter Proxies](#datacenter-proxies)
* [Dedicated Datacenter Proxies (Enterprise)](#dedicated-datacenter-proxies-enterprise)
* [Dedicated Datacenter Proxies (Self-service)](#dedicated-datacenter-proxies-self-service)
* [ISP Proxies](#isp-proxies)
* [Dedicated ISP Proxies](#dedicated-isp-proxies)
#### Residential & Mobile Proxies
**Type:** `HTTP`, `HTTPS`, or `SOCKS5`
**Address:** `pr.oxylabs.io`
**Port:** `7777`
You may also use **additional parameters** with residential and mobile proxies to set the geo-location (country, state, city, and etc.) and control sessions. Check out the [Residential Proxies documentation](/products/proxies/residential-proxies.md) to learn more.
#### Datacenter Proxies
**Type:** `HTTP`, `HTTPS`, or `SOCKS5`
**Address**: `dc.oxylabs.io`
**Port:** `8001`
{% tabs %}
{% tab title="Pay-per-IP subscription" %}
The port is the sequential number assigned to an IP address from the [proxy list](/products/proxies/datacenter-proxies/proxy-list.md). Thus, port `8001` uses the first IP address from your list. You may also enable [proxy IP rotation](/products/proxies/datacenter-proxies/ip-control.md) by setting the port to `8000`.
Furthermore, you can specify the [geo-location](/products/proxies/datacenter-proxies/select-country.md), for example, the US, by setting the **Proxy username** to `user-USERNAME-country-US`.
{% endtab %}
{% tab title="Pay-per-traffic subscription" %}
The port `8001` picks a random IP address but stays consistent during a session. Alternatively, you can [rotate proxy IPs](/products/proxies/datacenter-proxies/ip-control.md) with each request by using port `8000`.
If you want to use a specific [geo-location](/products/proxies/datacenter-proxies/select-country.md), for example, the US, set the Proxy username to `user-USERNAME-country-US`.
{% endtab %}
{% endtabs %}
#### Dedicated Datacenter Proxies (Enterprise)
**Type:** `HTTP` or `SOCKS5`
**Address:** `1.2.3.4` (IP address from your [proxy list](/products/proxies/dedicated-datacenter-proxies/enterprise/proxy-lists.md))
**Port:** `60000` (HTTP), `1180` (SOCKS5)
For Enterprise Dedicated Datacenter Proxies (purchased via sales), you’ll have to choose an IP address from the acquired [proxy list](/products/proxies/dedicated-datacenter-proxies/enterprise/proxy-lists.md).
#### Dedicated Datacenter Proxies (Self-service)
**Proxy type:** `HTTP`, `HTTPS`, or `SOCKS5`
**Address:** `ddc.oxylabs.io`
**Port:** `8001`
For Self-Service Dedicated Datacenter Proxies (purchased via Oxylabs dashboard), the port indicates the sequential number of an IP address from the acquired [proxy list](/products/proxies/datacenter-proxies/proxy-list.md). If you want to get a different IP with each request, change the **Port** to `8000` to enable [proxy rotation](/products/proxies/dedicated-datacenter-proxies/self-service/proxy-rotation.md).
#### ISP Proxies
**Type:** `HTTP`, `HTTPS`, or `SOCKS5`
**Address:** `isp.oxylabs.io`
**Port:** `8001`
ISP Proxies assign each port to a specific IP address and location. Port `8001` always uses the first IP from your [proxy list](/products/proxies/isp-proxies/proxy-list.md). Use port `8000` to enable [proxy rotation](/products/proxies/isp-proxies/proxy-rotation.md).
To get rotating IPs from a specific country's proxy pool, set the username using this format: `user-USERNAME-country-XX`, where `XX` is the country code (e.g., `US` for United States).
#### Dedicated ISP Proxies
**Type:** `HTTP`, `HTTPS`, or `SOCKS5`
**Address:** `disp.oxylabs.io`
**Port:** `8001`
You will need to choose the port assigned to an IP address from the purchased [proxy list](/products/proxies/dedicated-isp-proxies/self-service/proxy-list.md), which you can find on the Oxylabs dashboard. The `8001` port will pick the first IP address from your list for all requests. Use port `8000` for automatic [proxy IP rotation](/products/proxies/dedicated-isp-proxies/self-service/proxy-rotation.md).
### **Step 5**
Select **Requires Authentication** to enter your Oxylabs proxy **Username** and **Password**:
| Proxy type | Example |
| ------------------------------------------- | ----------------------------------------------------------------------------------------------------------------------- |
| Residential & Mobile proxies |
Username:customer-USERNAME
Password:PASSWORD
|
| Datacenter proxies |
Username:user-USERNAME
Password:PASSWORD
|
| Dedicated Datacenter proxies (Enterprise) |
Username:USERNAME
Password:PASSWORD
|
| Dedicated Datacenter proxies (Self-service) |
Username:user-USERNAME
Password:PASSWORD
|
| ISP proxies |
Username:user-USERNAME
Password:PASSWORD
|
| Dedicated ISP proxies |
Username:user-USERNAME
Password:PASSWORD
|
{% hint style="warning" %}
Make sure to add the `customer-` or `user-` prefix to your username if your proxy type requires it.
{% endhint %}
Click on the + button to add your new proxy to the list.
### **Step 6**
Press **Apply** to finish your WebHarvy proxy integration.
That's all. Now you can browse the internet and mark the specific rows to scrape. By clicking **Start,** you can begin selecting your target data.
Find the original WebHarvy integration blog post [here](https://oxylabs.io/resources/integrations/webharvy).
---
# Agent Instructions
This documentation is published with GitBook. GitBook is the documentation platform designed so that both humans and AI agents can read, navigate, and reason over technical content effectively. Learn more at gitbook.com.
## Querying This Documentation
If you need additional information that is not directly available in this page, you can query the documentation by asking a question.
Perform an HTTP GET request on the following URL with the `ask` and `goal` query parameters:
```
GET https://developers.oxylabs.io/integrations/proxy-integrations/webharvy.md?ask=&goal=
```
`ask` is the immediate question: it should be specific, self-contained, and written in natural language.
`goal` is what the user is ultimately trying to achieve, the reason they need the answer. Sharing it helps GitBook give you a better, more relevant answer. A goal is most helpful when it describes the outcome the user wants rather than restating the question. For example, with `ask=how do I create an API token`, a goal like `automate deployments from our CI pipeline` lets GitBook tailor the answer to that use case.
The response will contain a direct answer to the question and relevant excerpts and sources from the documentation.
Use this mechanism when the answer is not explicitly present in the current page, you need clarification or additional context, or you want to retrieve related documentation sections.