> For the complete documentation index, see [llms.txt](https://developers.oxylabs.io/llms.txt). Markdown versions of documentation pages are available by appending `.md` to page URLs; this page is available as [Markdown](https://developers.oxylabs.io/integrations/proxy-integrations/dicloak.md).

# DICloak

[**DICloak**](https://dicloak.com/) is an antidetect browser designed to mask digital fingerprints and simulate authentic browsing environments.

Follow the instructions below to integrate the following Oxylabs proxies:

* [**Residential & Mobile Proxies**](#residential-and-mobile-proxies)
* [**Datacenter Proxies**](#datacenter-proxies)
* [**Dedicated Datacenter Proxies (Enterprise)**](#dedicated-datacenter-proxies-enterprise)
* [**Dedicated Datacenter Proxies (Self-service)**](#dedicated-datacenter-proxies-self-service)
* [**ISP Proxies**](#isp-proxies)

{% stepper %}
{% step %}

### Set up DICloak

Download DICloak from the [**official website**](https://dicloak.com/download), launch the app, and log in.
{% endstep %}

{% step %}

### Add a new proxy

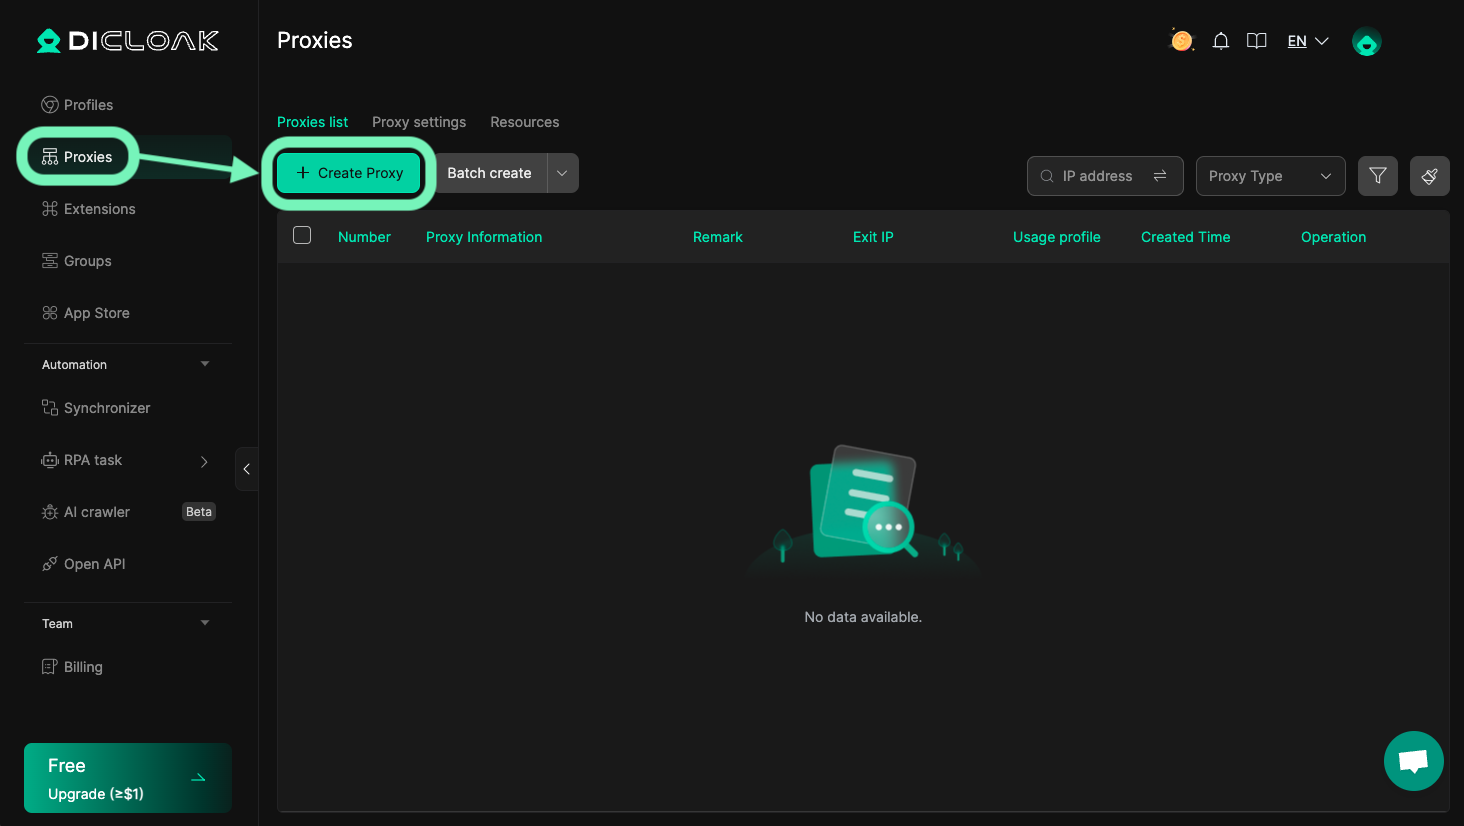
Select the **Proxies** tab and click **Create Proxy**.

<figure><img src="/files/plo5DsbCLZZbfyuehnpy" alt=""><figcaption></figcaption></figure>
{% endstep %}

{% step %}

### Enter proxy details

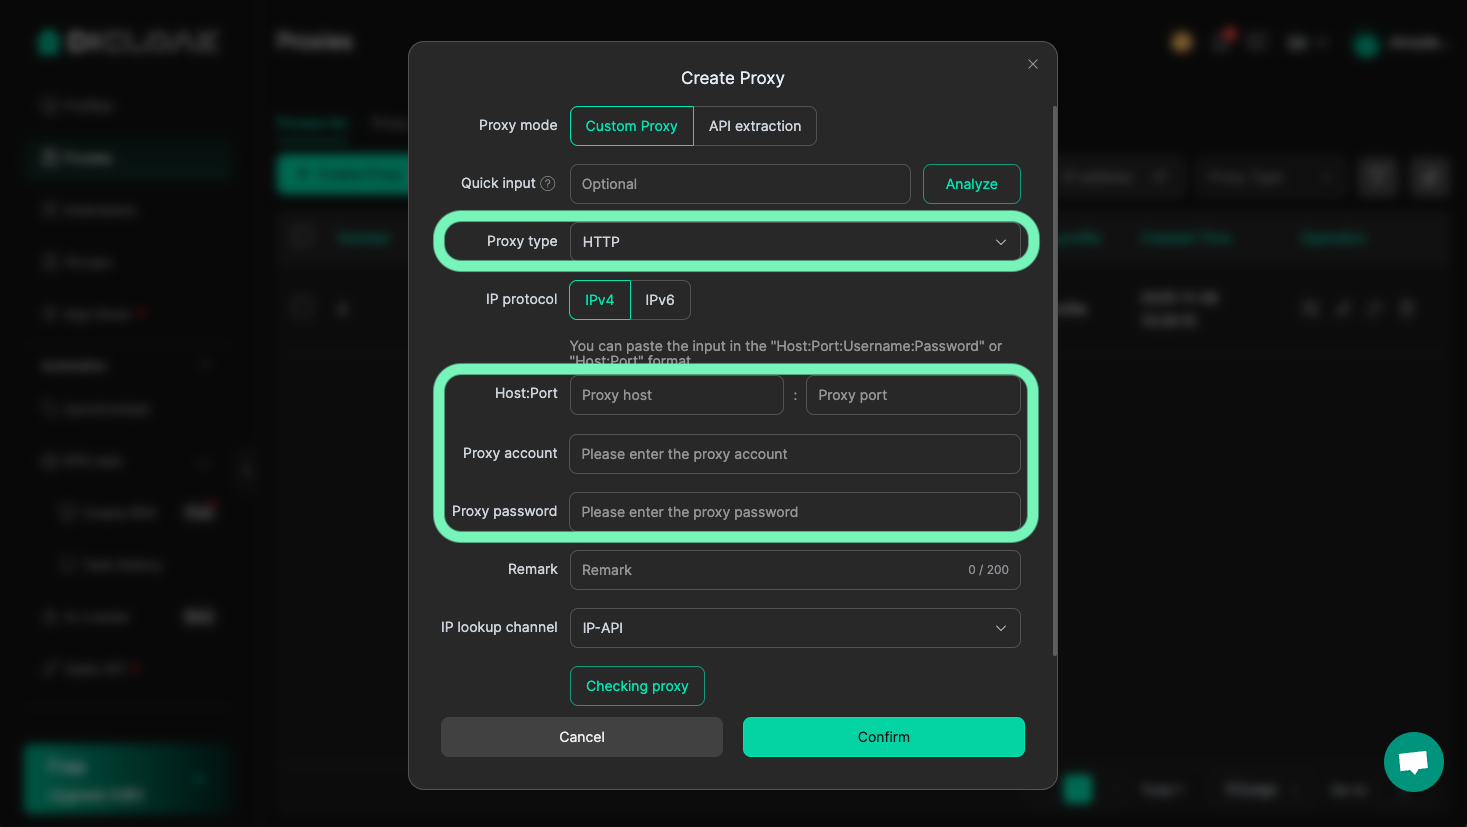
<figure><img src="/files/qoZBH4dCdea6tKx0WROS" alt=""><figcaption></figcaption></figure>

Choose a proxy type (HTTP, HTTPS, or [SOCKS5](https://oxylabs.io/products/socks5-proxies) protocols), then enter your proxy details and Oxylabs proxy user’s credentials. Use the same `username` and `password` you entered to create a new proxy user in the [Oxylabs dashboard](https://dashboard.oxylabs.io/en/).&#x20;

* [Residential & Mobile Proxies](#residential-and-mobile-proxies)
* [Datacenter Proxies](#datacenter-proxies)
* [Dedicated Datacenter Proxies (Enterprise)](#dedicated-datacenter-proxies-enterprise)
* [Dedicated Datacenter Proxies (Self-service)](#dedicated-datacenter-proxies-self-service)
* [ISP Proxies](#isp-proxies)

#### Residential & Mobile Proxies

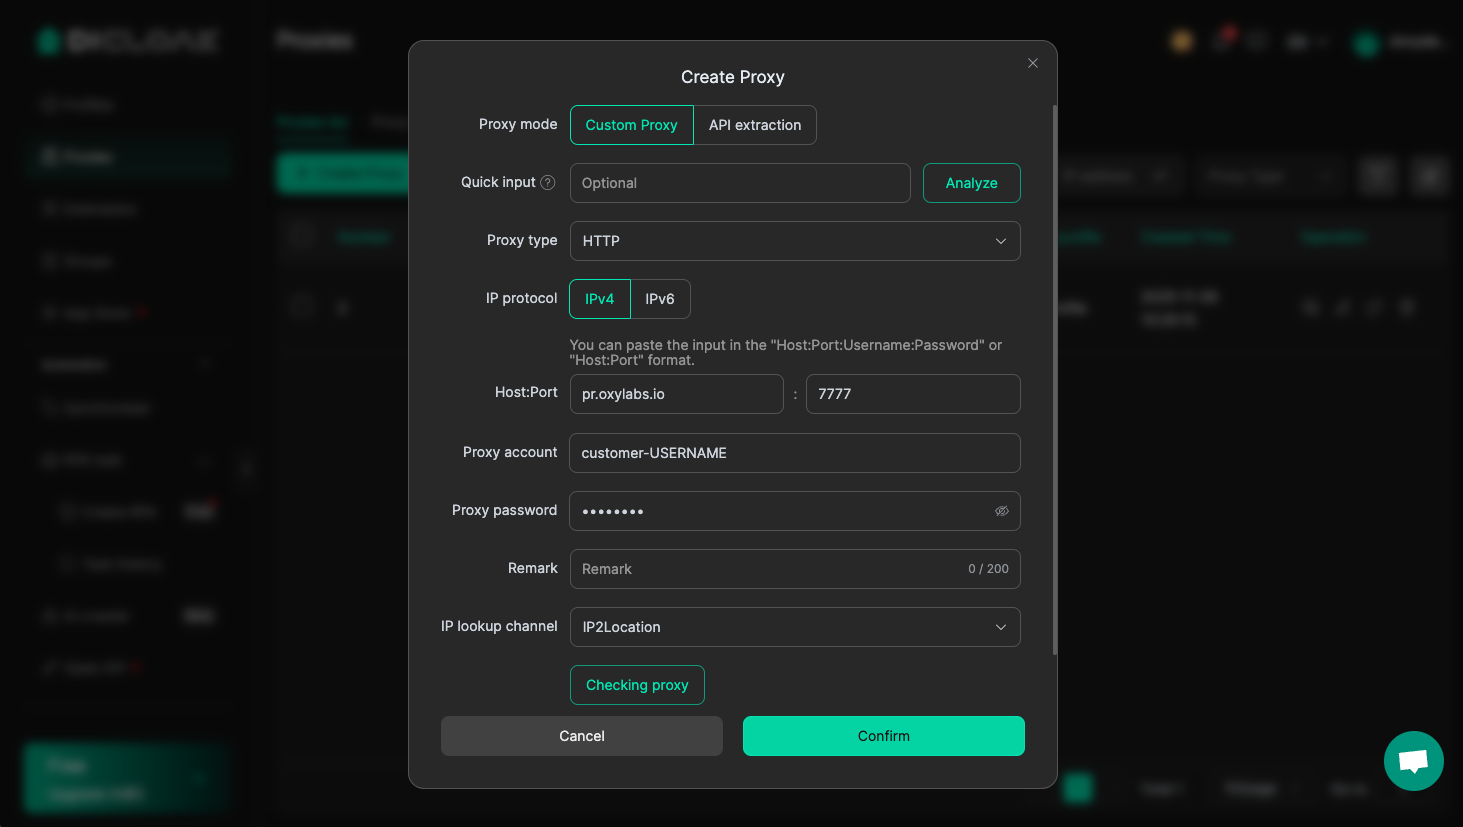
**Proxy type:** `HTTP`, `HTTPS`, or `SOCKS5`

**Host:** `pr.oxylabs.io`

**Port:** `7777`

**Proxy account:** `customer-USERNAME`

**Proxy password:** `PASSWORD`

{% hint style="warning" %}
**Note:** Don't forget to add `customer-` prefix to your username.
{% endhint %}

<figure><img src="/files/QoqVbFku3esvzJUd9ECl" alt=""><figcaption></figcaption></figure>

You may also use **additional parameters** with Residential and Mobile proxies to set the geo-location (country, state, city, and etc.) and control sessions. Check out the [Residential Proxies documentation](/products/proxies/residential-proxies.md) to learn more. The table below provides an overview of available parameters and their example values.

<table><thead><tr><th width="167">Proxy parameter</th><th width="412">Example</th><th>Protocols</th></tr></thead><tbody><tr><td><a href="/spaces/BQ7Zf9paoN3FTeGcyfY1/pages/UPg2AOzHh8eTwZf0ZfxE#country-specific-entry-nodes">Country entry node</a></td><td><p><strong>Host:</strong> <code>//us-pr.oxylabs.io</code></p><p><strong>Port:</strong> <code>10000</code></p></td><td><p>HTTP,</p><p>HTTPS</p></td></tr><tr><td><a href="/spaces/BQ7Zf9paoN3FTeGcyfY1/pages/UPg2AOzHh8eTwZf0ZfxE">Country</a></td><td><strong>User:</strong> <code>customer-username-cc-US</code></td><td><p>HTTP,</p><p>HTTPS,</p><p>SOCKS5</p></td></tr><tr><td><a href="/spaces/BQ7Zf9paoN3FTeGcyfY1/pages/e93RpcKghZnkSC6ATFPI">State</a></td><td><strong>User:</strong> <code>customer-username-st-US_texas</code></td><td><p>HTTP,</p><p>HTTPS,</p><p>SOCKS5</p></td></tr><tr><td><a href="/spaces/BQ7Zf9paoN3FTeGcyfY1/pages/SFkPGxvpqV8rBtKfCMo8">City</a></td><td><strong>User:</strong> <code>customer-username-city-paris</code></td><td><p>HTTP,</p><p>HTTPS,</p><p>SOCKS5</p></td></tr><tr><td><a href="/spaces/BQ7Zf9paoN3FTeGcyfY1/pages/GZqlA7kjGCjYeRz47eX0">Continent</a></td><td><strong>User:</strong> <code>customer-username-cn-NA</code></td><td><p>HTTP,</p><p>HTTPS,</p><p>SOCKS5</p></td></tr><tr><td><a href="/spaces/BQ7Zf9paoN3FTeGcyfY1/pages/ReB4Ej6De1X1uPh5QrRB">Postal code</a></td><td><strong>User:</strong> <code>customer-username-cc-US-postalcode-90210</code></td><td><p>HTTP, HTTPS,</p><p>SOCKS5</p></td></tr><tr><td><a href="/spaces/BQ7Zf9paoN3FTeGcyfY1/pages/ATRXHGvVOBqV6HM3m3j4">ASN targeting</a></td><td><strong>User:</strong> <code>customer-username-ASN-21928</code></td><td><p>HTTP,</p><p>HTTPS,</p><p>SOCKS5</p></td></tr><tr><td><a href="/spaces/BQ7Zf9paoN3FTeGcyfY1/pages/MARGpYxVNKNfIa0J3Khs">Session</a></td><td><strong>User:</strong> <code>customer-username-sessid-qwerty123-sesstime-30</code></td><td><p>HTTP,</p><p>HTTPS,</p><p>SOCKS5</p></td></tr><tr><td><a href="/spaces/BQ7Zf9paoN3FTeGcyfY1/pages/MARGpYxVNKNfIa0J3Khs#sticky-proxy-entry-nodes">Sticky session</a></td><td><p><strong>Host:</strong> <code>//us-pr.oxylabs.io</code></p><p><strong>Port:</strong> <code>10001</code></p></td><td>HTTP,<br>HTTPS</td></tr></tbody></table>

#### Datacenter Proxies

**Proxy type:** `HTTP`, `HTTPS`, or `SOCKS5`

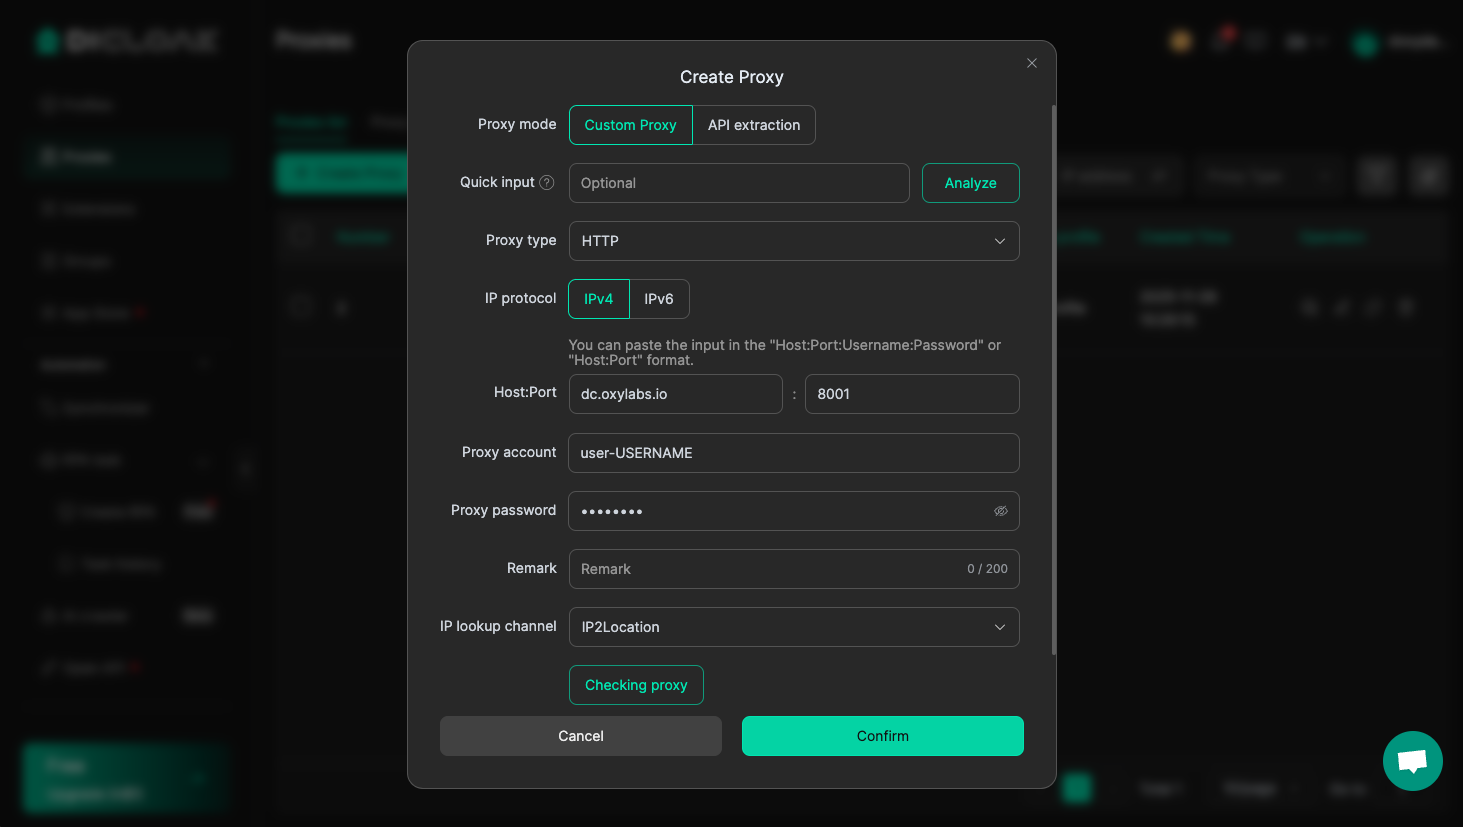
**Host:** `dc.oxylabs.io`

**Port:** `8001`

**Proxy account:** `user-USERNAME`

**Proxy password:** `PASSWORD`

{% hint style="warning" %}
**Note:** Don't forget to add `user-` prefix to your username.
{% endhint %}

<figure><img src="/files/0CJgwVVzKJGF1iL8gVJ3" alt=""><figcaption></figcaption></figure>

{% tabs %}
{% tab title="Pay-per-IP proxies" %}
The port is the sequential number assigned to an IP address from the [proxy list](/products/proxies/datacenter-proxies/proxy-list.md). Thus, port `8001` uses the first IP address from your list. You may also enable [proxy IP rotation](/products/proxies/datacenter-proxies/ip-control.md) by setting the port to `8000`.

Furthermore, you can specify the [geo-location](/products/proxies/datacenter-proxies/select-country.md), for example, the US, by setting the **Proxy username** to `user-USERNAME-country-US`.
{% endtab %}

{% tab title="Pay-per-traffic proxies" %}
The port `8001` picks a random IP address but stays consistent during a session. Alternatively, you can [rotate proxy IPs](/products/proxies/datacenter-proxies/ip-control.md) with each request by using port `8000`.

If you want to use a specific [geo-location](/products/proxies/datacenter-proxies/select-country.md), for example, the US, set the **Proxy username** to `user-USERNAME-country-US`.
{% endtab %}
{% endtabs %}

#### Dedicated Datacenter Proxies (Enterprise)

**Proxy type:** `HTTP`, `HTTPS`, or `SOCKS5`

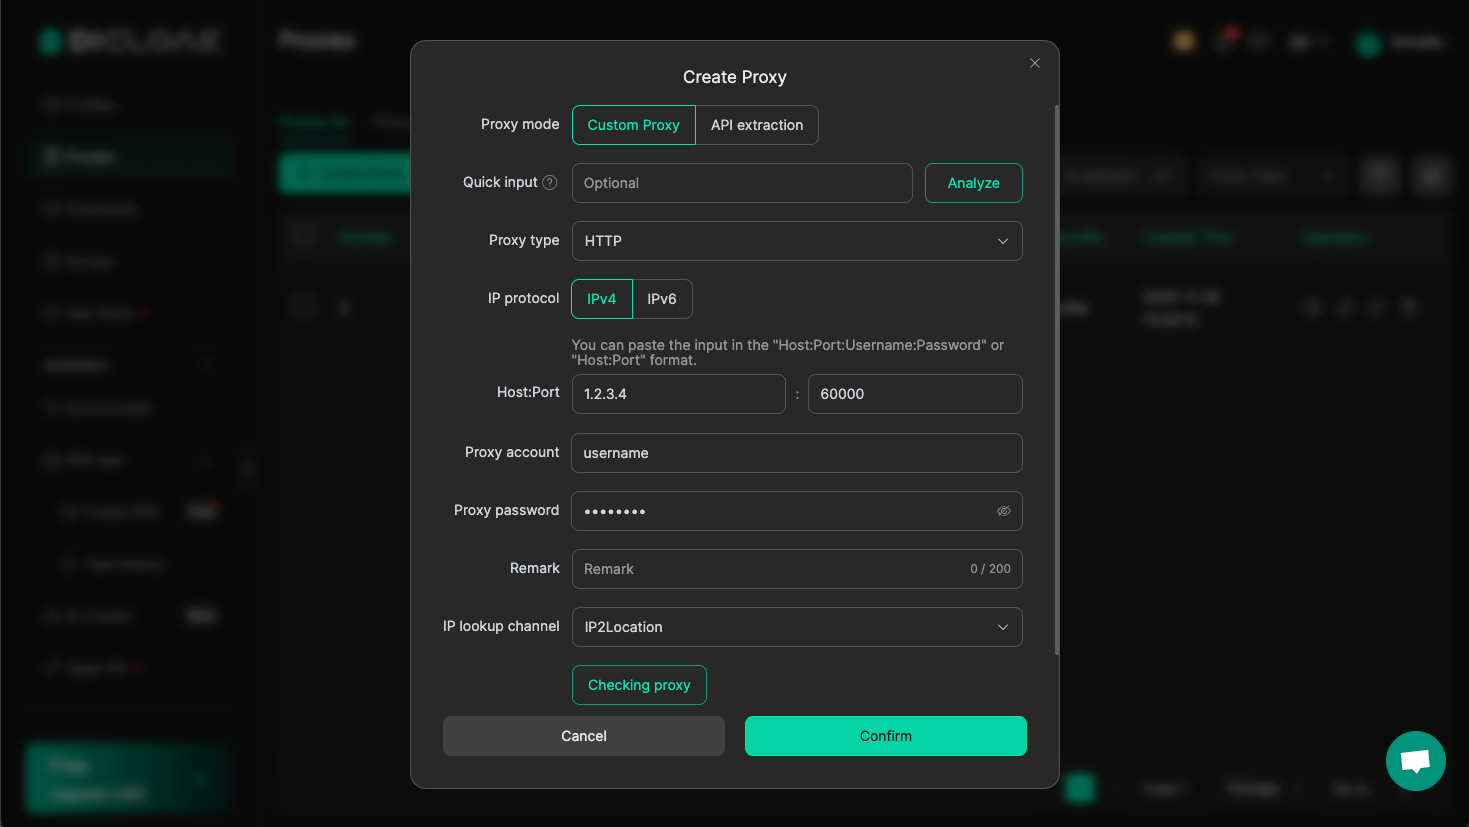
**Host:** `1.2.3.4` (IP address from your [proxy list](/products/proxies/dedicated-datacenter-proxies/enterprise/proxy-lists.md))

**Port:** `60000` (HTTP/HTTPS) or `1180` (SOCKS5)

**Proxy account:** `USERNAME`

**Proxy password:** `PASSWORD`

<figure><img src="/files/5YyZfLKJe0PwoD59EZKU" alt=""><figcaption></figcaption></figure>

For Enterprise Dedicated Datacenter Proxies, you’ll have to choose an IP address from the acquired [proxy list](/products/proxies/dedicated-datacenter-proxies/enterprise/proxy-lists.md).

#### Dedicated Datacenter Proxies (Self-service)

**Proxy type:** `HTTP`, `HTTPS`, or `SOCKS5`

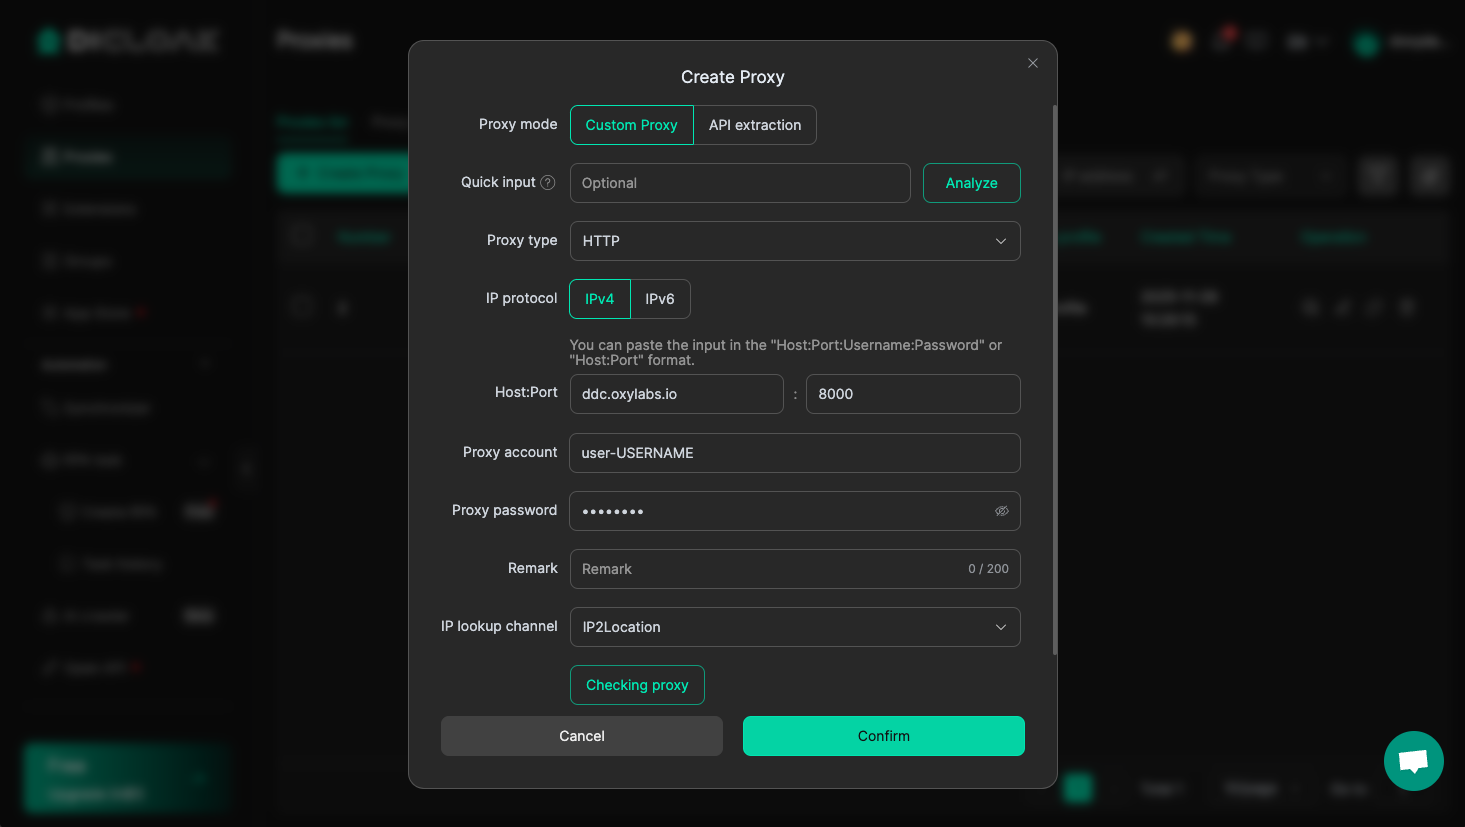
**Host:** `ddc.oxylabs.io`

**Port:** `8001`

**Proxy account:** `user-USERNAME`

**Proxy password:** `PASSWORD`

{% hint style="warning" %}
**Note:** Don't forget to add `user-` prefix to your username.
{% endhint %}

<figure><img src="/files/rQ3aTe7NxciD6jUH3Vbq" alt=""><figcaption></figcaption></figure>

For Self-Service Dedicated Datacenter Proxies, the port indicates the sequential number of an IP address from the acquired [proxy list](/products/proxies/dedicated-datacenter-proxies/self-service/proxy-list.md). If you want to get a different IP with each request, change the Port to `8000` to enable [proxy rotation](/products/proxies/dedicated-datacenter-proxies/self-service/proxy-rotation.md).

#### ISP Proxies

**Proxy type:** `HTTP`, `HTTPS`, or `SOCKS5`

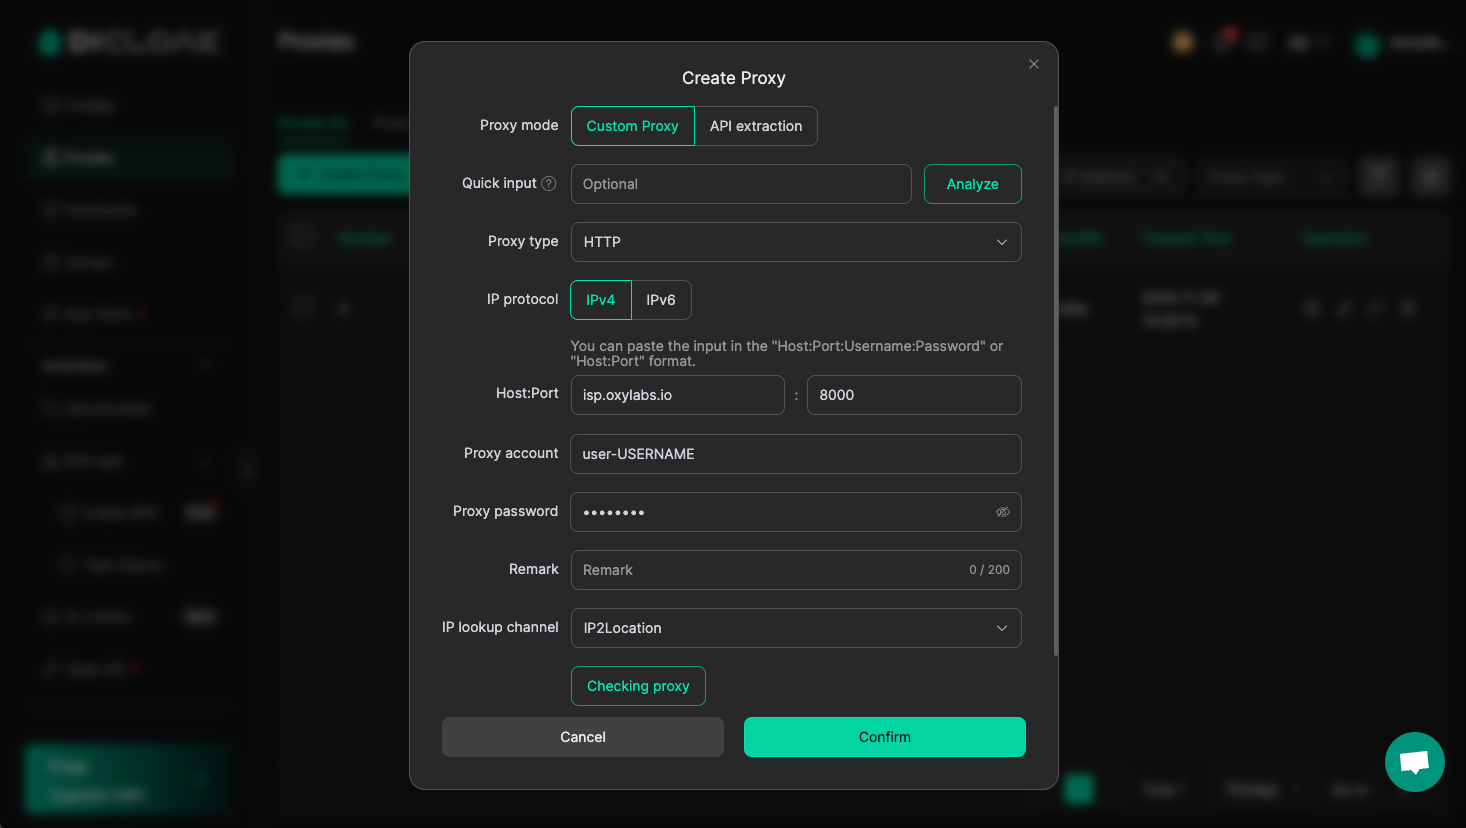
**Host:** `isp.oxylabs.io`

**Port:** `8001`

**Proxy account:** `user-USERNAME`

**Proxy password:** `PASSWORD`

{% hint style="warning" %}
**Note:** Don't forget to add `user-` prefix to your username.
{% endhint %}

<figure><img src="/files/j67rktGkn7rHmWf6bXpK" alt=""><figcaption></figcaption></figure>

With ISP Proxies, the port is assigned to a specific IP address and its location. Hence, port `8001` will always pick the first IP from your [proxy list](/products/proxies/isp-proxies/proxy-list.md).&#x20;

If you want to get a different IP with each request, change the Port to `8000` to enable [proxy rotation](/products/proxies/isp-proxies/proxy-rotation.md).
{% endstep %}

{% step %}

### Testing

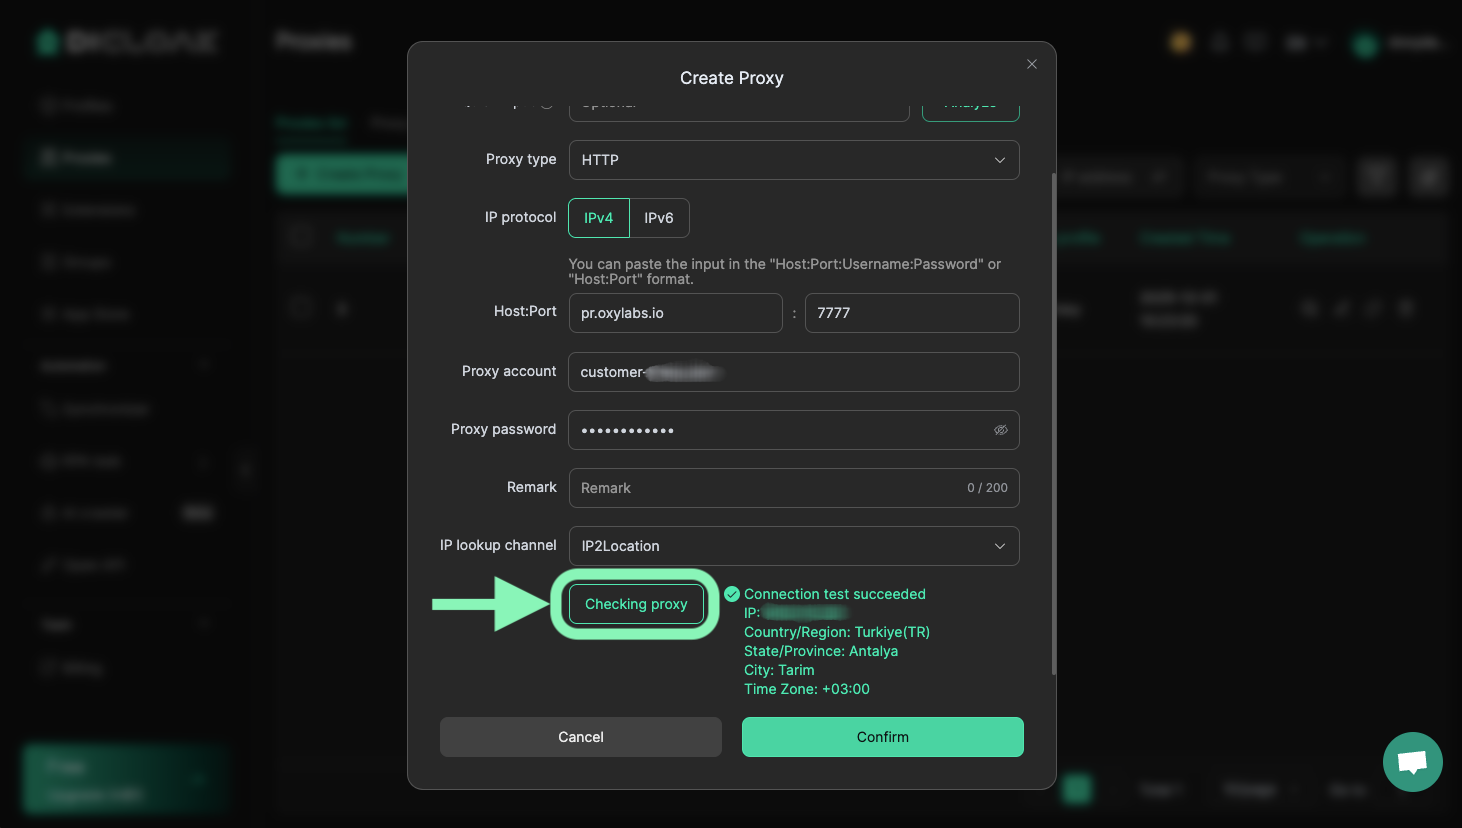
To check proxy functionality, select your IP lookup channel (IP-API or IP2Location), then click **Checking proxy**.

<figure><img src="/files/cZxMmPigRZI4K228cZaH" alt=""><figcaption></figcaption></figure>

If the test is successful, you’ll see an active proxy IP address.&#x20;

Finally, **Confirm** your new proxy. You can add as many proxies as you like and pair or unpair them with different profiles.
{% endstep %}

{% step %}

### Create a browser profile

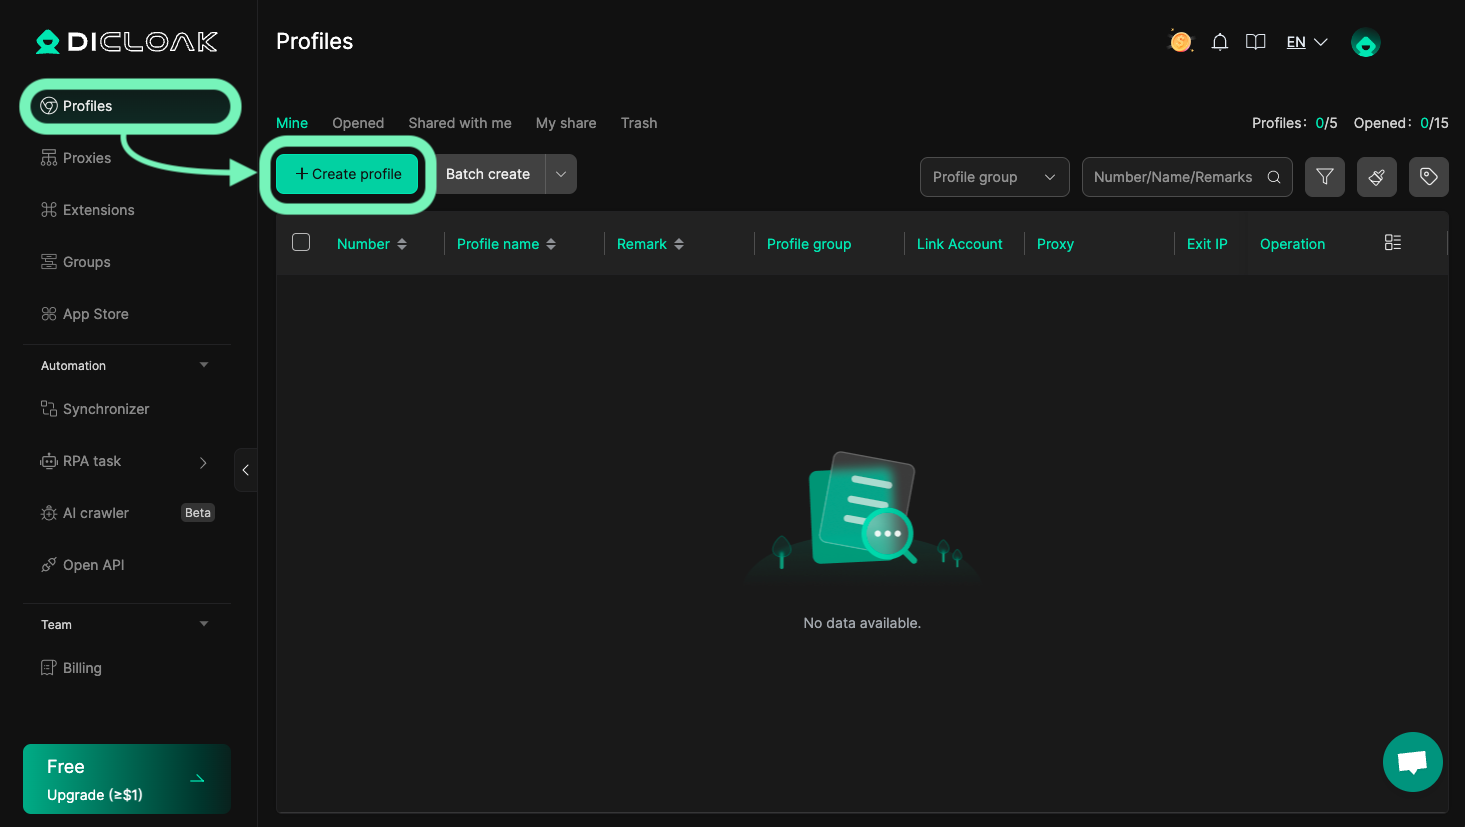
Go to the **Profiles** tab and select **Create profile**.

<figure><img src="/files/9JxYMwo2yznBvDY5Amqn" alt=""><figcaption></figcaption></figure>

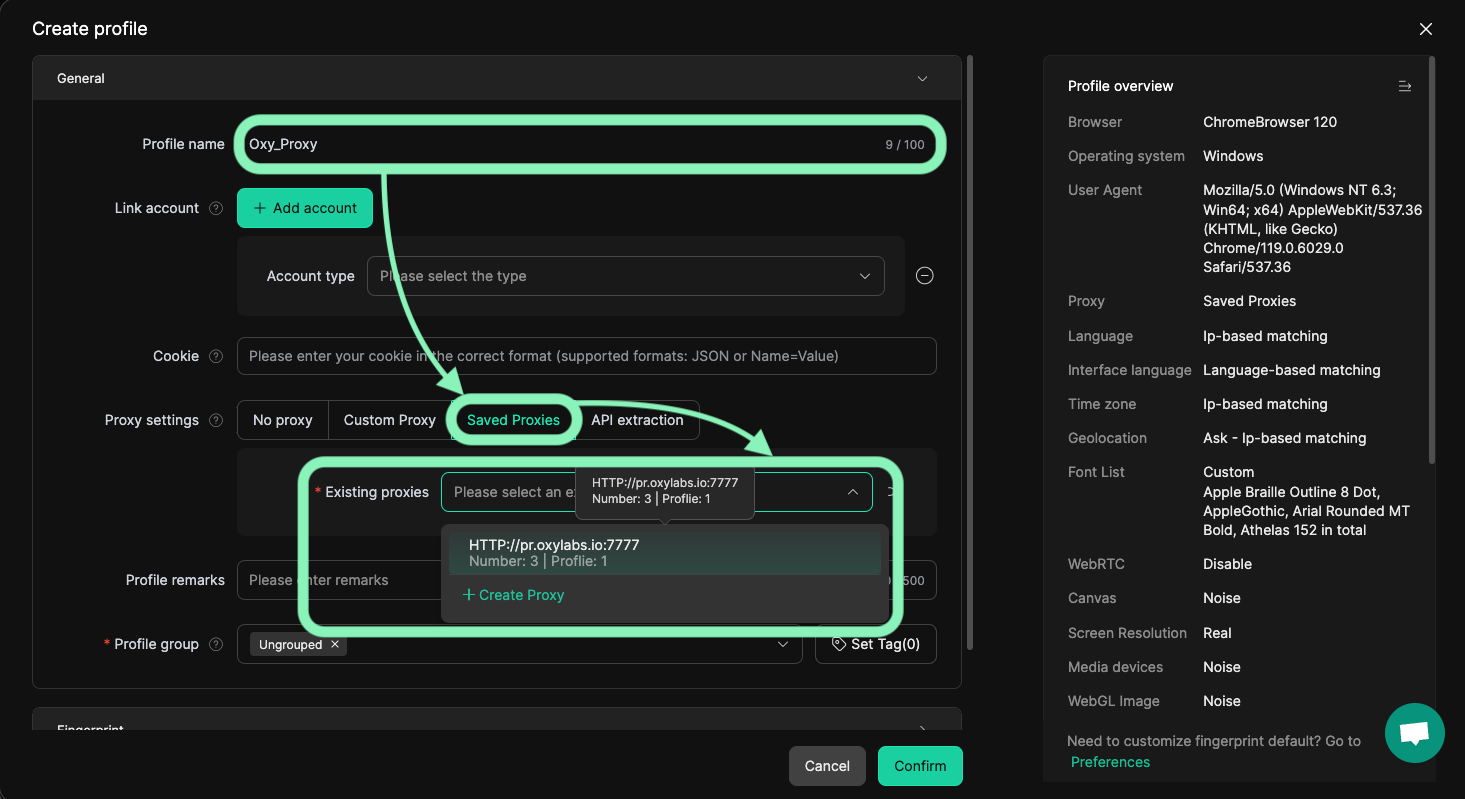
There, enter your **Profile name**, and **select the proxy you just added** from **Saved Proxies**.

<figure><img src="/files/6HqChgeK0N95RSflMqML" alt=""><figcaption></figcaption></figure>

If required, adjust your profile with a custom browser fingerprint, including user agents, cookies, and hardware or software parameters.

To finish the profile, click **Confirm** at the bottom of the screen.
{% endstep %}

{% step %}

### Run new profile

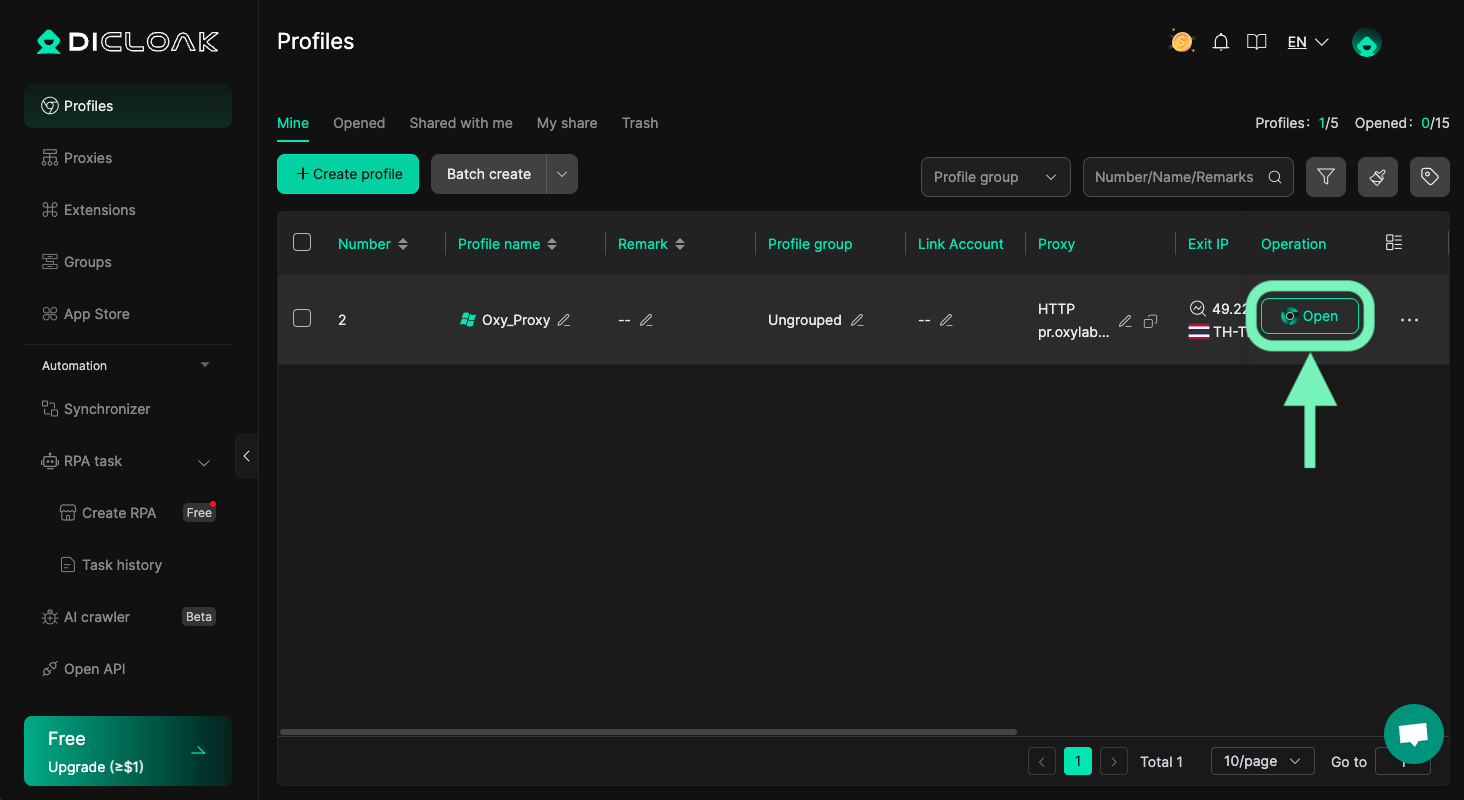
Press **Open** in the Operation column of the profile to launch a private browser and carry on with your tasks.

<figure><img src="/files/bR5iYoiM6yWHq6DNWFdz" alt=""><figcaption></figcaption></figure>
{% endstep %}
{% endstepper %}

And that’s it. You’ve successfully integrated your Oxylabs proxies with DICloak browser. You can find the original DICloak integration blog post [**here**](https://oxylabs.io/resources/integrations/dicloak).

If you have any questions or concerns regarding our solutions or the process above, please contact us via the live chat on our [homepage](https://oxylabs.io/) or email us at <hello@oxylabs.io>.


---

# Agent Instructions
This documentation is published with GitBook. GitBook is the documentation platform designed so that both humans and AI agents can read, navigate, and reason over technical content effectively. Learn more at gitbook.com.

## Querying This Documentation
If you need additional information that is not directly available in this page, you can query the documentation dynamically by asking a question.

Perform an HTTP GET request on the current page URL with the `ask` query parameter, and the optional `goal` query parameter:

```
GET https://developers.oxylabs.io/integrations/proxy-integrations/dicloak.md?ask=<question>&goal=<endgoal>
```

`ask` is the immediate question: it should be specific, self-contained, and written in natural language.
`goal` is optional and describes the broader end goal you are ultimately trying to accomplish on behalf of the user. GitBook uses it to tailor the answer towards what is most useful for that goal.

The response will contain a direct answer to the question and relevant excerpts and sources from the documentation.

Use this mechanism when the answer is not explicitly present in the current page, you need clarification or additional context, or you want to retrieve related documentation sections.