> For the complete documentation index, see [llms.txt](https://developers.oxylabs.io/llms.txt). Markdown versions of documentation pages are available by appending `.md` to page URLs; this page is available as [Markdown](https://developers.oxylabs.io/integrations/es/proxy-integrations/datacenter-proxies-guides/switchyomega.md).
# SwitchyOmega
SwitchyOmega es un gestor de proxy potente y fiable que funciona con muchos navegadores populares.
{% hint style="warning" %}
**Aviso legal:** Switchy Omega ya no es compatible con Google Chrome ni con navegadores basados en Chromium desde la versión de Manifest V3. La siguiente guía cubre solo la extensión del navegador disponible para Mozilla Firefox.
{% endhint %}
Sigue estos pasos para integrar Oxylabs [**Datacenter Proxies**](https://oxylabs.io/products/datacenter-proxies):
**Paso 1.** Obtén el plugin e instálalo. Para el complemento de Firefox, haz clic [**aquí**](https://addons.mozilla.org/en-US/firefox/addon/switchyomega/).
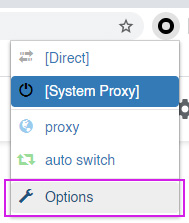
**Paso 2.** Abre SwitchyOmega **Opciones**.
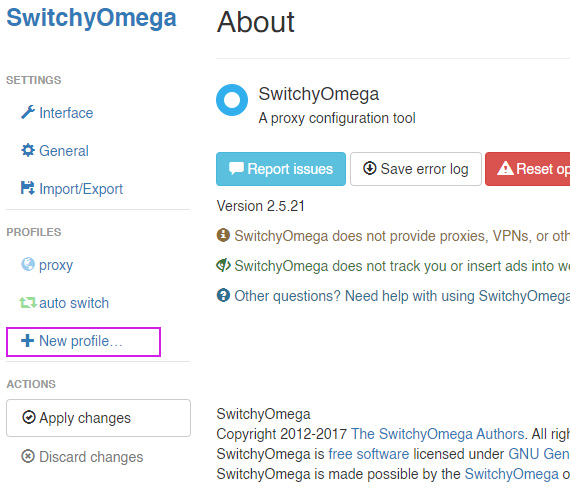
**Paso 3.** Haz clic en **+Nuevo perfil.**
**Paso 4.** Asigna un nombre a este nuevo perfil, elige **Perfil de proxy** tipo, y haz clic **Crear**.
**Paso 5.** Complete los detalles:
**Tipo de conexión:** `HTTP`, `HTTPS`, o `SOCKS5`
**Servidor:** `dc.oxylabs.io`
**Puerto:** `8001`
{% hint style="warning" %}
Para la suscripción **Pay-per-IP** el puerto es el número secuencial asignado a una dirección IP de la lista dada. Por lo tanto, el puerto `8001` usa la primera dirección IP de tu lista.
Para la suscripción **Pay-per-traffic** suscripción, el puerto `8001` elige una dirección IP aleatoria, pero se mantiene constante durante una sesión.
{% endhint %}
{% hint style="info" %}
También puedes especificar la geolocalización, por ejemplo, EE. UU., dentro de la cadena de autenticación del usuario: `user-USERNAME-country-US:PASSWORD`. Consulta nuestra [documentación](https://developers.oxylabs.io/proxies/datacenter-proxies/select-country) para más detalles.
{% endhint %}
**Paso 6.** Haz clic en el **candado** icono a la derecha. Completa los detalles para **Autenticación de proxy**:
**usuario del proxy** **nombre de usuario:** `user-nombredeusuario`
**contraseña del usuario del proxy:** `contraseña`
{% hint style="info" %}
Asegúrate de haber añadido la `user-` parte antes de tu nombre de usuario.
{% endhint %}
Haz clic en **Guarda los cambios.**
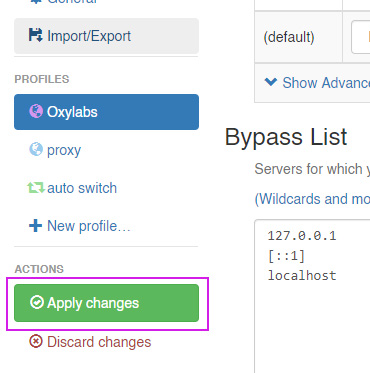
**Paso 7.** Haz clic en **Aplica los cambios.**
**Paso 8**. Haz clic en el icono de SwitchyOmega y elige tu proxy recién configurado.
¡Eso es todo! Ahora estás listo para usar SwitchyOmega con Datacenter Proxies.
Encuentra la publicación original del blog sobre la integración de SwitchyOmega [aquí](https://oxylabs.io/resources/integrations/proxy-switchyomega).
---
# Agent Instructions
This documentation is published with GitBook. GitBook is the documentation platform designed so that both humans and AI agents can read, navigate, and reason over technical content effectively. Learn more at gitbook.com.
## Querying This Documentation
If you need additional information that is not directly available in this page, you can query the documentation dynamically by asking a question.
Perform an HTTP GET request on the current page URL with the `ask` query parameter:
```
GET https://developers.oxylabs.io/integrations/es/proxy-integrations/datacenter-proxies-guides/switchyomega.md?ask=
```
The question should be specific, self-contained, and written in natural language.
The response will contain a direct answer to the question and relevant excerpts and sources from the documentation.
Use this mechanism when the answer is not explicitly present in the current page, you need clarification or additional context, or you want to retrieve related documentation sections.