> For the complete documentation index, see [llms.txt](https://developers.oxylabs.io/llms.txt). Markdown versions of documentation pages are available by appending `.md` to page URLs; this page is available as [Markdown](https://developers.oxylabs.io/integrations/cn/proxy-integrations/octo-browser.md).

# Octo Browser

Octo Browser 与 Oxylabs 代理集成：按照此分步指南配置代理设置并私密浏览。

[**Octo Browser**](https://octobrowser.net/) 是一款防检测网页浏览器，可防止在线追踪并保护用户隐私。

按照以下说明集成以下 Oxylabs 代理：

* [**住宅代理和移动代理**](#residential-and-mobile-proxies)
* [**数据中心代理**](#datacenter-proxies)
* [**独享数据中心代理（企业版）**](#dedicated-datacenter-proxies-enterprise)
* [**独享数据中心代理（自助服务版）**](#dedicated-datacenter-proxies-self-service)
* [**ISP代理**](#isp-proxies)
* [**独享ISP代理**](#dedicated-isp-proxies)

{% stepper %}
{% step %}

### 设置 Octo Browser

从以下位置下载 Octo Browser： [**官方网站**](https://octobrowser.net/download/)，启动应用并登录。
{% endstep %}

{% step %}

### 添加新代理

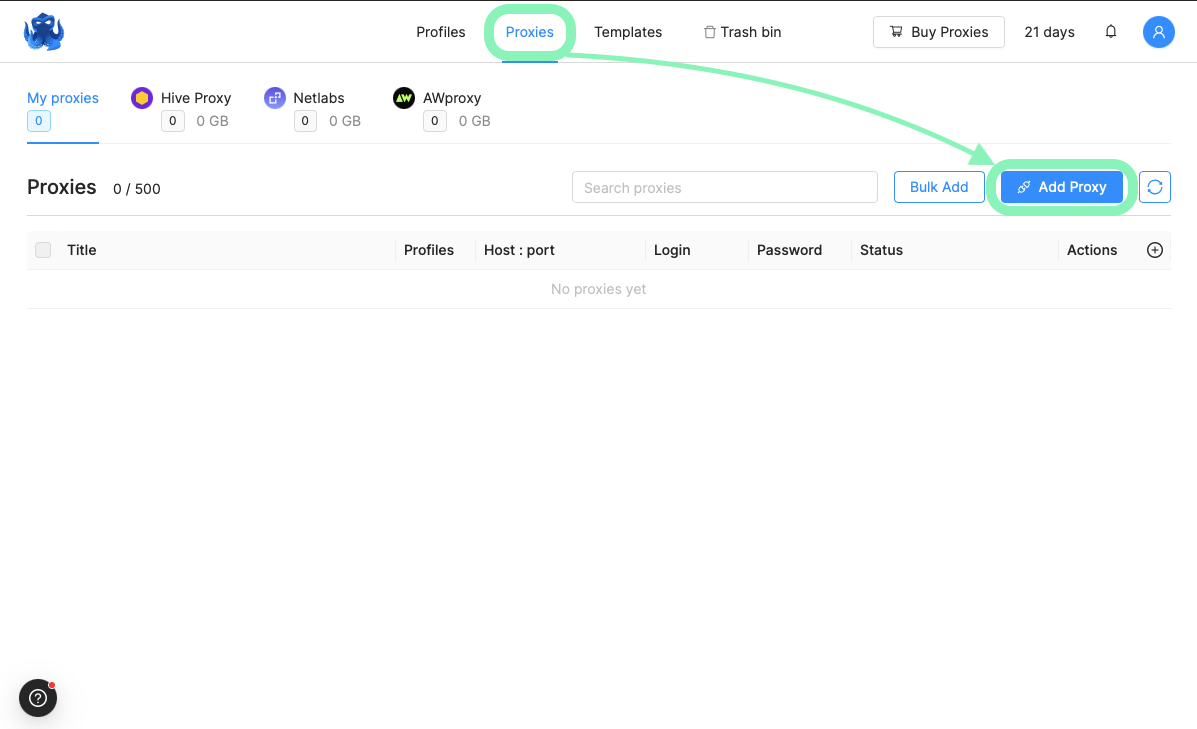
选择 **代理** 选项卡，然后点击 **添加代理**.

<figure><img src="https://1216392379-files.gitbook.io/~/files/v0/b/gitbook-x-prod.appspot.com/o/spaces%2FU4lV7kLC2Df45W0aLQlX%2Fuploads%2Fgit-blob-56343c944e21c772ce41a5cc17bf072dbbc719ab%2Focto-browser-proxies-tab.png?alt=media" alt=""><figcaption></figcaption></figure>
{% endstep %}

{% step %}

### 输入代理详情

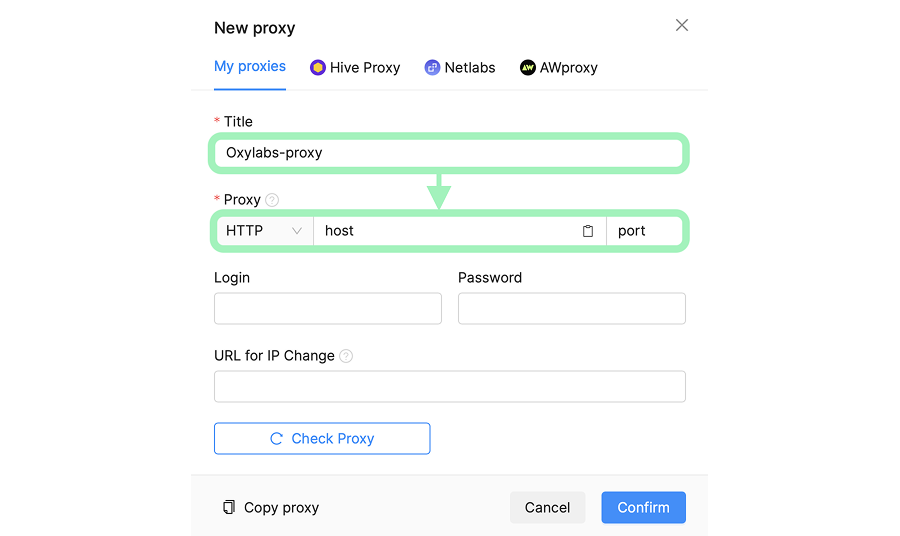
输入代理标题并选择代理协议（HTTP、HTTPS 或 [SOCKS5](https://oxylabs.io/products/socks5-proxies))

<figure><img src="https://1216392379-files.gitbook.io/~/files/v0/b/gitbook-x-prod.appspot.com/o/spaces%2FU4lV7kLC2Df45W0aLQlX%2Fuploads%2Fgit-blob-5cd50d34208458bc651347e1d551280dca25d74b%2Focto-proxy-details.png?alt=media" alt=""><figcaption></figcaption></figure>

然后输入你的代理详情和 Oxylabs 代理用户凭据（在以下位置创建： [Oxylabs 控制面板](https://dashboard.oxylabs.io/en/)中创建）以匹配你选择的代理类型：

* [住宅代理和移动代理](#residential-and-mobile-proxies)
* [数据中心代理](#datacenter-proxies)
* [独享数据中心代理（企业版）](#dedicated-datacenter-proxies-enterprise)
* [独享数据中心代理（自助服务版）](#dedicated-datacenter-proxies-self-service)
* [ISP代理](#isp-proxies)
* [独享ISP代理](#dedicated-isp-proxies)

#### 住宅代理和移动代理

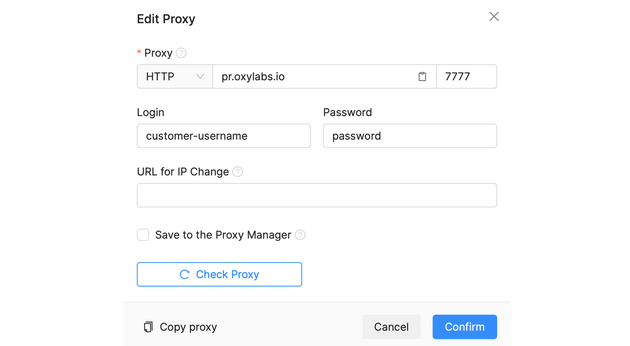
**主机：** `pr.oxylabs.io`

**端口：** `7777`

**登录：** `customer-username`

**密码：** `password`

{% hint style="warning" %}
**注意：** 别忘了添加 `customer-` 用户名前缀。
{% endhint %}

<figure><img src="https://1216392379-files.gitbook.io/~/files/v0/b/gitbook-x-prod.appspot.com/o/spaces%2FU4lV7kLC2Df45W0aLQlX%2Fuploads%2Fgit-blob-0ec9ae44608e6bde13d02850ee056a81dc8f8a74%2Focto-resi.png?alt=media" alt=""><figcaption></figcaption></figure>

你还可以使用 **附加参数** 配合住宅代理来设置地理位置（国家、州、城市等）并控制会话。查看 [住宅代理文档](https://developers.oxylabs.io/proxies/residential-proxies) 了解更多。下表概述了可用参数及其示例值。

<table><thead><tr><th width="167">代理参数</th><th width="412">示例</th><th>协议</th></tr></thead><tbody><tr><td><a href="/products/cn/proxies/residential-proxies/location-settings/select-country.md#country-specific-entry-nodes">国家入口节点</a></td><td><p><strong>主机：</strong> <code>//us-pr.oxylabs.io</code></p><p><strong>端口：</strong> <code>10000</code></p></td><td><p>HTTP、</p><p>HTTPS</p></td></tr><tr><td><a href="/products/cn/proxies/residential-proxies/location-settings/select-country.md">国家</a></td><td><strong>用户：</strong> <code>customer-username-cc-US</code></td><td><p>HTTP、</p><p>HTTPS，</p><p>SOCKS5</p></td></tr><tr><td><a href="/products/cn/proxies/residential-proxies/location-settings/select-state.md">州</a></td><td><strong>用户：</strong> <code>customer-username-st-US_texas</code></td><td><p>HTTP、</p><p>HTTPS，</p><p>SOCKS5</p></td></tr><tr><td><a href="/products/cn/proxies/residential-proxies/location-settings/select-city.md">城市</a></td><td><strong>用户：</strong> <code>customer-username-city-paris</code></td><td><p>HTTP、</p><p>HTTPS，</p><p>SOCKS5</p></td></tr><tr><td><a href="/products/cn/proxies/residential-proxies/location-settings/continent.md">洲</a></td><td><strong>用户：</strong> <code>customer-username-cn-NA</code></td><td><p>HTTP、</p><p>HTTPS，</p><p>SOCKS5</p></td></tr><tr><td><a href="/products/cn/proxies/residential-proxies/location-settings/zip-postal-code.md">ZIP/邮政编码</a></td><td><strong>用户：</strong> <code>customer-username-cc-US-postalcode-90210</code></td><td><p>HTTP、HTTPS、</p><p>SOCKS5</p></td></tr><tr><td><a href="/products/cn/proxies/residential-proxies/location-settings/asn-targeting.md">ASN 定向</a></td><td><strong>用户：</strong> <code>customer-username-ASN-21928</code></td><td><p>HTTP、</p><p>HTTPS，</p><p>SOCKS5</p></td></tr><tr><td><a href="/products/cn/proxies/residential-proxies/session-control.md">会话</a></td><td><strong>用户：</strong> <code>customer-username-sessid-qwerty123-sesstime-30</code></td><td><p>HTTP、</p><p>HTTPS，</p><p>SOCKS5</p></td></tr><tr><td><a href="/products/cn/proxies/residential-proxies/session-control.md#session-time">会话时间</a></td><td><p><strong>主机：</strong> <code>//us-pr.oxylabs.io</code></p><p><strong>端口：</strong> <code>10001</code></p></td><td>HTTP、<br>HTTPS</td></tr></tbody></table>

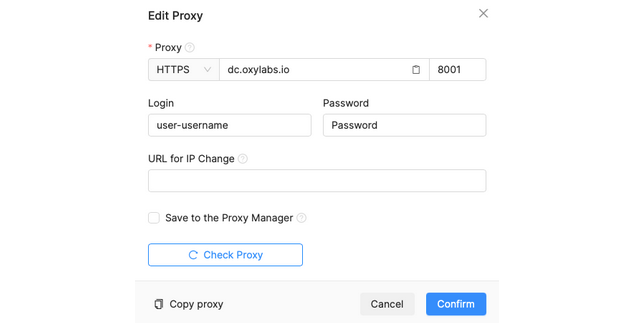
#### 数据中心代理

**主机：** `dc.oxylabs.io`

**端口：** `8001`

**登录：** `user-username`

**密码：** `password`

{% hint style="warning" %}
**注意：** 别忘了添加 `user-` 用户名前缀。
{% endhint %}

<figure><img src="https://1216392379-files.gitbook.io/~/files/v0/b/gitbook-x-prod.appspot.com/o/spaces%2FU4lV7kLC2Df45W0aLQlX%2Fuploads%2Fgit-blob-f9b42134a6fcb62ceb011b95bd27d9e94e521801%2Focto-dc.png?alt=media" alt=""><figcaption></figcaption></figure>

{% tabs %}
{% tab title="按 IP 计费订阅" %}
端口是从代理列表中分配给 IP 地址的顺序编号。因此，端口 `8001` 使用列表中的第一个 IP 地址。您也可以通过将端口设置为以下值来启用代理 IP 轮换： `8000`.

此外，您可以通过将代理用户名设置为以下值来指定地理位置，例如美国： `user-USERNAME-country-US`.
{% endtab %}

{% tab title="按流量计费订阅" %}
端口 `8001` 会随机选择一个 IP 地址，但在会话期间保持一致。或者，您可以使用端口按每个请求轮换代理 IP： `8000`.

还可以通过将代理用户名设置为以下值来指定地理位置，例如美国： `user-USERNAME-country-US`.
{% endtab %}
{% endtabs %}

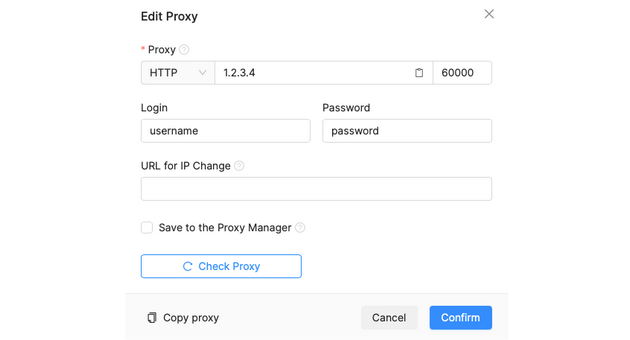
#### 独享数据中心代理（企业版）

**主机：** `1.2.3.4` （来自你的 [代理列表](/products/cn/proxies/dedicated-datacenter-proxies/enterprise/proxy-lists.md))

**端口：** `60000` （HTTP）或 `1180` (SOCKS5)

**登录：** `username`

**密码：** `password`

<figure><img src="https://1216392379-files.gitbook.io/~/files/v0/b/gitbook-x-prod.appspot.com/o/spaces%2FU4lV7kLC2Df45W0aLQlX%2Fuploads%2Fgit-blob-577df2550d5fd21ddc767b1f3004f32b7046533d%2Focto-ddc-enterprise.png?alt=media" alt=""><figcaption></figcaption></figure>

对于 Enterprise 独享数据中心代理，你需要从 [已获取的列表](/products/cn/proxies/dedicated-datacenter-proxies/enterprise/proxy-lists.md).

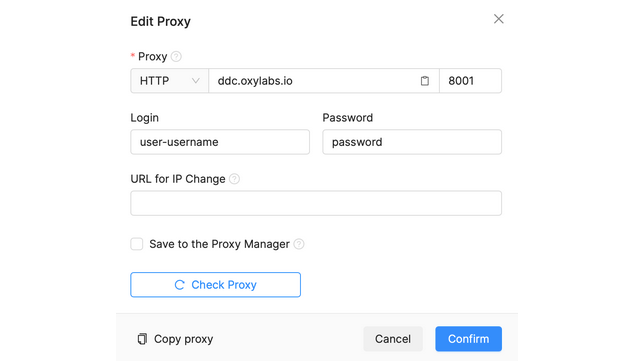
#### 独享数据中心代理（自助服务版）

**主机：** `ddc.oxylabs.io`

**端口：** `8001`

**登录：** `user-username`

**密码：** `password`

{% hint style="warning" %}
别忘了添加 `user-` 在用户名中添加前缀
{% endhint %}

<figure><img src="https://1216392379-files.gitbook.io/~/files/v0/b/gitbook-x-prod.appspot.com/o/spaces%2FU4lV7kLC2Df45W0aLQlX%2Fuploads%2Fgit-blob-e9d0b2cf1ad3d417ceeacdf1885dffa47c43169b%2Focto-ss-ddc.png?alt=media" alt=""><figcaption></figcaption></figure>

对于自助服务独享数据中心代理，端口表示来自已获取 [代理列表](/products/cn/proxies/dedicated-datacenter-proxies/self-service/proxy-list.md).

如果你想让每个请求都获得不同的 IP，请更改 **端口** 设置为 `8000` 以启用 [代理轮换](/products/cn/proxies/dedicated-datacenter-proxies/self-service/proxy-rotation.md).

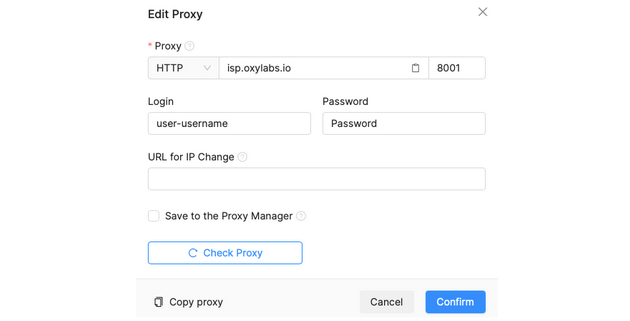
#### ISP代理

**主机：** `isp.oxylabs.io`

**端口：** `8001`

**登录：** `user-username`

**密码：** `password`

{% hint style="warning" %}
**注意：** 别忘了添加 `user-` 用户名前缀。
{% endhint %}

<figure><img src="https://1216392379-files.gitbook.io/~/files/v0/b/gitbook-x-prod.appspot.com/o/spaces%2FU4lV7kLC2Df45W0aLQlX%2Fuploads%2Fgit-blob-59ea9dfb8f75acf1107213e78907b5331ac9a59b%2Focto-isp.png?alt=media" alt=""><figcaption></figcaption></figure>

对于 ISP 代理，端口会分配给一个特定的 IP 地址及其位置。因此，端口 `8001` 将始终选择你 [代理列表](/products/cn/proxies/isp-proxies/proxy-list.md).

中的第一个 IP。如果你希望每个请求都获得不同的 IP，请将端口改为 `8000` 以启用 [代理轮换](/products/cn/proxies/isp-proxies/proxy-rotation.md).

#### 独享ISP代理

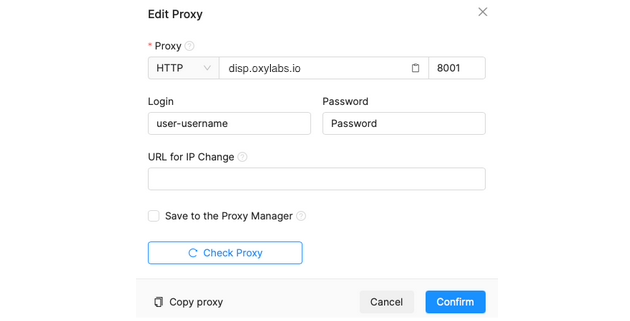
**主机：** `disp.oxylabs.io`

**端口：** `8001`

**登录：** `user-USERNAME`

**密码：** `PASSWORD`

{% hint style="warning" %}
**注意：** 别忘了添加 `user-` 用户名前缀。
{% endhint %}

<figure><img src="https://1216392379-files.gitbook.io/~/files/v0/b/gitbook-x-prod.appspot.com/o/spaces%2FU4lV7kLC2Df45W0aLQlX%2Fuploads%2Fgit-blob-5b320952b773ed588c2aaf5ba1fc9a5b3f9648d7%2Foctobrowser-1.png?alt=media" alt=""><figcaption></figcaption></figure>

您需要选择分配给所购买的 IP 地址的端口 [代理列表](/products/cn/proxies/dedicated-isp-proxies/self-service/proxy-list.md)，你可以在 Oxylabs 控制面板中找到。 `8001` 端口将为所有请求选取列表中的第一个 IP 地址。使用端口 `8000` 可自动进行 [代理 IP 轮换](/products/cn/proxies/dedicated-isp-proxies/self-service/proxy-rotation.md).
{% endstep %}

{% step %}

### 测试

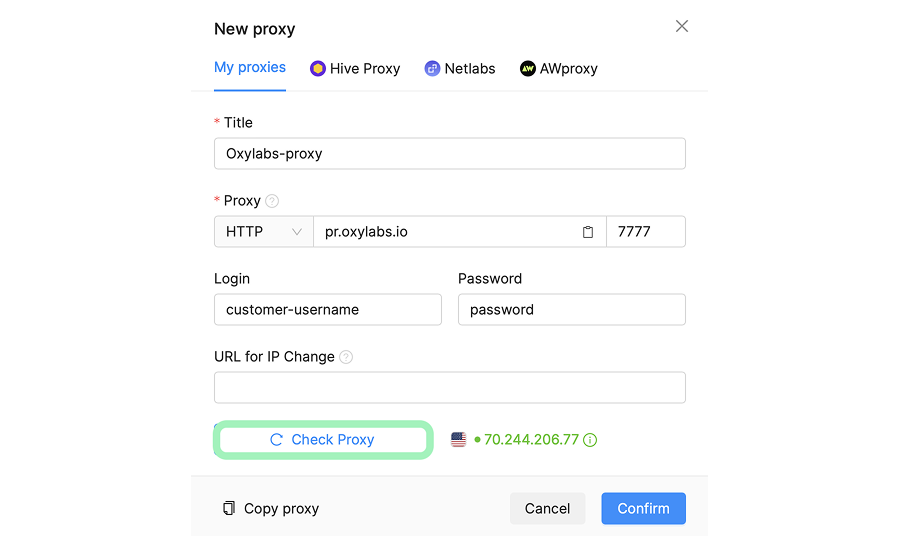
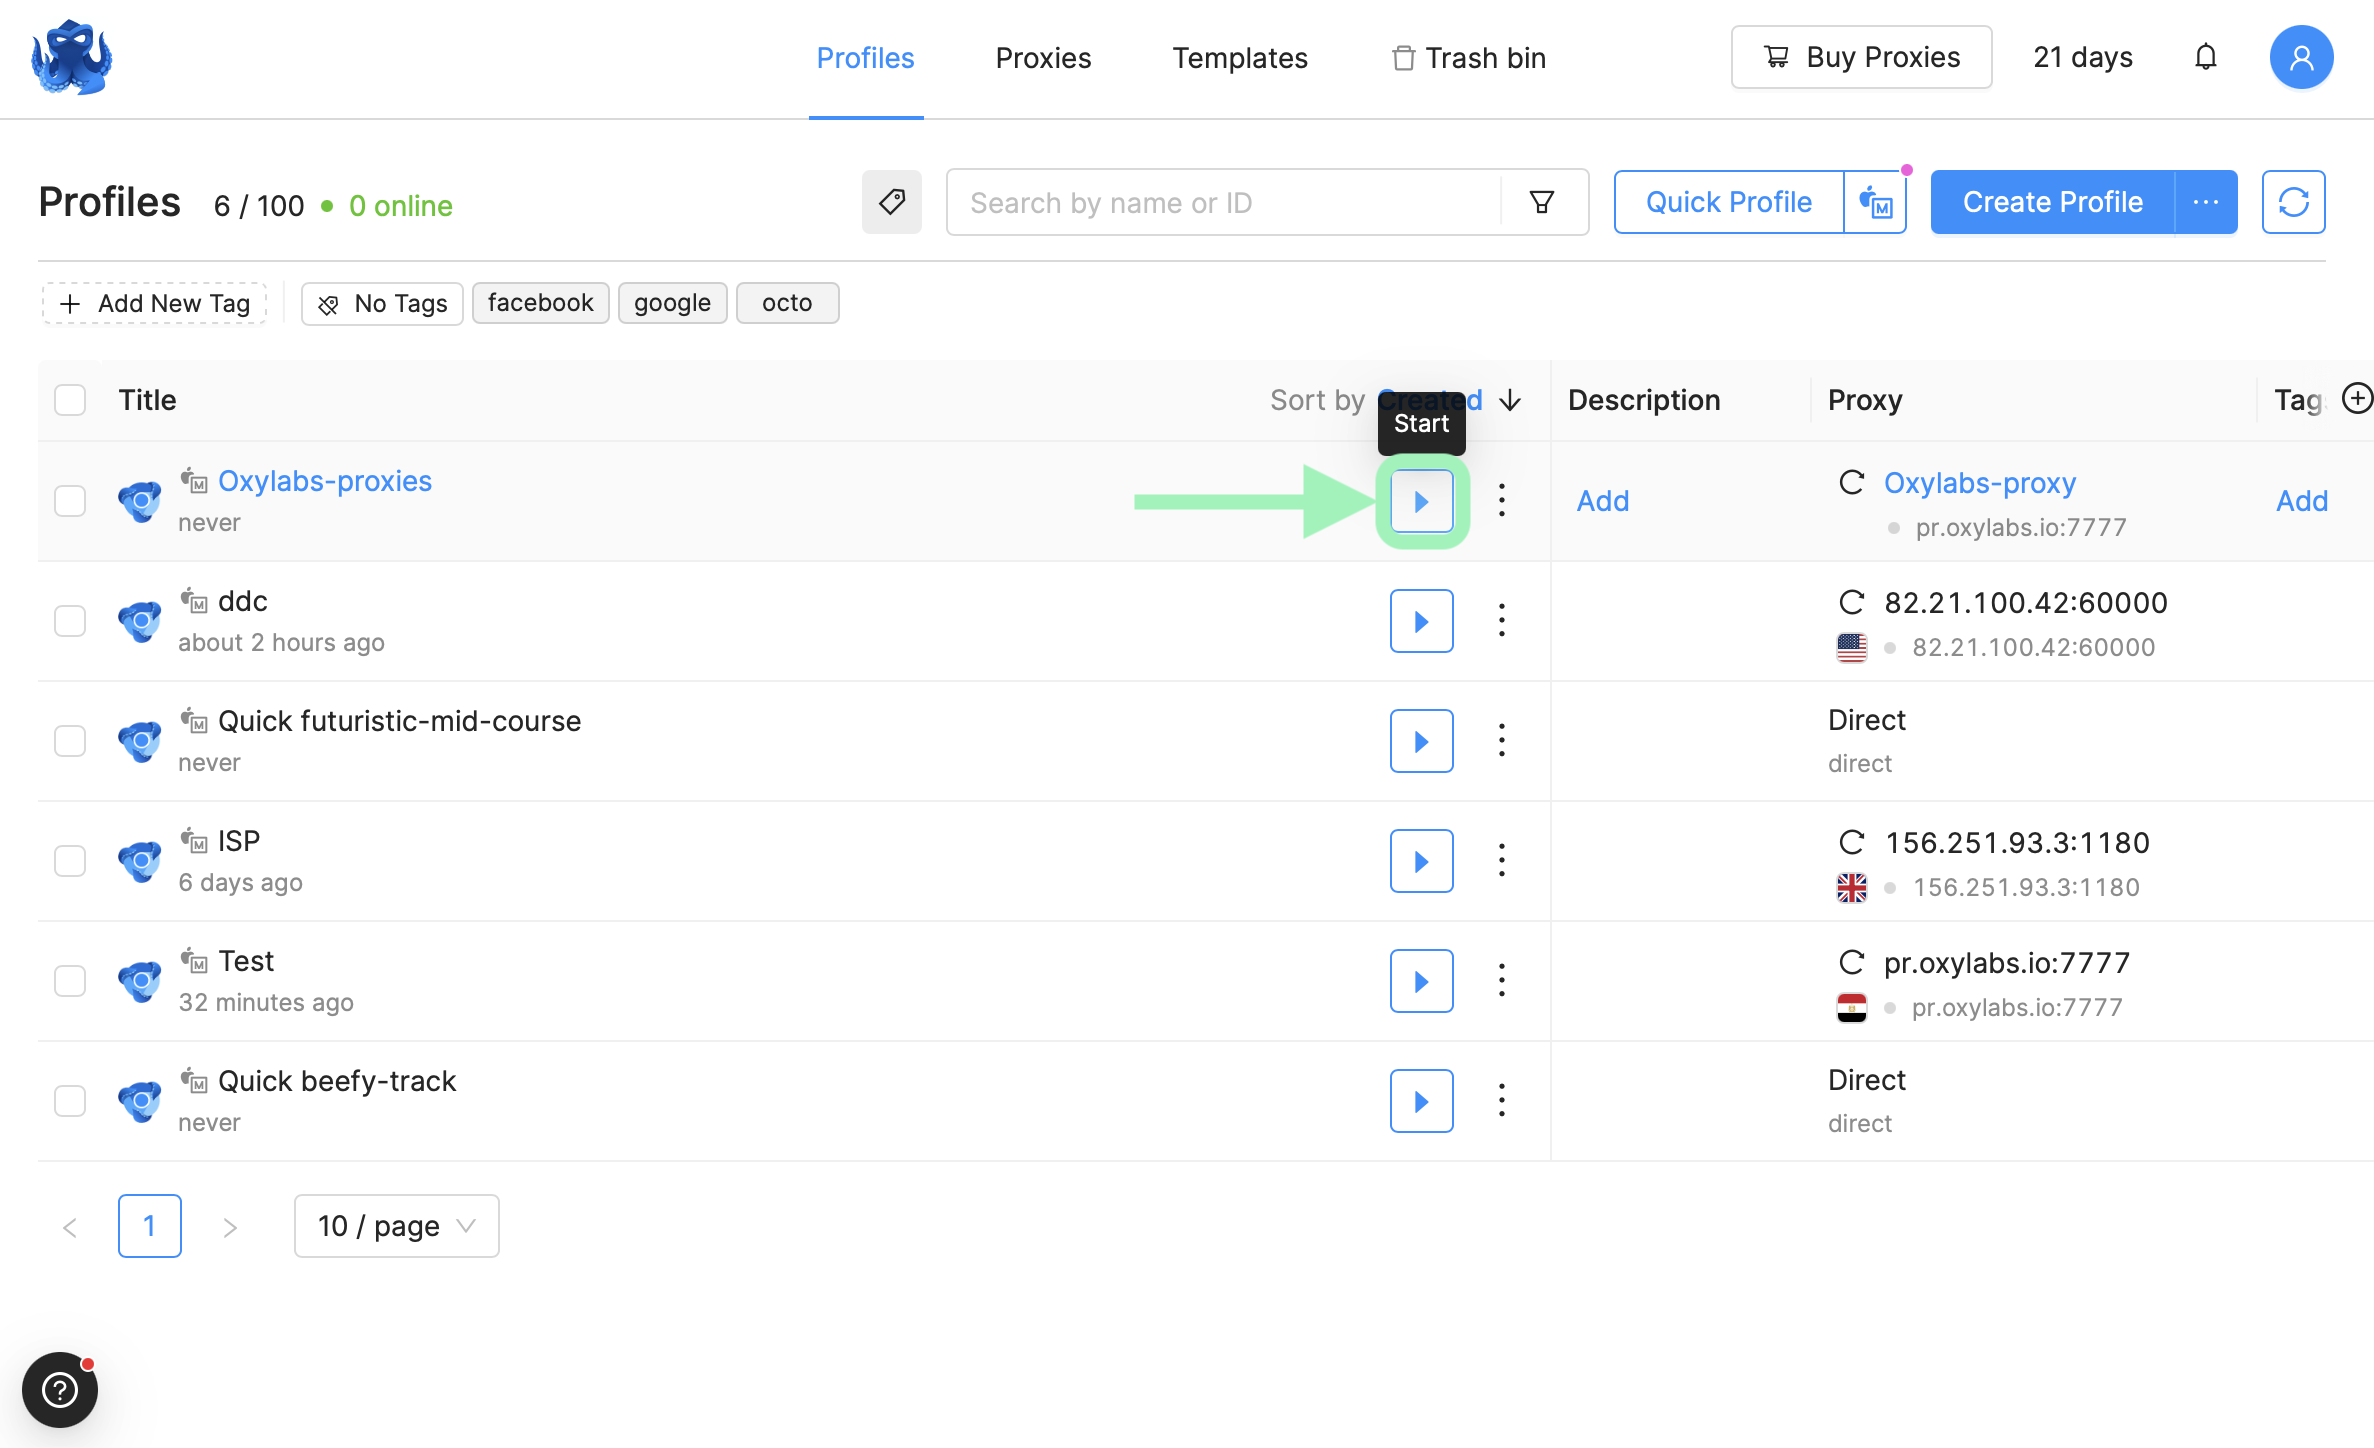
要检查代理功能，请点击 **检查代理**.

<figure><img src="https://1216392379-files.gitbook.io/~/files/v0/b/gitbook-x-prod.appspot.com/o/spaces%2FU4lV7kLC2Df45W0aLQlX%2Fuploads%2Fgit-blob-03a57a0b3f7c65a1f58446825c9e1519511cc575%2Focto-test-proxy.png?alt=media" alt=""><figcaption></figcaption></figure>

如果测试成功，你会看到一个可用的代理 IP 地址。

最后， **“Confirm”** 你的新代理。你可以添加任意数量的代理，并将它们与不同配置文件配对或取消配对。
{% endstep %}

{% step %}

### 创建浏览器配置文件

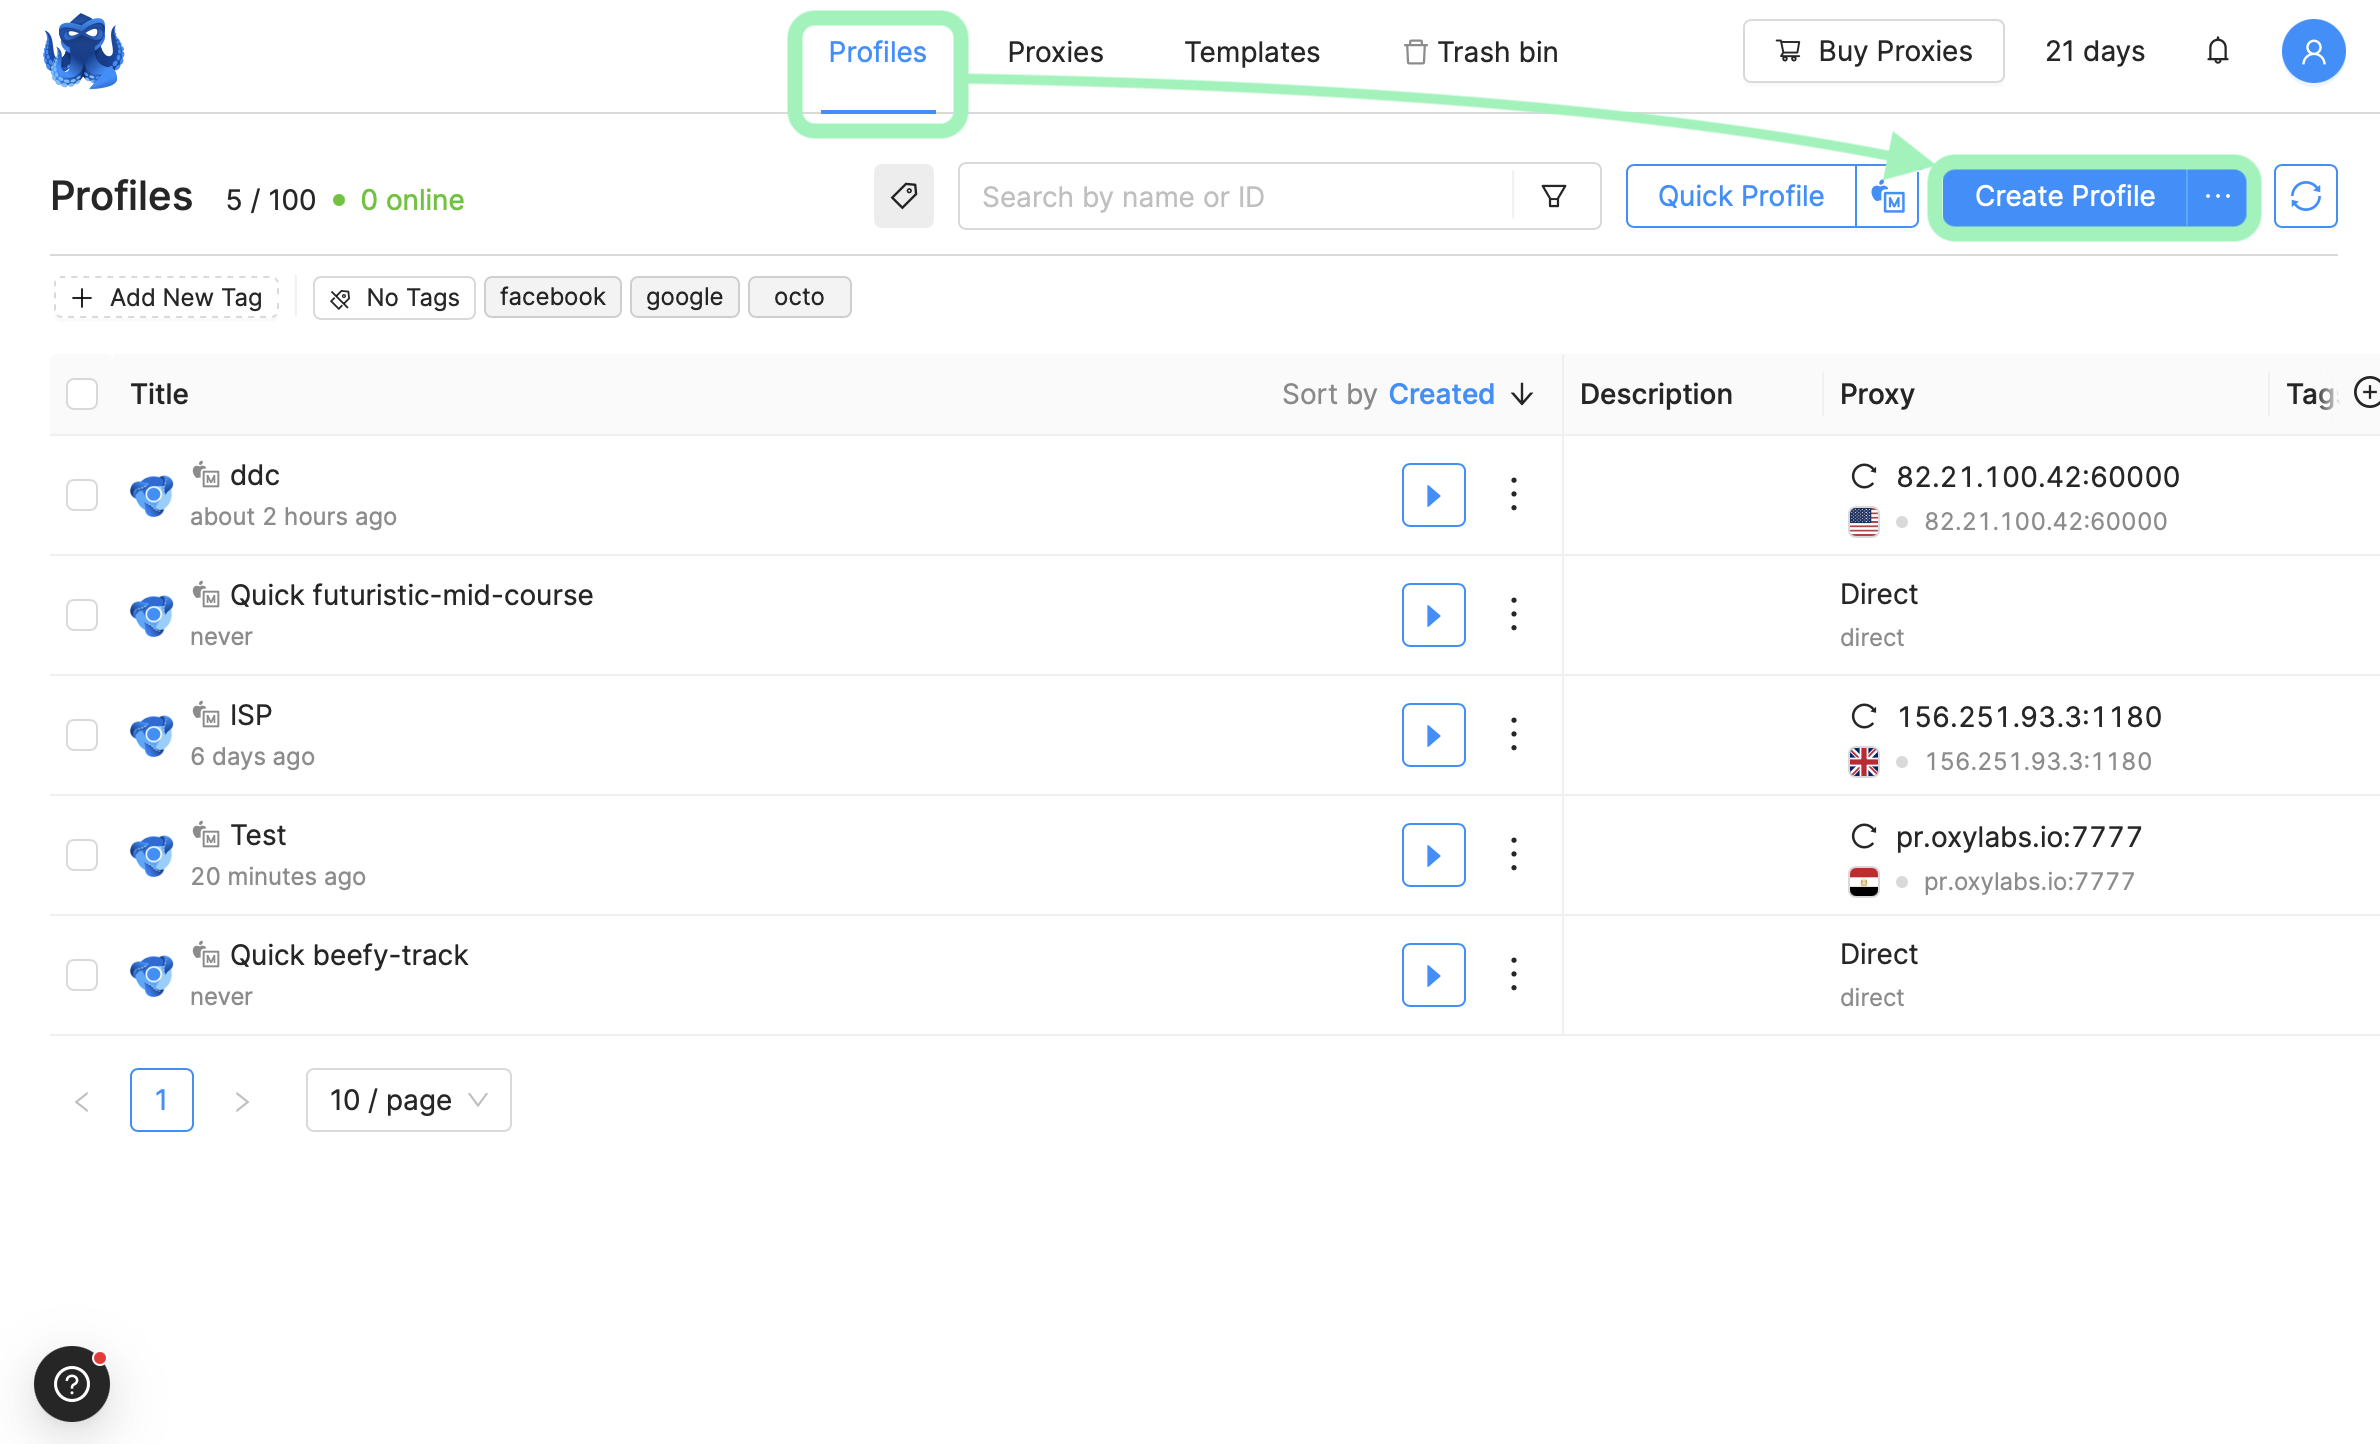
转到 **配置文件** 选项卡，然后选择 **创建配置文件**.

<figure><img src="https://1216392379-files.gitbook.io/~/files/v0/b/gitbook-x-prod.appspot.com/o/spaces%2FU4lV7kLC2Df45W0aLQlX%2Fuploads%2Fgit-blob-f4af0cf1a40ec91c7d933edbcaa0b2123a227262%2Focto-create-profile.png?alt=media" alt=""><figcaption></figcaption></figure>

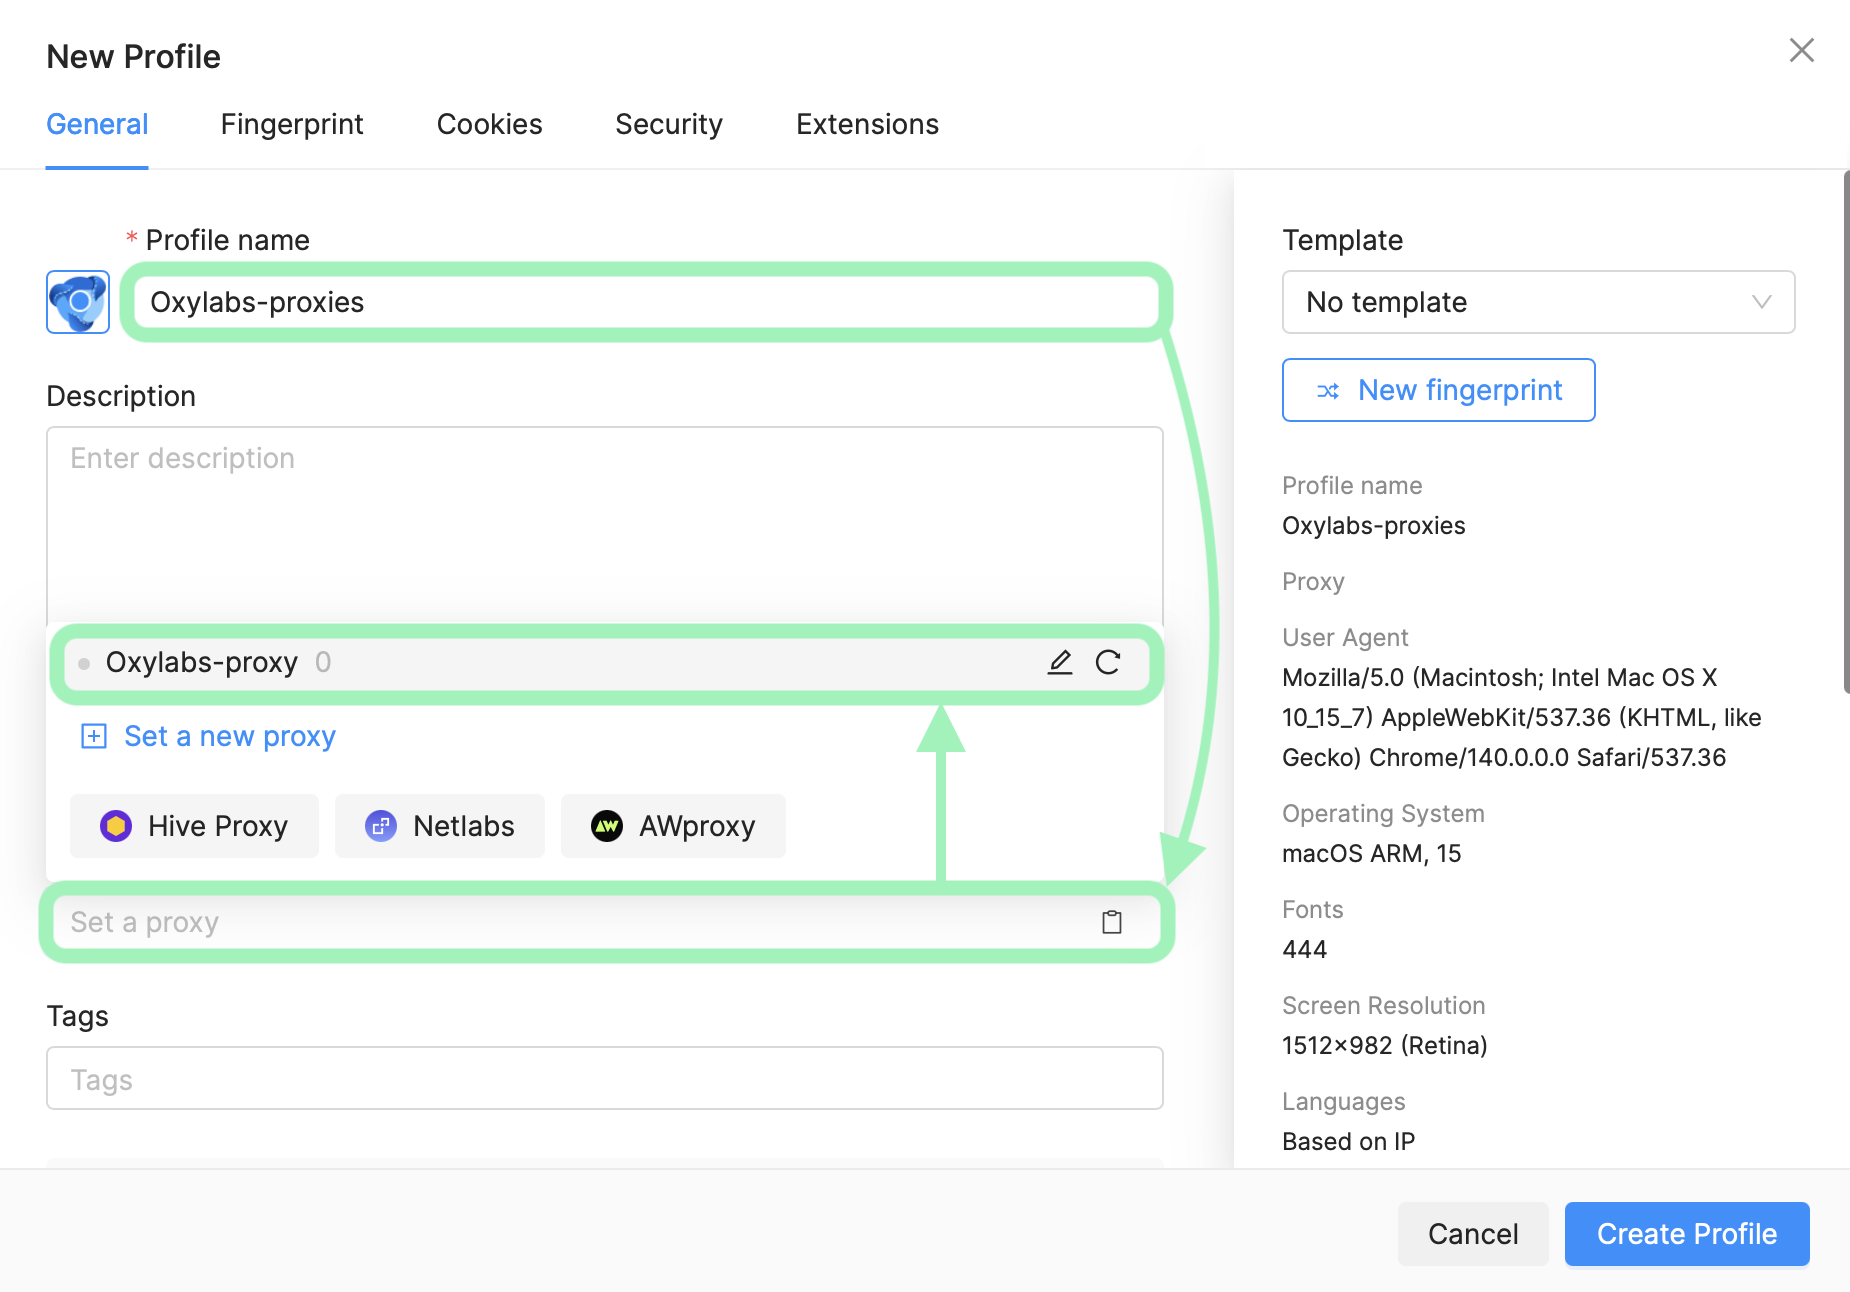
在那里，输入你的 **配置文件名称**和 **选择你刚添加的代理**.

<figure><img src="https://1216392379-files.gitbook.io/~/files/v0/b/gitbook-x-prod.appspot.com/o/spaces%2FU4lV7kLC2Df45W0aLQlX%2Fuploads%2Fgit-blob-b21aa44dadef17af052957d56d9da974c26c9131%2Focto-add-proxy-to-profile.png?alt=media" alt=""><figcaption></figcaption></figure>

如有需要，可使用自定义浏览器指纹调整你的配置文件，包括用户代理、Cookie 以及硬件和软件参数。

要完成配置文件，请点击 **创建配置文件** 屏幕右下角的。
{% endstep %}

{% step %}

### 运行新配置文件

按 **▶(开始)** 在配置文件部分中点击你的配置文件，以启动私密浏览器并继续执行任务。

<figure><img src="https://1216392379-files.gitbook.io/~/files/v0/b/gitbook-x-prod.appspot.com/o/spaces%2FU4lV7kLC2Df45W0aLQlX%2Fuploads%2Fgit-blob-d6ef692f62d8d2beda4709b50c832848bd9eaa44%2Focto-start-profile.png?alt=media" alt=""><figcaption></figcaption></figure>
{% endstep %}
{% endstepper %}

就是这样。你已成功将你的 Oxylabs 代理与 Octo Browser 集成。你可以在以下位置找到原始的 Octo Browser 集成博客文章 [**此处**](https://oxylabs.io/resources/integrations/octobrowser).

如果你对我们的解决方案或上述流程有任何问题或疑虑，请通过我们主页上的在线聊天联系我们，或发送电子邮件至 <hello@oxylabs.io>.


---

# Agent Instructions
This documentation is published with GitBook. GitBook is the documentation platform designed so that both humans and AI agents can read, navigate, and reason over technical content effectively. Learn more at gitbook.com.

## Querying This Documentation
If you need additional information that is not directly available in this page, you can query the documentation dynamically by asking a question.

Perform an HTTP GET request on the current page URL with the `ask` query parameter, and the optional `goal` query parameter:

```
GET https://developers.oxylabs.io/integrations/cn/proxy-integrations/octo-browser.md?ask=<question>&goal=<endgoal>
```

`ask` is the immediate question: it should be specific, self-contained, and written in natural language.
`goal` is optional and describes the broader end goal you are ultimately trying to accomplish on behalf of the user. GitBook uses it to tailor the answer towards what is most useful for that goal.

The response will contain a direct answer to the question and relevant excerpts and sources from the documentation.

Use this mechanism when the answer is not explicitly present in the current page, you need clarification or additional context, or you want to retrieve related documentation sections.