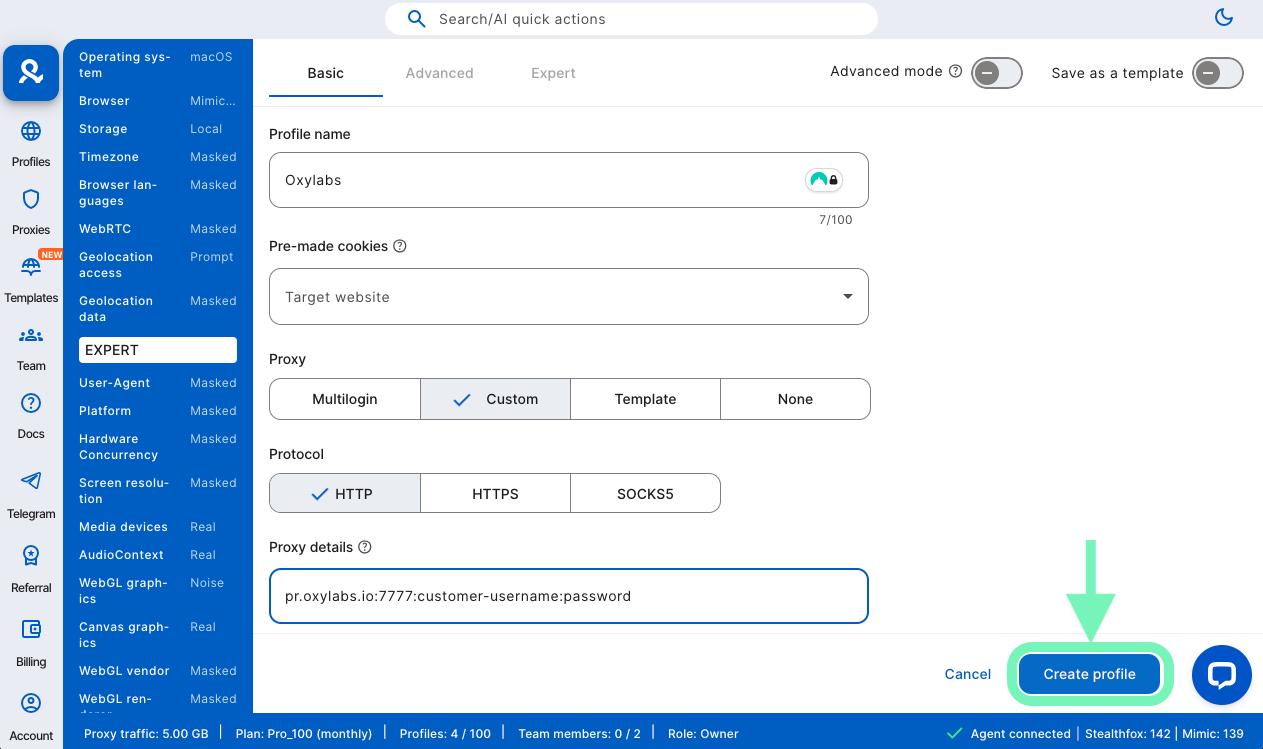
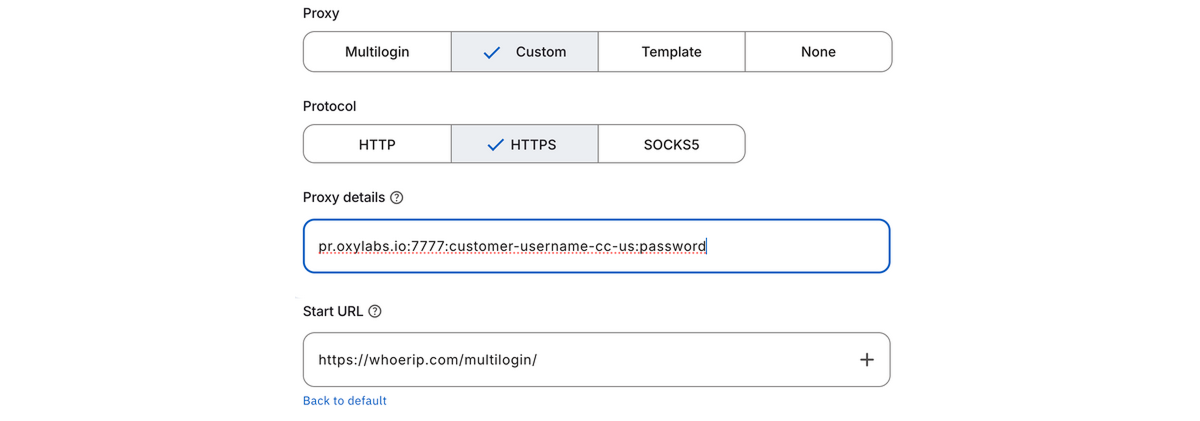
# Multilogin

[**Multilogin**](https://multilogin.com/pricing/?utm_source=referrer\&utm_medium=website\&utm_campaign=OxylabsP_2022\&utm_id=Oxylabs) 是一款可靠的领先市场解决方案，旨在轻松构建虚拟浏览器配置文件。&#x20;

按照下面的说明集成 Oxylabs [移动代理](https://oxylabs.io/products/mobile-proxies)**:**

{% stepper %}
{% step %}

### 登录 Multilogin 并创建配置文件

前往 Multilogin [**官方网站**](https://multilogin.com/)，登录，然后查找 **+创建** 按钮以创建新配置文件

<figure><img src="https://2655358775-files.gitbook.io/~/files/v0/b/gitbook-x-prod.appspot.com/o/spaces%2FzrXw45naRpCZ0Ku9AjY1%2Fuploads%2F4yffpIfNsHmXxYDSMdSx%2Fmultilogin-new-profile.png?alt=media&#x26;token=1e79d191-0160-46b6-9ba5-b54ceb752da2" alt=""><figcaption></figcaption></figure>
{% endstep %}

{% step %}

### 添加一个新代理

输入配置文件名称，选择 **自定义代理**，并选择代理协议（HTTP、HTTPS 或 [SOCKS5](https://oxylabs.io/products/socks5-proxies))

<figure><img src="https://2655358775-files.gitbook.io/~/files/v0/b/gitbook-x-prod.appspot.com/o/spaces%2FzrXw45naRpCZ0Ku9AjY1%2Fuploads%2FVtC2urP95PWtR17EzLei%2Fmultilogin-proxy-details.png?alt=media&#x26;token=c0769493-1724-4760-a4fc-e6d0e3680bec" alt=""><figcaption></figcaption></figure>

然后输入您的代理详细信息和 Oxylabs 代理用户凭据。使用与在 [Oxylabs 仪表板](https://dashboard.oxylabs.io/en/):

**主机：** `pr.oxylabs.io`

**端口：** `7777`

**用户名：** `customer-username`

**密码：** `密码`

{% hint style="warning" %}
**注意：** 别忘了在用户名前添加 `customer-` 前缀。
{% endhint %}

<figure><img src="https://2655358775-files.gitbook.io/~/files/v0/b/gitbook-x-prod.appspot.com/o/spaces%2FzrXw45naRpCZ0Ku9AjY1%2Fuploads%2FAwWXXYr3SdCrSAbGiiaD%2Fmultilogin-resi.png?alt=media&#x26;token=9670368a-f694-4d87-ab26-60b4ba636f13" alt=""><figcaption></figcaption></figure>
{% endstep %}

{% step %}

### 添加附加参数

您还可以使用 **附加参数** 配合移动代理设置地理位置（国家、州、城市等）并控制会话。请查看 [移动代理文档](https://developers.oxylabs.io/documentation/cn/dai-li/mobile-proxies) 以了解更多。下表提供可用参数及其示例值的概览。

<table><thead><tr><th width="167">代理参数</th><th width="412">示例</th><th>协议</th></tr></thead><tbody><tr><td><a href="../../residential-proxies/location-settings">国家入口节点</a></td><td><p><strong>主机：</strong> <code>//us-pr.oxylabs.io</code></p><p><strong>端口：</strong> <code>10000</code></p></td><td><p>HTTP，</p><p>HTTPS</p></td></tr><tr><td><a href="../../residential-proxies/location-settings/select-country">国家</a></td><td><strong>用户：</strong> <code>customer-username-cc-US</code></td><td><p>HTTP，</p><p>HTTPS，</p><p>SOCKS5</p></td></tr><tr><td><a href="../../residential-proxies/location-settings/select-state">州</a></td><td><strong>用户：</strong> <code>customer-username-st-US_texas</code></td><td><p>HTTP，</p><p>HTTPS，</p><p>SOCKS5</p></td></tr><tr><td><a href="../../residential-proxies/location-settings/select-city">城市</a></td><td><strong>用户：</strong> <code>customer-username-city-paris</code></td><td><p>HTTP，</p><p>HTTPS，</p><p>SOCKS5</p></td></tr><tr><td><a href="../../residential-proxies/location-settings/continent">大洲</a></td><td><strong>用户：</strong> <code>customer-username-cn-NA</code></td><td><p>HTTP，</p><p>HTTPS，</p><p>SOCKS5</p></td></tr><tr><td><a href="../../residential-proxies/location-settings/zip-postal-code">邮政编码</a></td><td><strong>用户：</strong> <code>customer-username-cc-US-postalcode-90210</code></td><td><p>HTTP、HTTPS，</p><p>SOCKS5</p></td></tr><tr><td><a href="../../residential-proxies/location-settings/asn-targeting">ASN 定向</a></td><td><strong>用户：</strong> <code>customer-username-ASN-21928</code></td><td><p>HTTP，</p><p>HTTPS，</p><p>SOCKS5</p></td></tr><tr><td><a href="../../residential-proxies/session-control">会话</a></td><td><strong>用户：</strong> <code>customer-username-sessid-qwerty123-sesstime-30</code></td><td><p>HTTP，</p><p>HTTPS，</p><p>SOCKS5</p></td></tr><tr><td><a href="../../residential-proxies/session-control/sticky-proxy-entry-nodes">粘性会话</a></td><td><p><strong>主机：</strong> <code>//us-pr.oxylabs.io</code></p><p><strong>端口：</strong> <code>10001</code></p></td><td>HTTP,<br>HTTPS</td></tr></tbody></table>
{% endstep %}

{% step %}

### 完成配置文件

如果您需要使用特定的浏览器指纹选项，例如 User-Agent、Cookie 和设备设置，请在屏幕顶部切换 **高级模式** 。否则，您可以通过点击屏幕底部的 **创建配置文件** 来完成新配置文件。

<figure><img src="https://2655358775-files.gitbook.io/~/files/v0/b/gitbook-x-prod.appspot.com/o/spaces%2FzrXw45naRpCZ0Ku9AjY1%2Fuploads%2Fe2yYGk0x8Mz0apNflMHH%2Fmultilogin-create-profile.png?alt=media&#x26;token=00849df5-6cc6-4613-819c-62e3c163cc94" alt=""><figcaption></figcaption></figure>
{% endstep %}

{% step %}

### 完成配置文件

按下 **开始** 在主屏幕中的配置文件以启动新创建的配置文件，并在私有浏览器中继续您的任务。

<figure><img src="https://2655358775-files.gitbook.io/~/files/v0/b/gitbook-x-prod.appspot.com/o/spaces%2FzrXw45naRpCZ0Ku9AjY1%2Fuploads%2FOT0ECpEKRdJbFs2gXjGV%2Fmultilogin-start-profile.png?alt=media&#x26;token=4babce60-55c8-43e9-98f2-ebd5ab60e8a6" alt=""><figcaption></figcaption></figure>

如果一切操作正确， <https://whoerip.com/multilogin/> 将打开以显示您的新 IP 以及下面的所有自定义指纹信息。

<figure><img src="https://2655358775-files.gitbook.io/~/files/v0/b/gitbook-x-prod.appspot.com/o/spaces%2FzrXw45naRpCZ0Ku9AjY1%2Fuploads%2FowgXpuGGreMeBIsHTyQh%2Fmultilogin-successful-connection.jpg?alt=media&#x26;token=f3e2995e-e92b-412a-a3ab-152d0b465e60" alt=""><figcaption></figcaption></figure>
{% endstep %}
{% endstepper %}

就是这样。您已成功将 Oxylabs 代理与 Multilogin 集成。您可以在原始 Multilogin 集成博客文章中找到相关内容 [**这里**](https://oxylabs.io/resources/integrations/multilogin).

另外，请查看详细的 [**Multilogin vs. Incognition**](https://oxylabs.io/blog/incogniton-vs-multilogin), [**AdsPower vs. Multilogin**](https://oxylabs.io/blog/adspower-vs-multilogin)，或 [**GoLogin vs. Multilogin**](https://oxylabs.io/blog/gologin-vs-multilogin) 文章以比较最受欢迎的反检测浏览器。
