# Android
Android 是一种基于 Linux 的开源移动设备操作系统,例如智能手机和平板电脑。
请使用以下指南配置您的独享数据中心代理 用于 [**使用移动数据**](#using-mobile-data) 或 [**Wi-Fi 网络**](#setting-up-a-proxy-for-a-wi-fi-network).
{% hint style="warning" %}
**注意:** 本指南中的一些截图展示的是使用住宅代理的设置过程,仅作示例参考;请参阅文中的独享数据中心代理具体指南。
{% endhint %}
### 使用移动数据
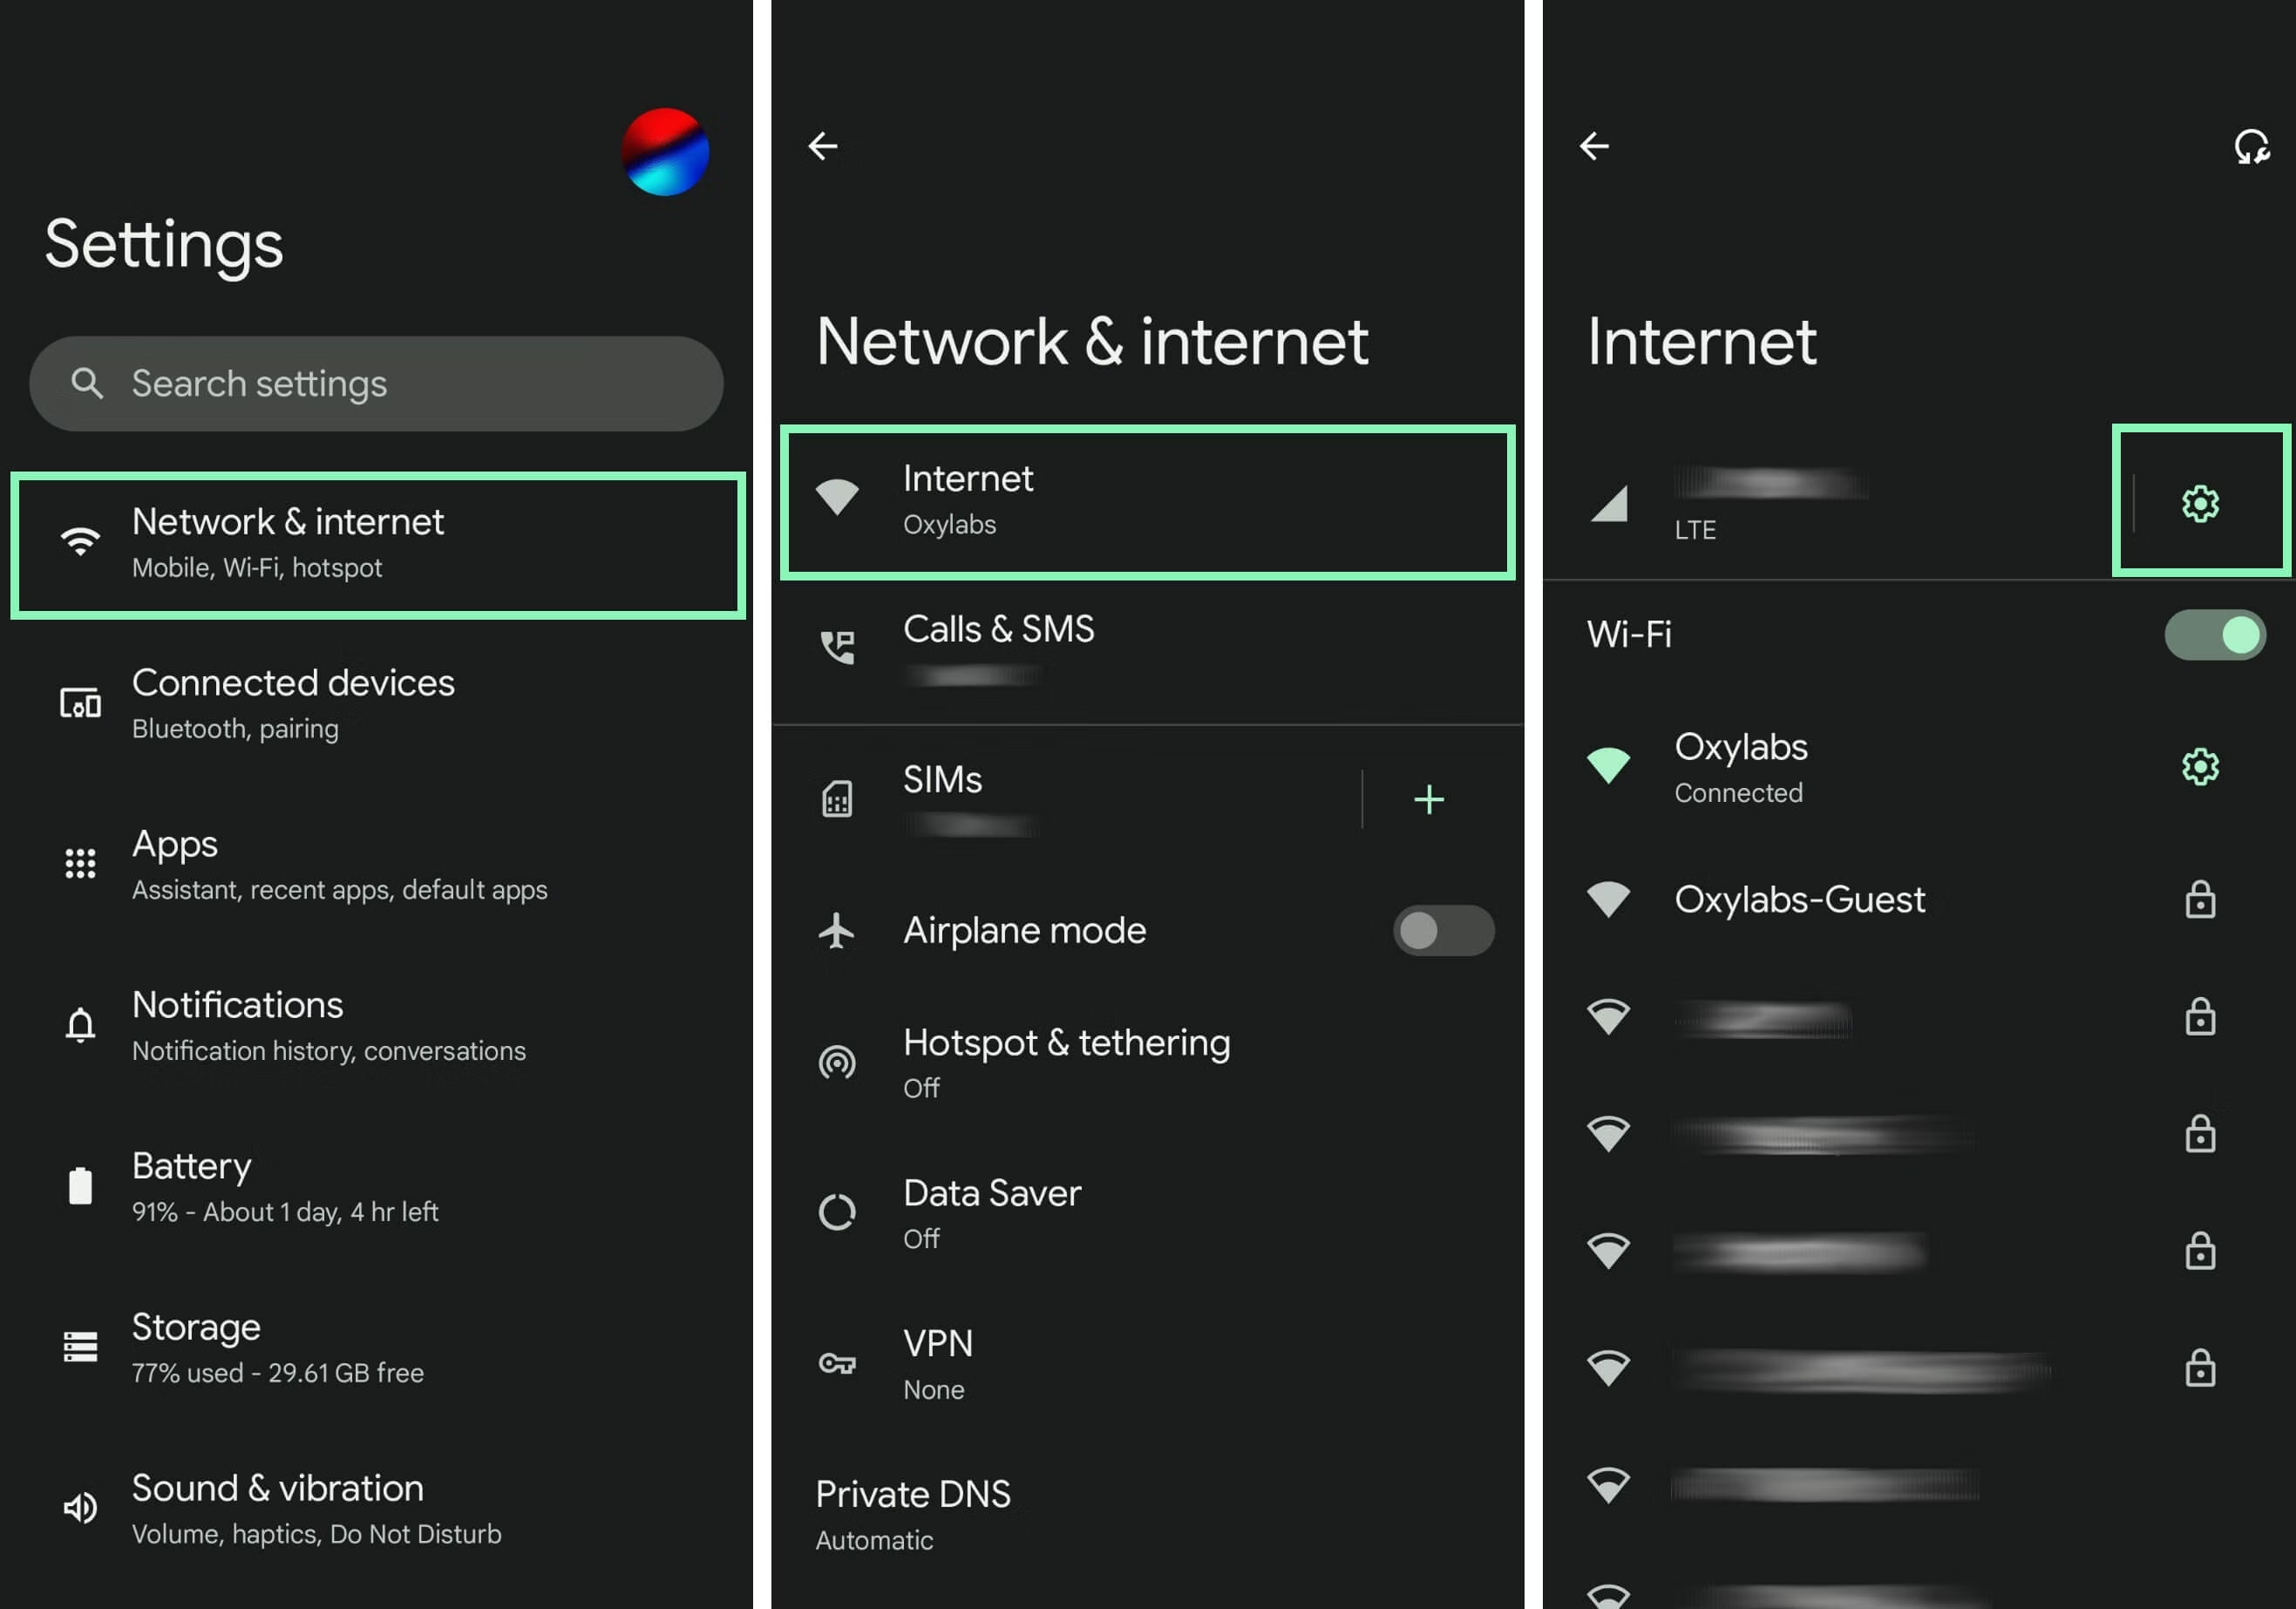
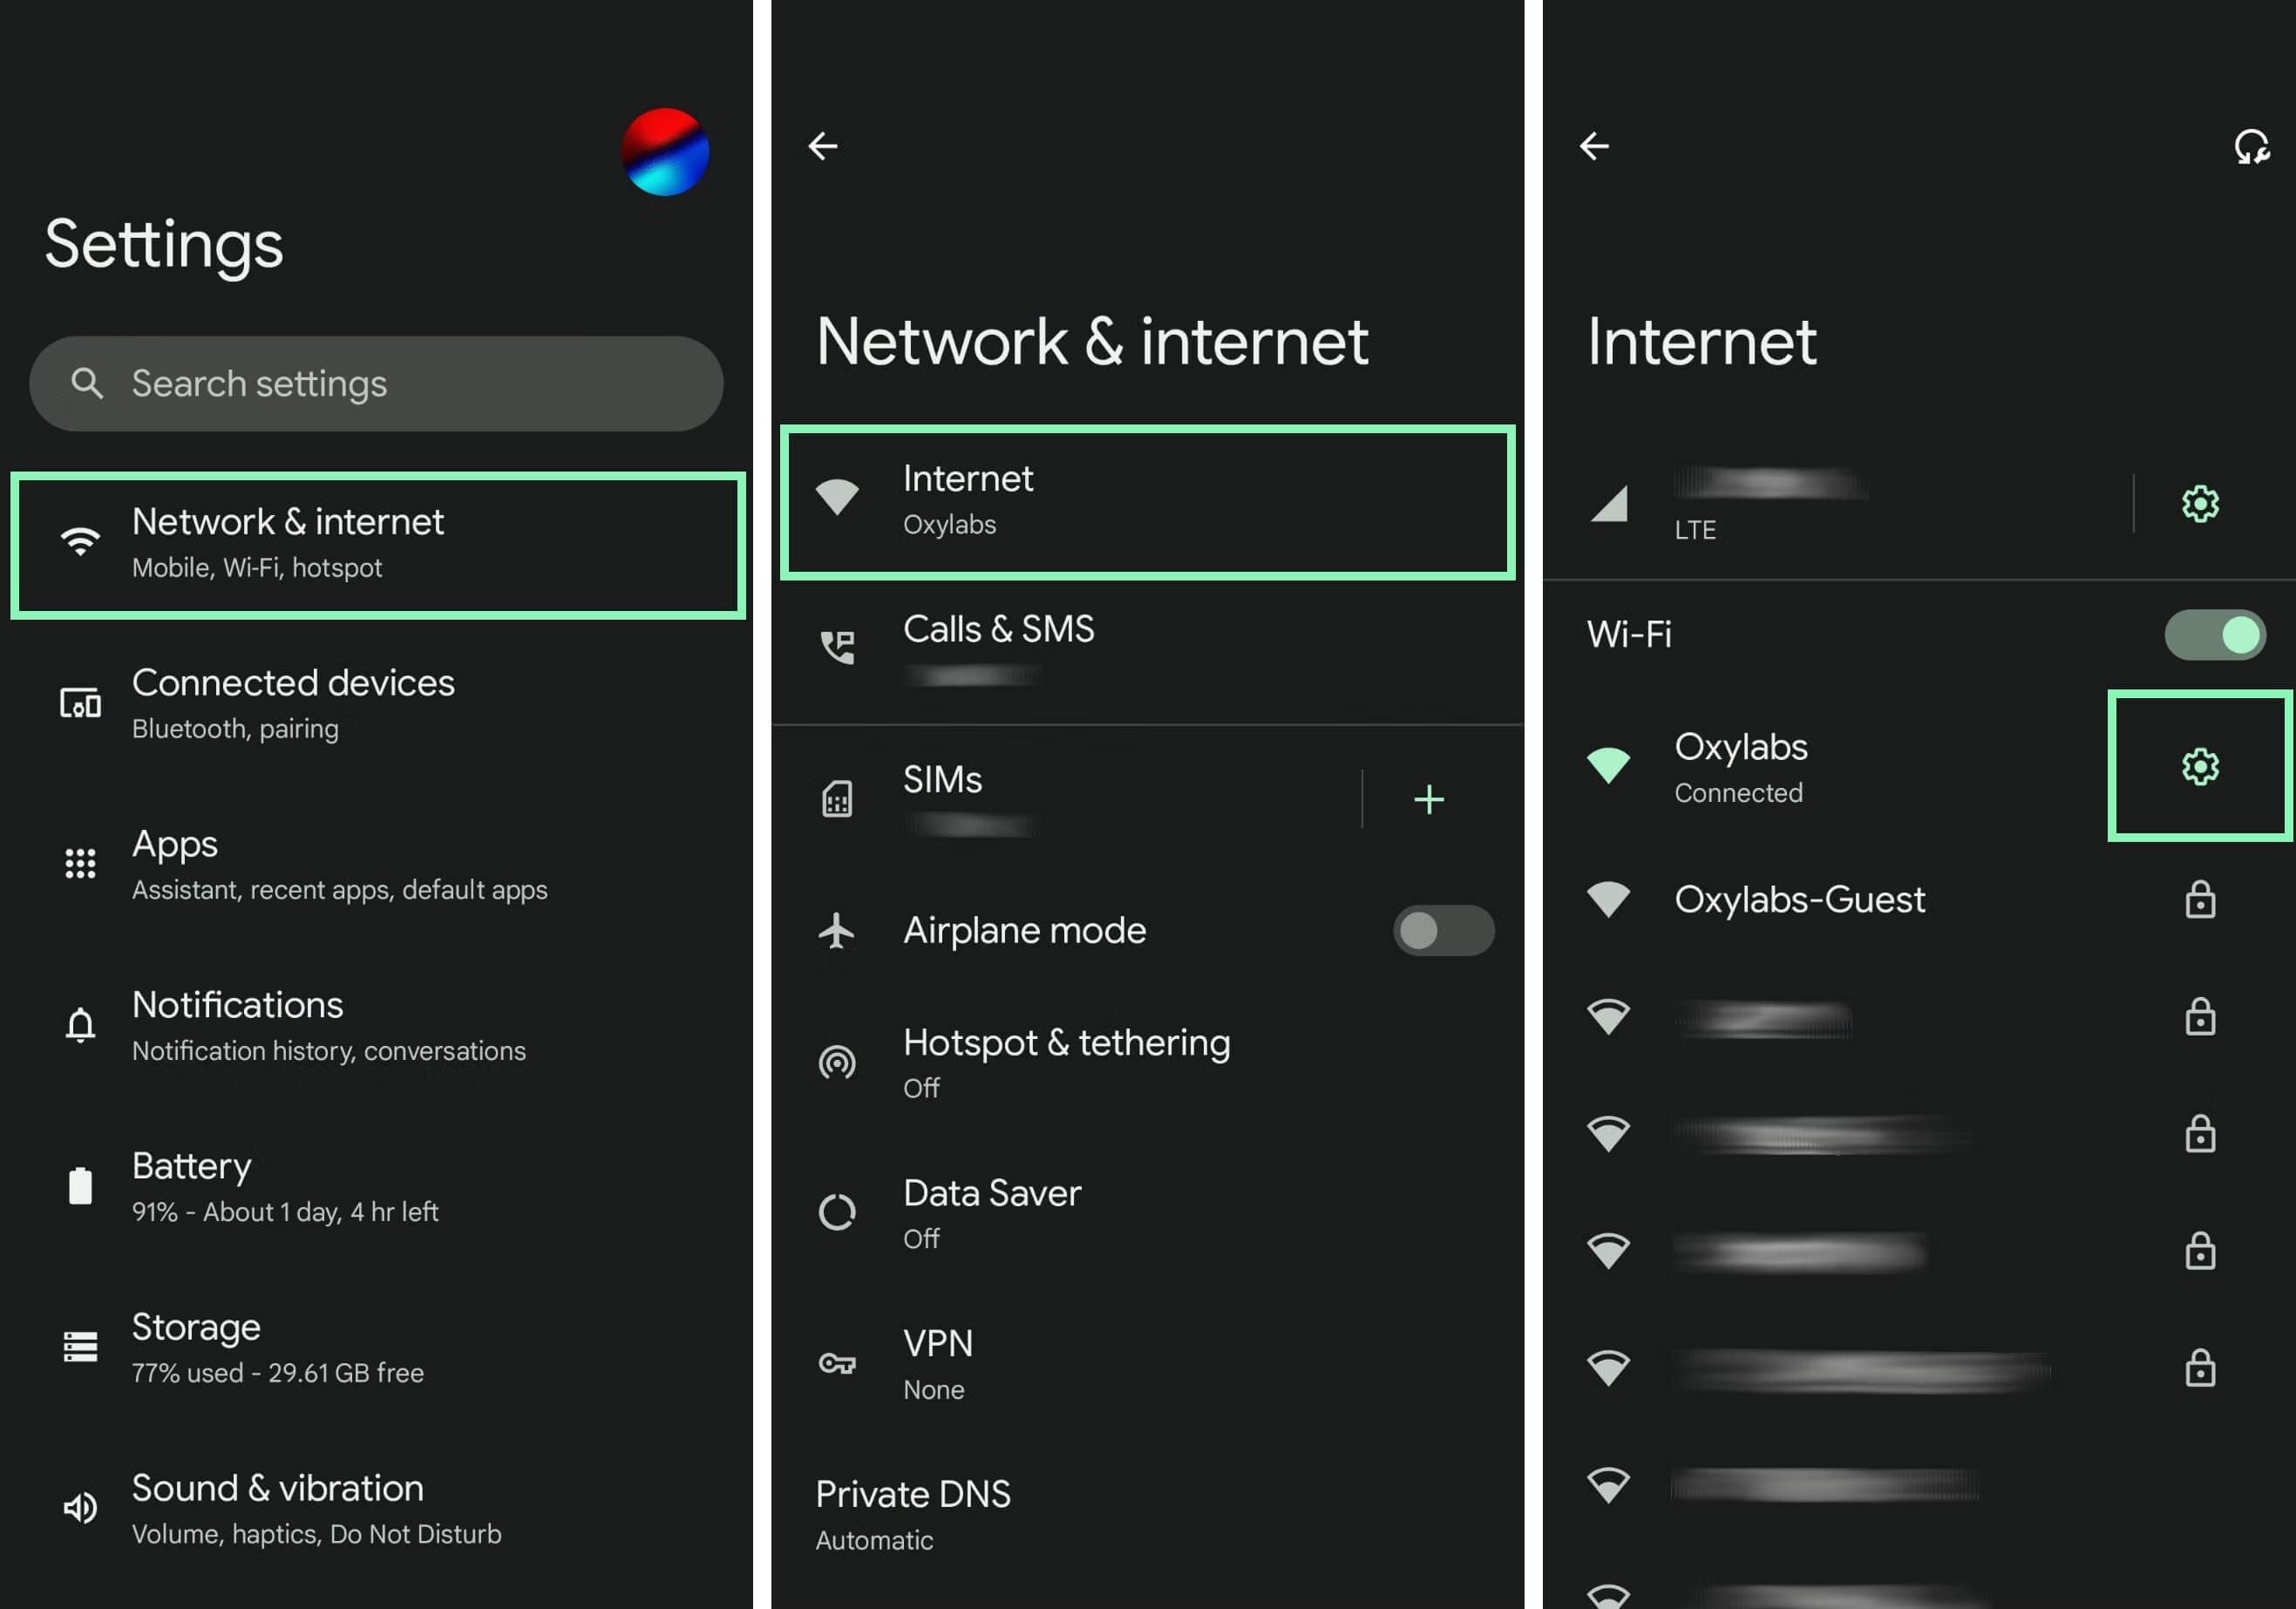
**第 1 步。** 导航到 **设置** > **网络和互联网** > **互联网**.
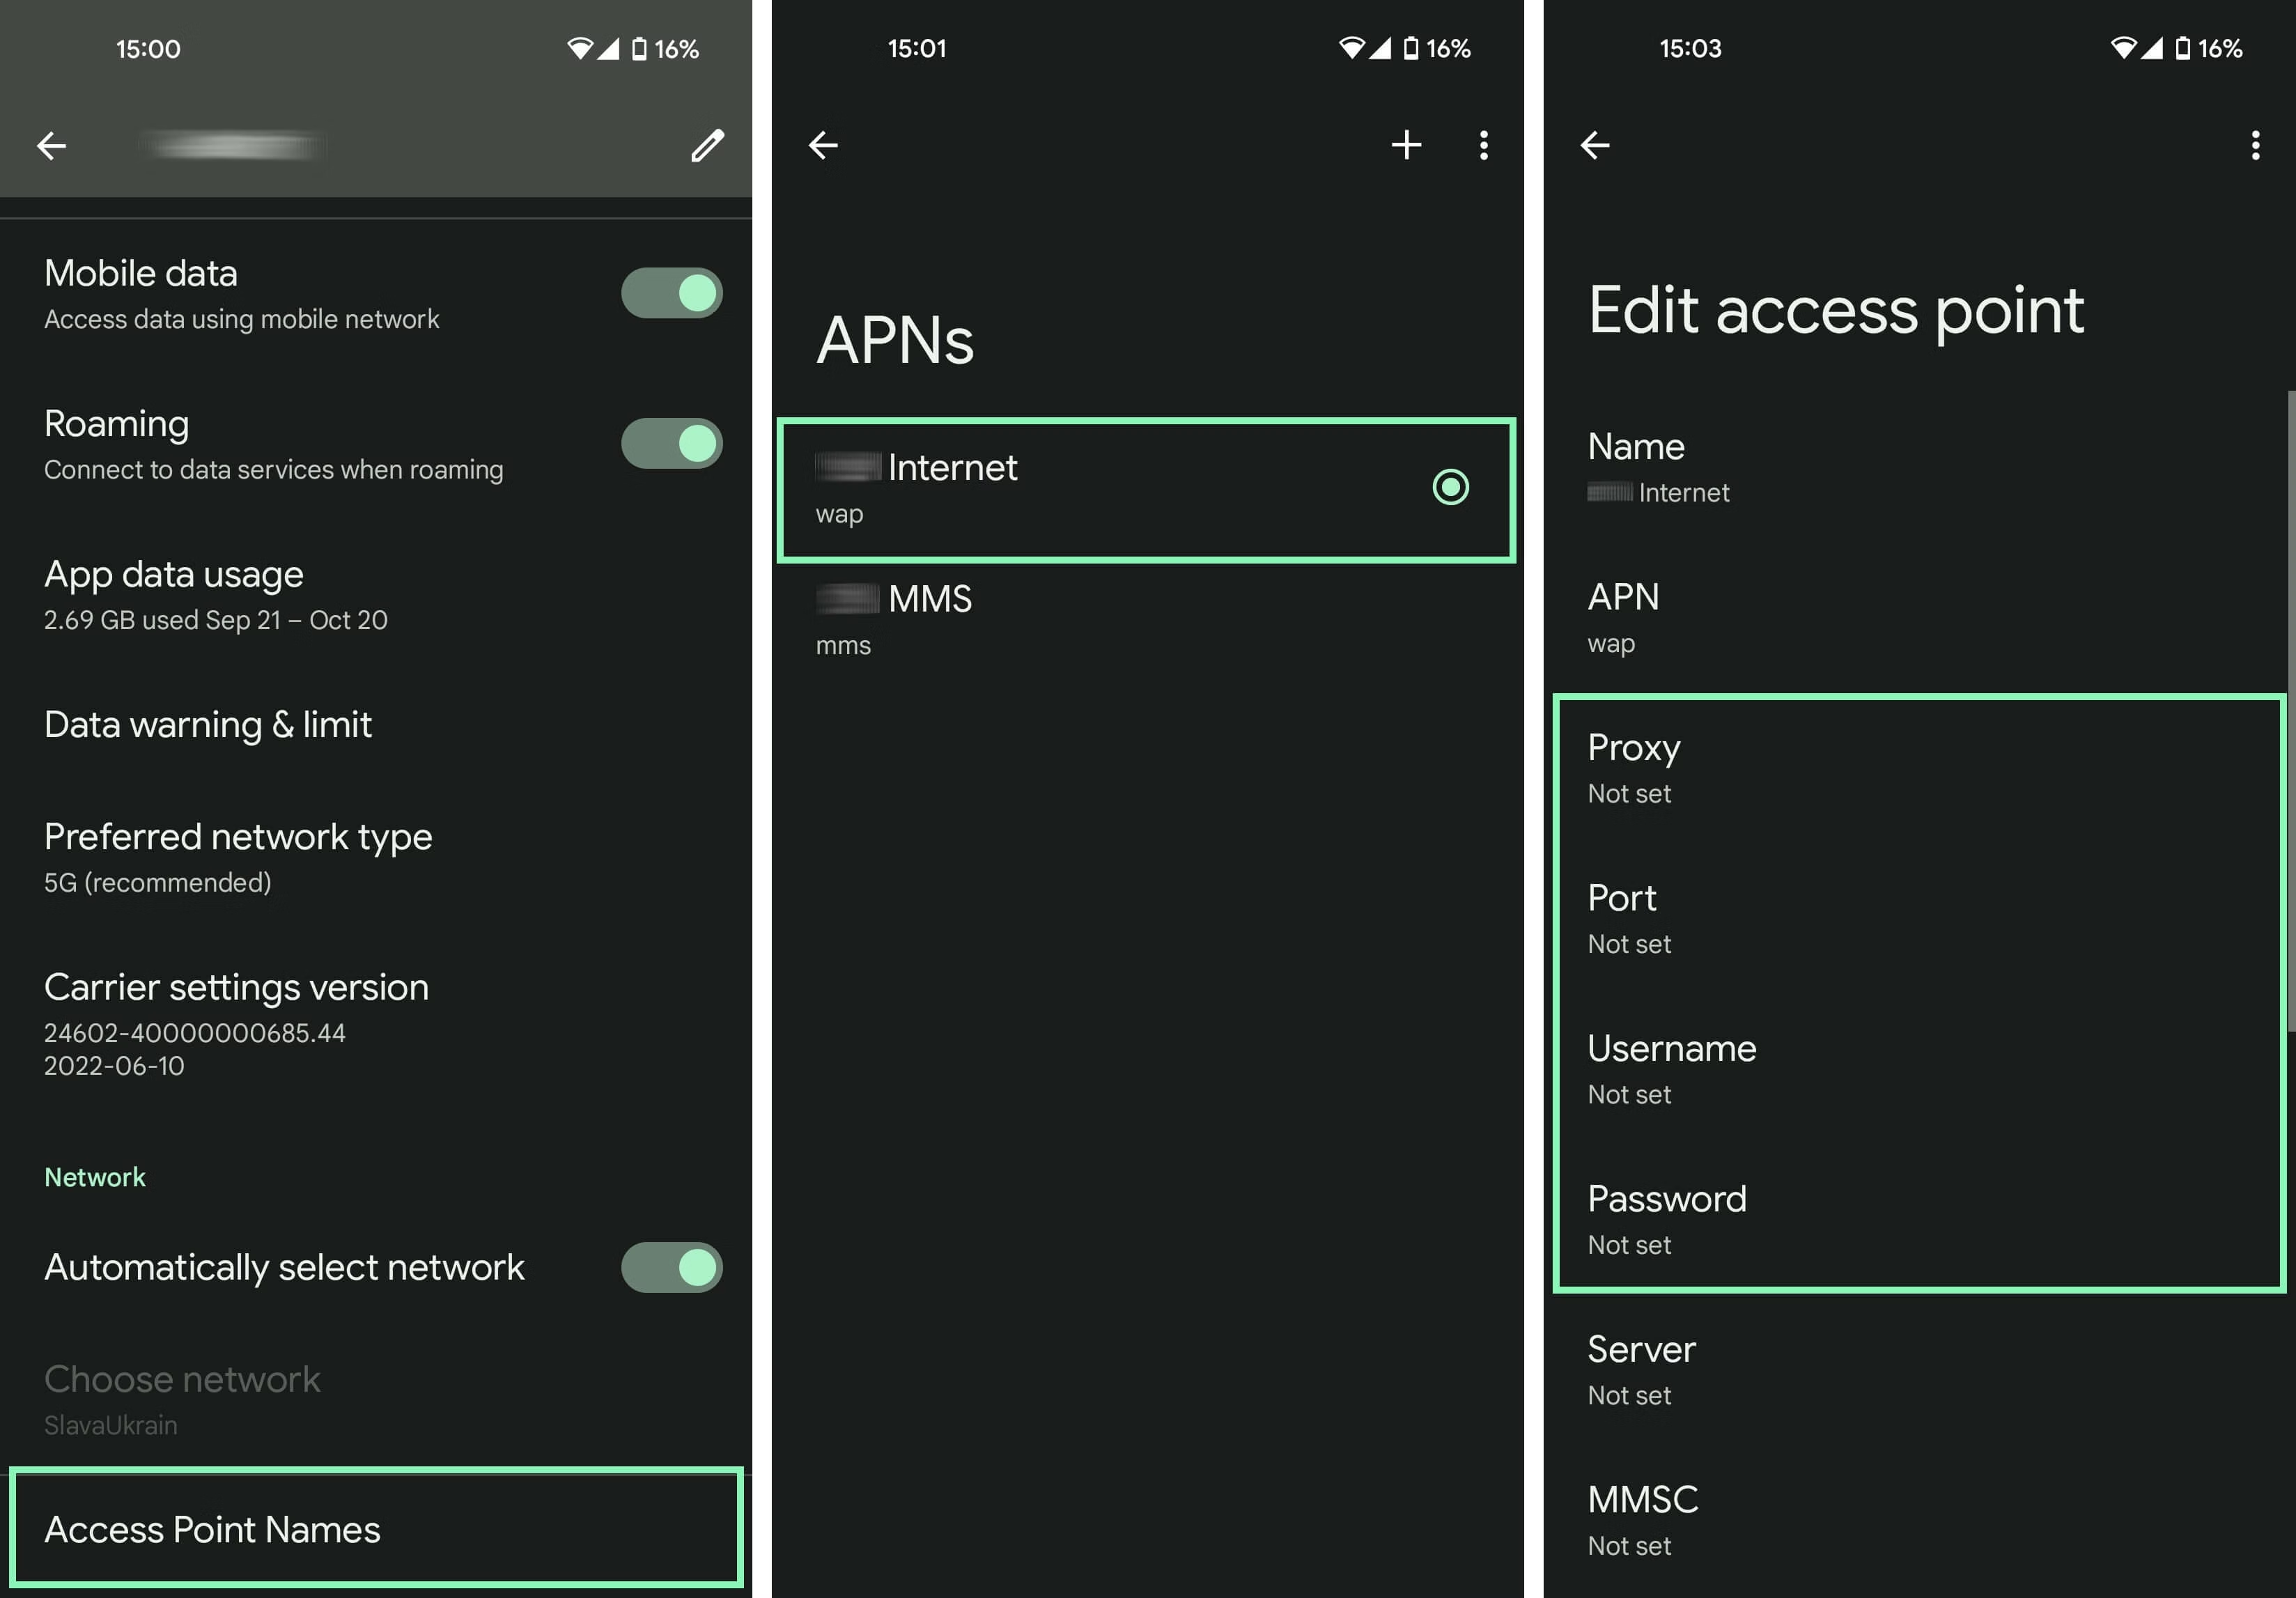
**第 2 步。** 点击你的移动网络运营商设置,滚动到底部,然后选择 **接入点名称(APN)**.
**第 3 步。** 选择一个 **APN** 你当前正在使用的,以配置 Android 代理设置。
**第 4 步。** 按照下面指定填写设置字段:
{% hint style="warning" %}
当为移动网络使用代理时,连接类型可以是 `HTTP` 仅此而已。
{% endhint %}
**代理:** `ddc.oxylabs.io`
**端口:** `8001`
{% hint style="info" %}
你需要为从已购买的 [**代理列表**](https://developers.oxylabs.io/proxies/dedicated-datacenter-proxies/self-service/proxy-list)**,** 您可以在 Oxylabs 仪表板上找到它们。 `8001` 端口会为所有请求从你的列表中选取第一个 IP 地址。
{% endhint %}
**用户名**: `user-username`
**用户名:** `password`
{% hint style="warning" %}
别忘了添加 `user-` 部分。
{% endhint %}
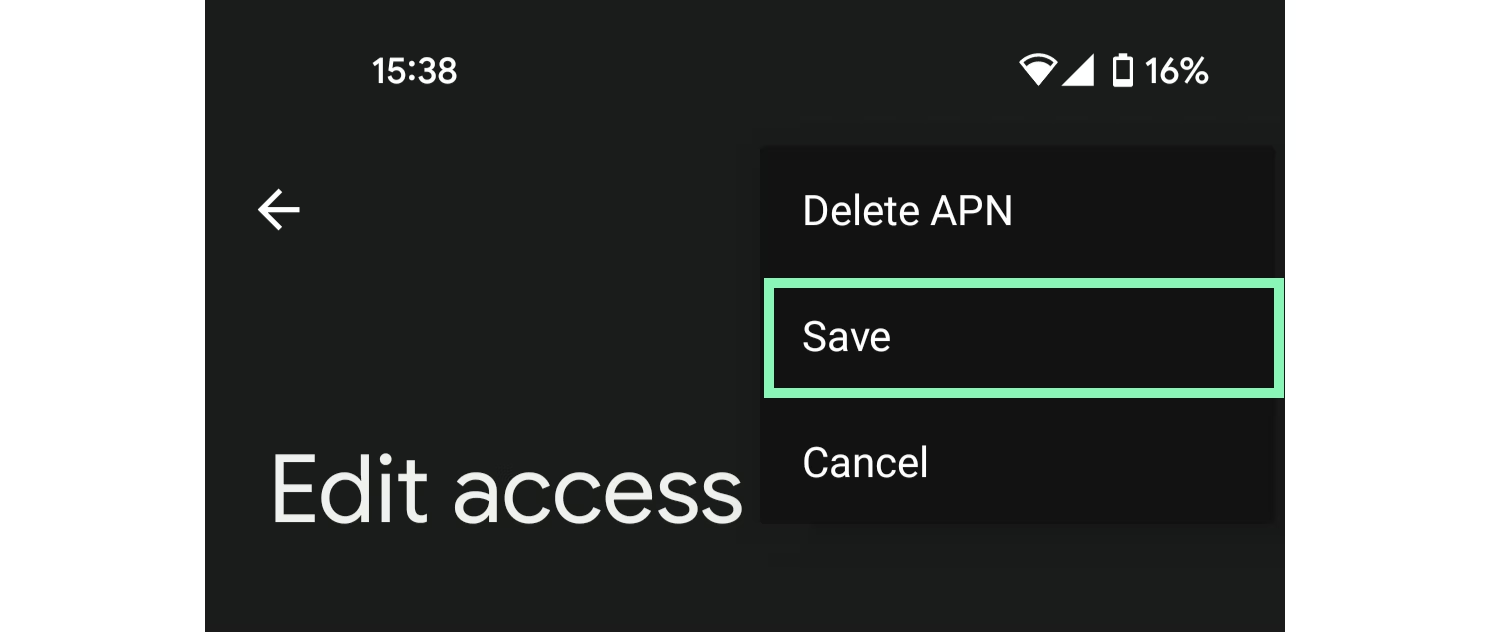
**第 5 步。** 点击右上角的三个竖点,然后选择 **保存**.
**第 6 步。** 通过关闭并重新打开连接来重启网络,以应用更改。
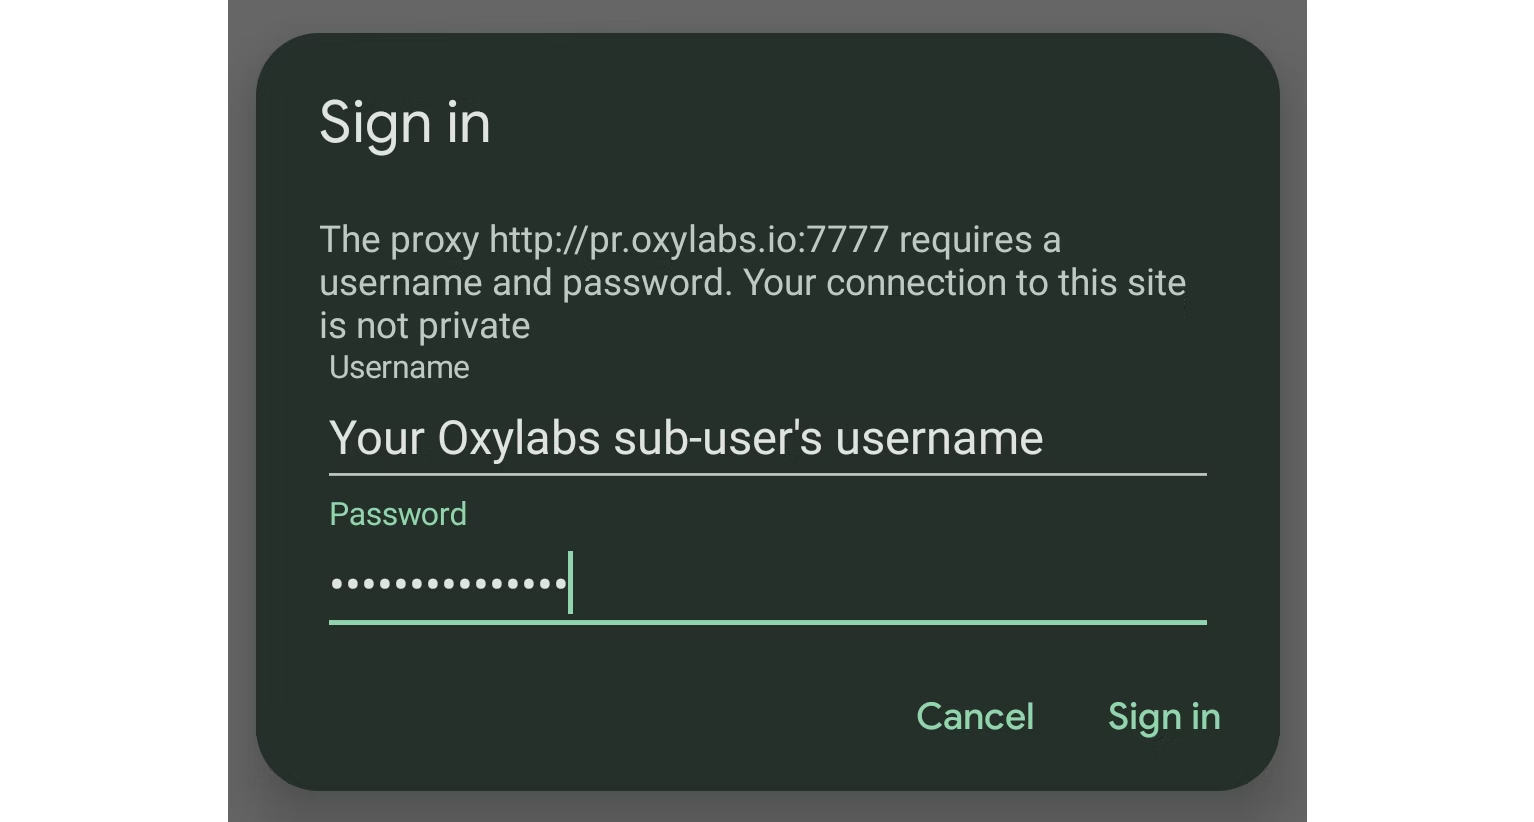
**第 7 步。** 最后,打开你的网页浏览器,输入之前指定的凭据,然后按 **登录**.
就是这样!你现在正在使用带有代理 IP 地址的移动网络。
### 使用 Wi-Fi 网络
**第 1 步。** 导航到 **设置** > **网络和互联网** > **互联网**.
**第 2 步。** 选择你当前的 Wi-Fi 网络,并点击设置图标以访问 **网络详情**.
**第 3 步。** 点击右上角的编辑按钮并展开 **高级选项** 部分,以配置 Android 代理设置。
**第 4 步。** 在 **代理,** 选择 **手动** 并输入你的代理详情以及凭据:
{% hint style="warning" %}
当为 Wi-Fi 网络使用代理时,连接类型可以是 `HTTP` 仅此而已。
{% endhint %}
**代理主机名:** `ddc.oxylabs.io`
**代理端口:** `8001`
{% hint style="info" %}
你需要为从已购买的 [**代理列表**](https://developers.oxylabs.io/proxies/dedicated-datacenter-proxies/self-service/proxy-list)**,** 中分配到 IP 地址的端口进行选择,你可以在 Oxylabs 的仪表板上找到它。该 `8001` 端口会为所有请求从你的列表中选取第一个 IP 地址。
{% endhint %}
**用户名**: `user-username`
**用户名:** `password`
{% hint style="warning" %}
别忘了添加 `user-` 部分。
{% endhint %}
**第 5 步。** 最后,打开你的网页浏览器,输入之前指定的凭据,然后按 **登录**.
就是这样!你现在正在使用带有代理 IP 地址的 Wi-Fi 网络。
查找原始 Android 集成博客文章 [这里](https://oxylabs.io/resources/integrations/android).
---
# Agent Instructions: Querying This Documentation
If you need additional information that is not directly available in this page, you can query the documentation dynamically by asking a question.
Perform an HTTP GET request on the current page URL with the `ask` query parameter:
```
GET https://developers.oxylabs.io/documentation/cn/dai-li/integration-guides/3rd-party-integrations-1-1/self-service/android.md?ask=
```
The question should be specific, self-contained, and written in natural language.
The response will contain a direct answer to the question and relevant excerpts and sources from the documentation.
Use this mechanism when the answer is not explicitly present in the current page, you need clarification or additional context, or you want to retrieve related documentation sections.