# Lalicat Browser
[**Lalicat**](https://www.lalicat.com/) 是一款允许用户同时管理多个账户的浏览器,通过区分浏览器指纹以避免被标记或封禁。
将 Lalicat 与 Oxylabs 配置 [**移动代理**](https://developers.oxylabs.io/documentation/cn/dai-li/mobile-proxies),请按以下步骤操作:
**步骤 1。** [**下载**](https://www.lalicat.com/download),安装并启动应用程序。然后,创建一个新账户并登录。
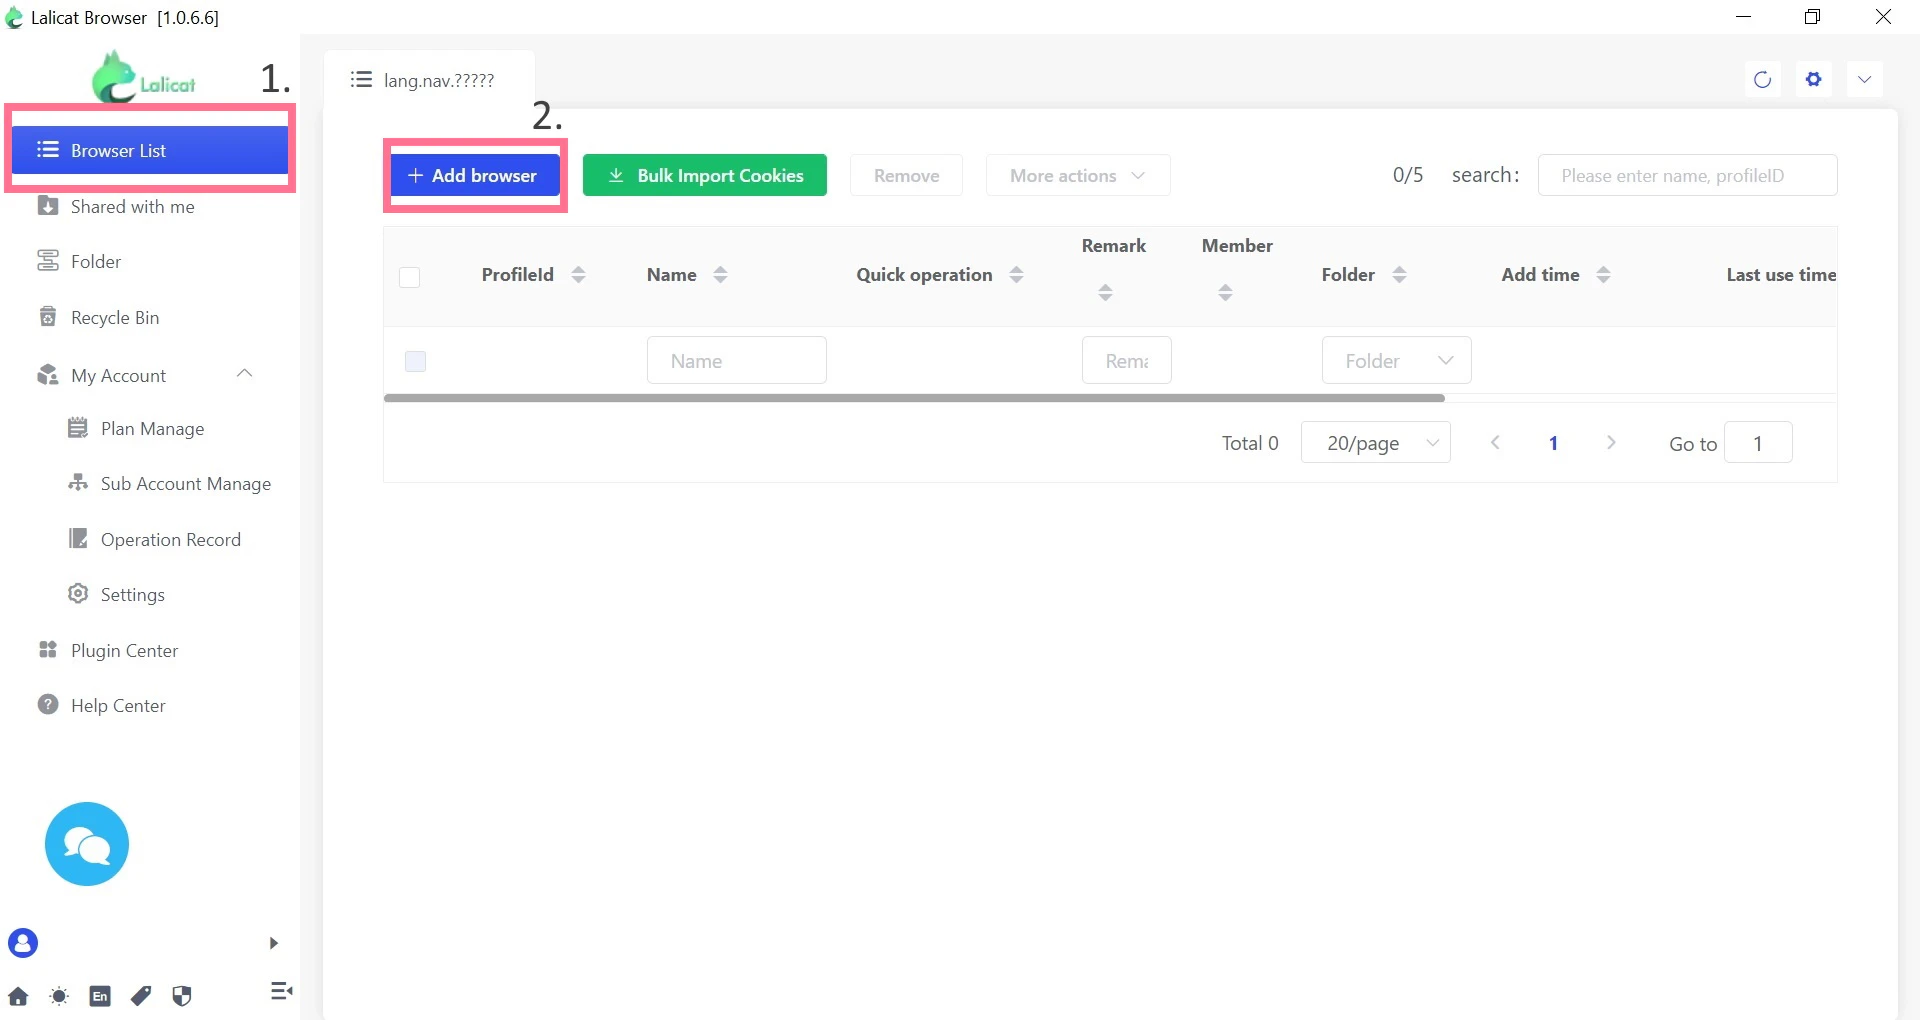
**步骤 2。** 在主屏幕上,按下 **浏览器列表** 然后点击 **+添加浏览器** 以配置新的浏览器实例。
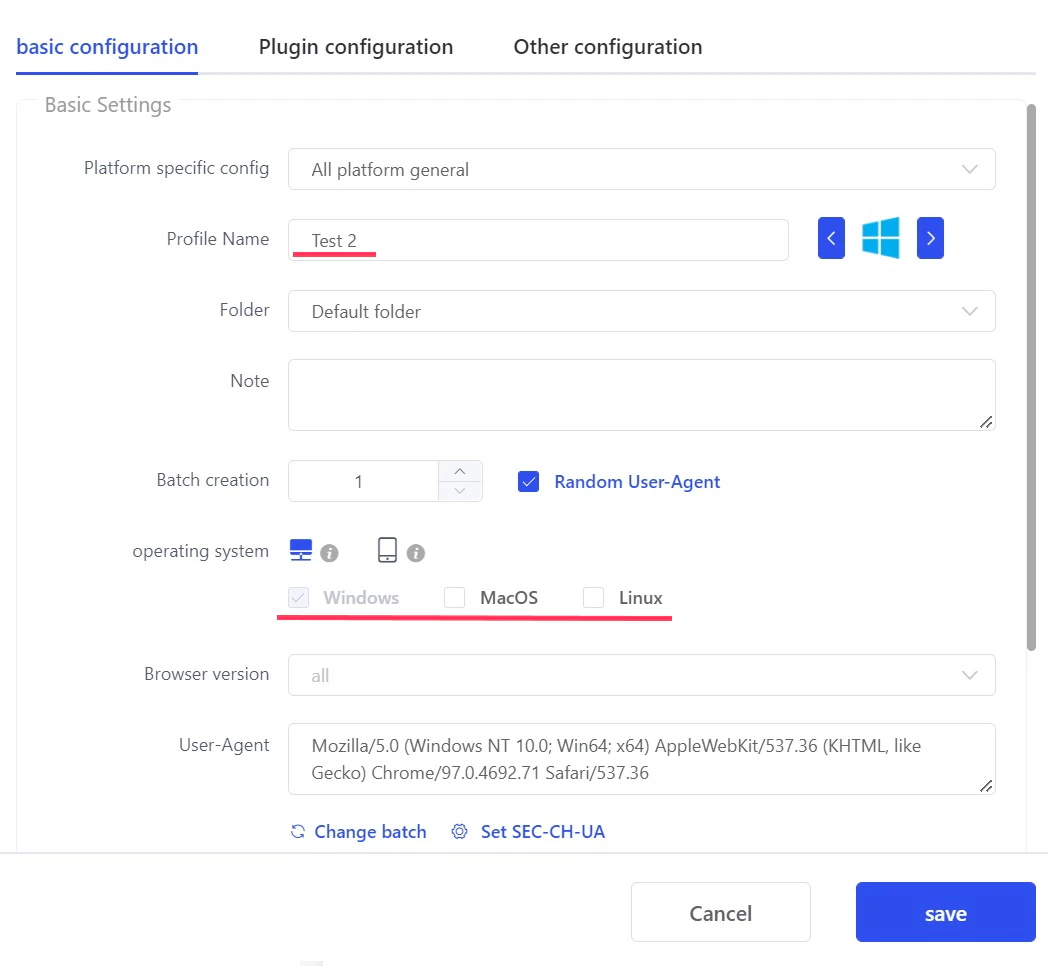
 **步骤 3。** 在 **基本配置**,填写 **配置文件名称** 并选择一个模拟的 **操作系统** 以及任务所需的其他设置。
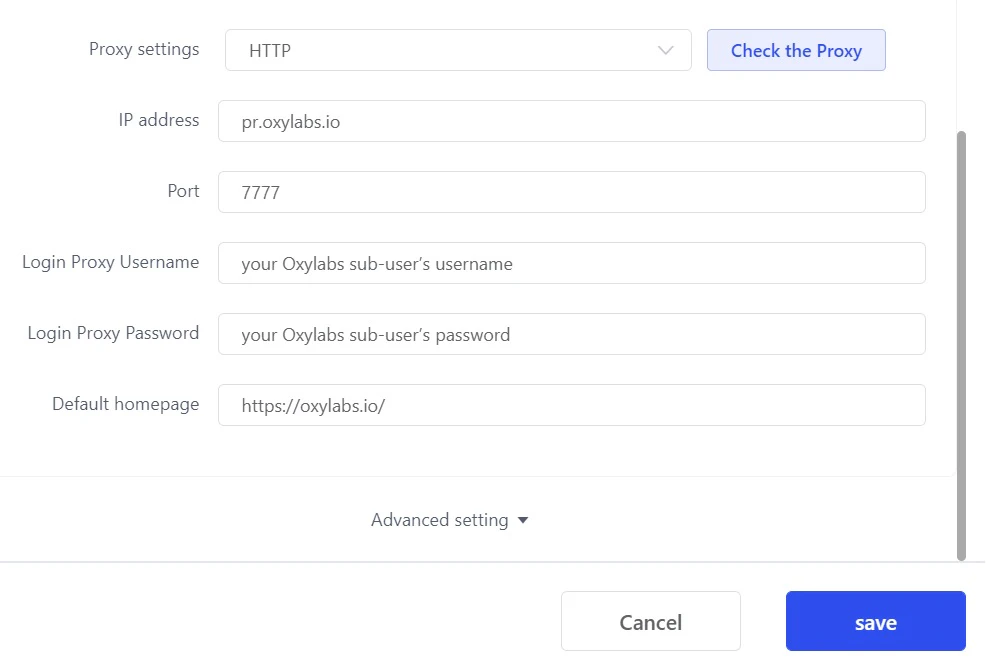
 **步骤 4。** 在 **代理设置**,选择 `HTTP` 作为代理协议来配置您的代理设置。填写以下详细信息:
**代理设置:** `HTTP`
**IP 地址:** `pr.oxylabs.io`
**端口:** `7777`
{% hint style="info" %}
你也可以使用随机或带会话粘性的国家特定入口。例如,如果你在 `us-pr.oxylabs.io` 下输入 **IP 地址** 和 `10000` 下输入 **端口**,你将获得一个美国出口节点。如果你输入 `10001` 下输入 **端口**,你将收到带有粘性会话的美国出口节点。你可以在这里找到完整的国家特定随机代理入口节点列表 [**此处**](https://developers.oxylabs.io/proxies/residential-proxies/country-specific-entry-nodes#random-proxy-entry-nodes) 以及粘性代理入口节点列表 - [**此处**](https://developers.oxylabs.io/proxies/residential-proxies/country-specific-entry-nodes#sticky-proxy-entry-nodes).
{% endhint %}
**代理登录用户名:** `Oxylabs 子用户的用户名`
**代理登录密码:** `Oxylabs 子用户的密码`
{% hint style="info" %}
您可以在我们的 [**控制面板**](https://dashboard.oxylabs.io/en/)**.**
{% endhint %}
通过点击以下的 **高级设置** 来自定义更广泛的选项。
**步骤 4。** 在 **代理设置**,选择 `HTTP` 作为代理协议来配置您的代理设置。填写以下详细信息:
**代理设置:** `HTTP`
**IP 地址:** `pr.oxylabs.io`
**端口:** `7777`
{% hint style="info" %}
你也可以使用随机或带会话粘性的国家特定入口。例如,如果你在 `us-pr.oxylabs.io` 下输入 **IP 地址** 和 `10000` 下输入 **端口**,你将获得一个美国出口节点。如果你输入 `10001` 下输入 **端口**,你将收到带有粘性会话的美国出口节点。你可以在这里找到完整的国家特定随机代理入口节点列表 [**此处**](https://developers.oxylabs.io/proxies/residential-proxies/country-specific-entry-nodes#random-proxy-entry-nodes) 以及粘性代理入口节点列表 - [**此处**](https://developers.oxylabs.io/proxies/residential-proxies/country-specific-entry-nodes#sticky-proxy-entry-nodes).
{% endhint %}
**代理登录用户名:** `Oxylabs 子用户的用户名`
**代理登录密码:** `Oxylabs 子用户的密码`
{% hint style="info" %}
您可以在我们的 [**控制面板**](https://dashboard.oxylabs.io/en/)**.**
{% endhint %}
通过点击以下的 **高级设置** 来自定义更广泛的选项。
 **步骤 5。** 按下 **检查代理** 以查看您的代理是否正常工作以及专用位置是否准确。
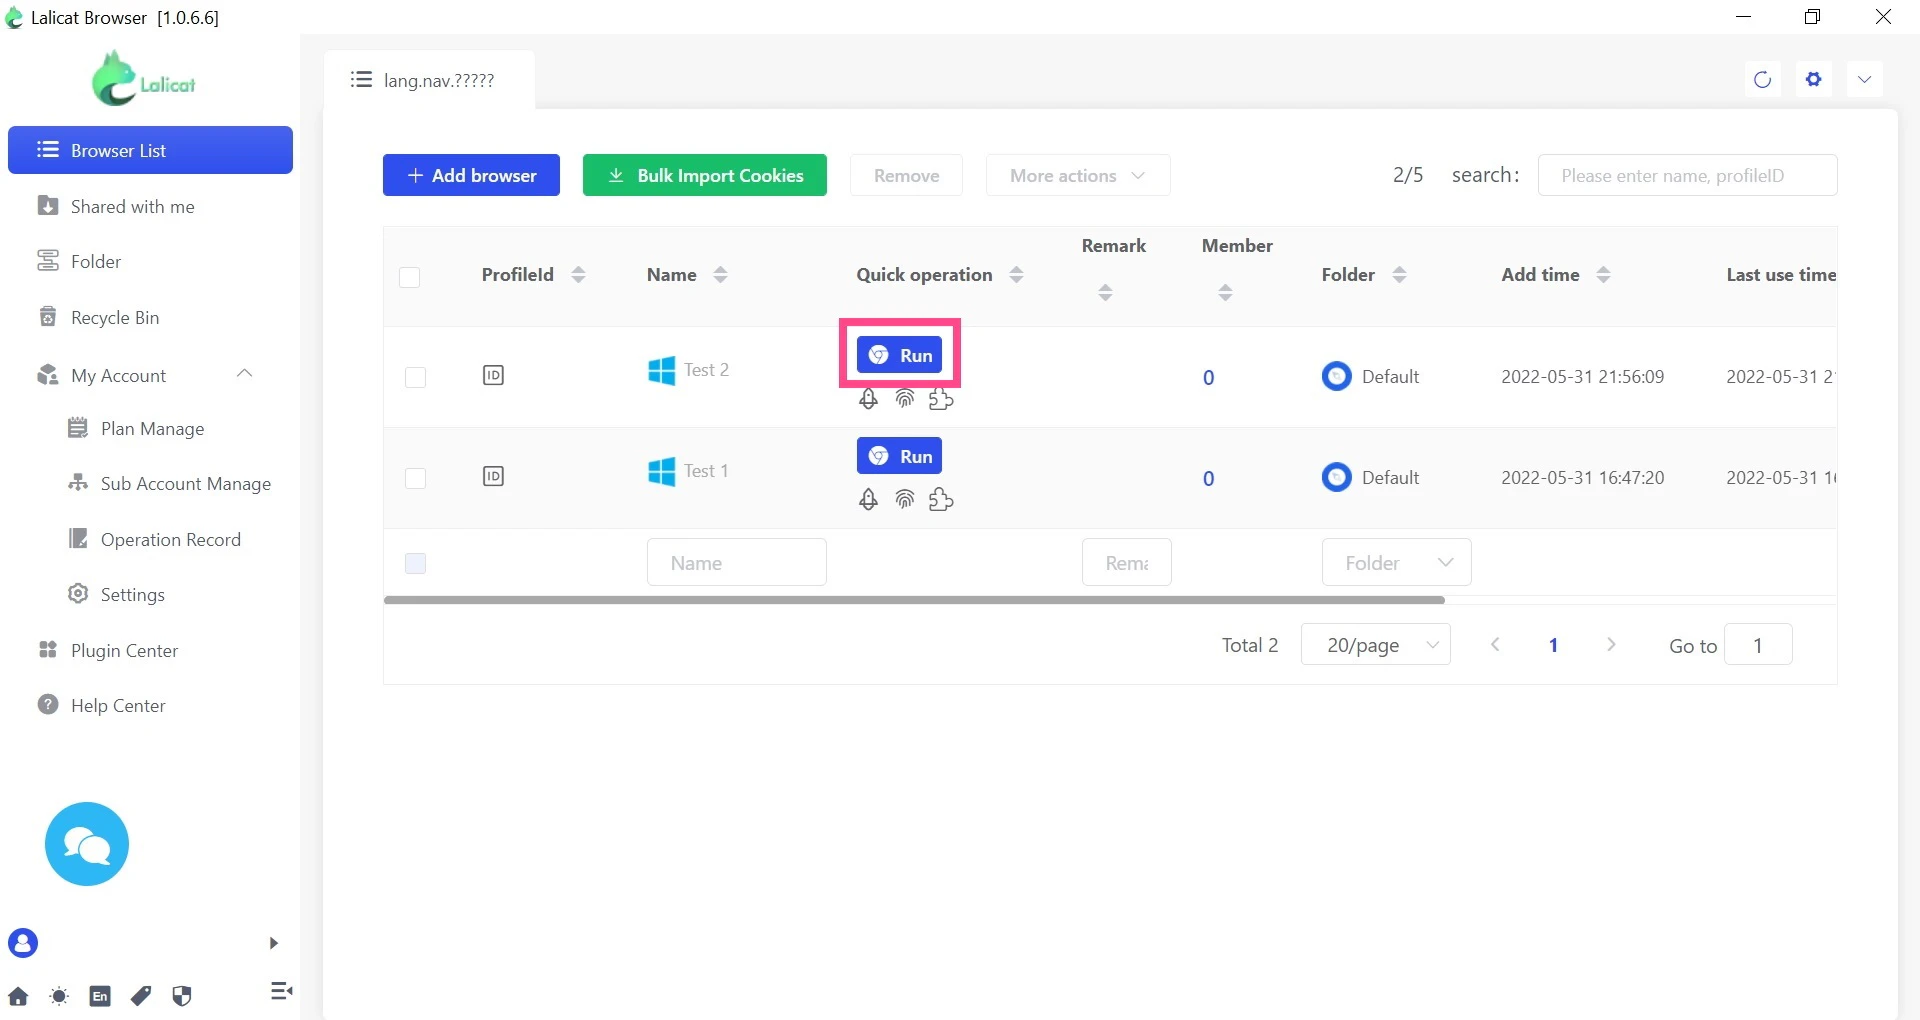
.jpg?auto=compress,format&fm=webp&q=75) **步骤 6。** 最后,点击 **保存** 以完成配置,若要运行浏览器 - 点击 **运行。**
**步骤 6。** 最后,点击 **保存** 以完成配置,若要运行浏览器 - 点击 **运行。**
 就这样!您已成功将 Oxylabs 代理与 Lalicat 浏览器集成。
查找原始的 Lalicat 浏览器集成博客文章 [此处](https://oxylabs.io/resources/integrations/lalicat).
就这样!您已成功将 Oxylabs 代理与 Lalicat 浏览器集成。
查找原始的 Lalicat 浏览器集成博客文章 [此处](https://oxylabs.io/resources/integrations/lalicat).